Slip Text Replace Node
Using Slipbox Nodes (Slip Text Replace)
The Slip Text Replace node finds text that matches exactly once in a slip's body and replaces it with different text.
If the Slip Field Update node overwrites an entire field — title, summary, or body — the Slip Text Replace node is for when you only want to change a specific sentence or word within the body.
In this tutorial, you'll build an Ability workflow that replaces one heading phrase in the body of an existing slip with a different phrase.
Why Does the Text Have to Match Uniquely?
The most important constraint of this node is that the text you specify in old_text must appear exactly once in the slip's body. If there's no match, or two or more matches, the replacement fails.
For example, suppose a slip's body contains the following two sentences.
What happens if you enter just Agentria in old_text? The string "Agentria" appears once in each sentence, twice in total. The node can't determine which occurrence to change, so the replacement fails.
If you instead enter Use Agentria in old_text, that phrase only exists in the first sentence — it appears exactly once in the entire body — so the node can find that exact spot and replace it.
In other words, old_text should be a phrase that's uniquely identified across the whole body, including enough surrounding context, rather than a short, common word. old_text also has to match the body verbatim, down to spacing and line breaks, so it's safest to check the target slip's actual body and copy the text directly from there.
Before You Begin
A slipbox must already be set up in your project, and the slip you want to update must already exist, before starting this tutorial.
Create a slipbox
If you don't have a slipbox yet, you can create one quickly from the slipbox screen's +Create Slipbox button by entering just a name. For instructions on building a slipbox, see the 🔗Slipbox Guide.
After completing this tutorial, you will be able to:
Use the Slip Text Replace node to partially replace specific text in a slip's body.
Understand how to specify
old_textas text that's uniquely identified within the body.Connect each input variable of the Slip Text Replace node to the Start Node's input values.
Verify the replacement was applied correctly using the node test and by checking the actual slip.
Workflow Overview
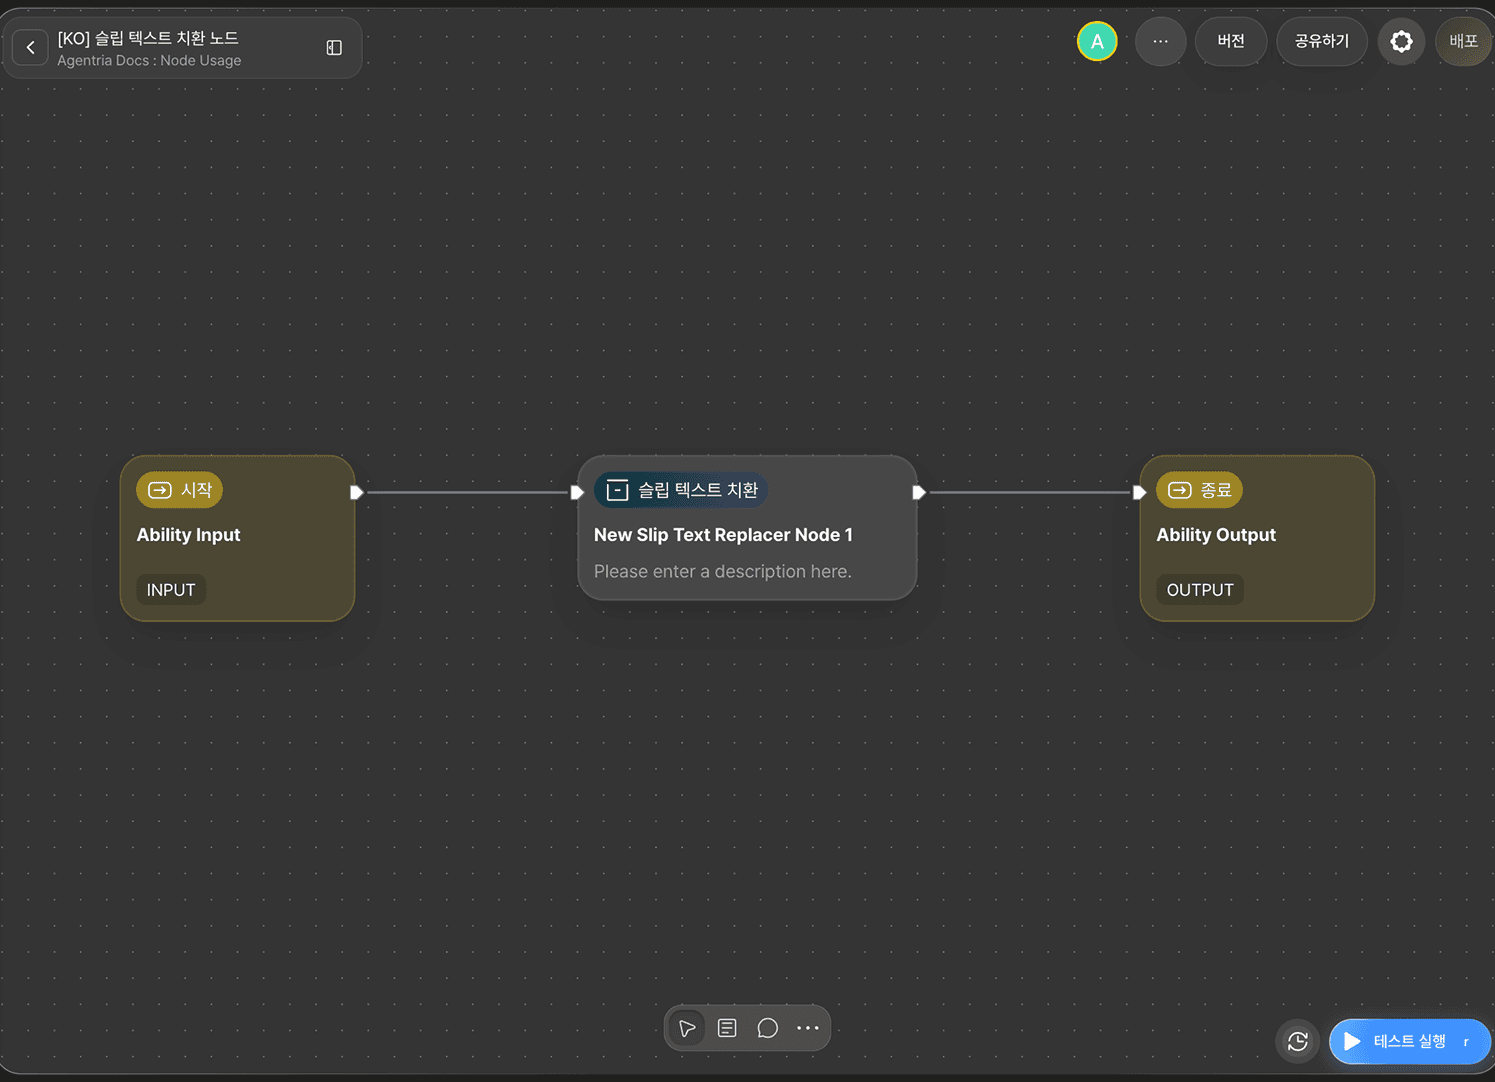
The core of this tutorial is the Slip Text Replace node.
The Slip Text Replace node identifies the slip to update by its public UUID (slip_public_uuid), finds the part of the body that matches old_text exactly, and replaces it with new_text. You can also use this node to delete the matched part by leaving new_text as an empty string.
Slip Text Replace Node Basic Info
The Slip Text Replace node provides the following options.
Option | Required | Description |
|---|---|---|
| Required | Select the target slipbox that the slip to replace text in belongs to. |
| Required | The public UUID of the slip to update. |
| Required | The existing text to replace. Must match the body verbatim and appear exactly once in the body. |
| Required | The replacement text. Entering an empty string deletes the matched part. |
This tutorial uses all of the fields above.
Step 1: Create an Ability
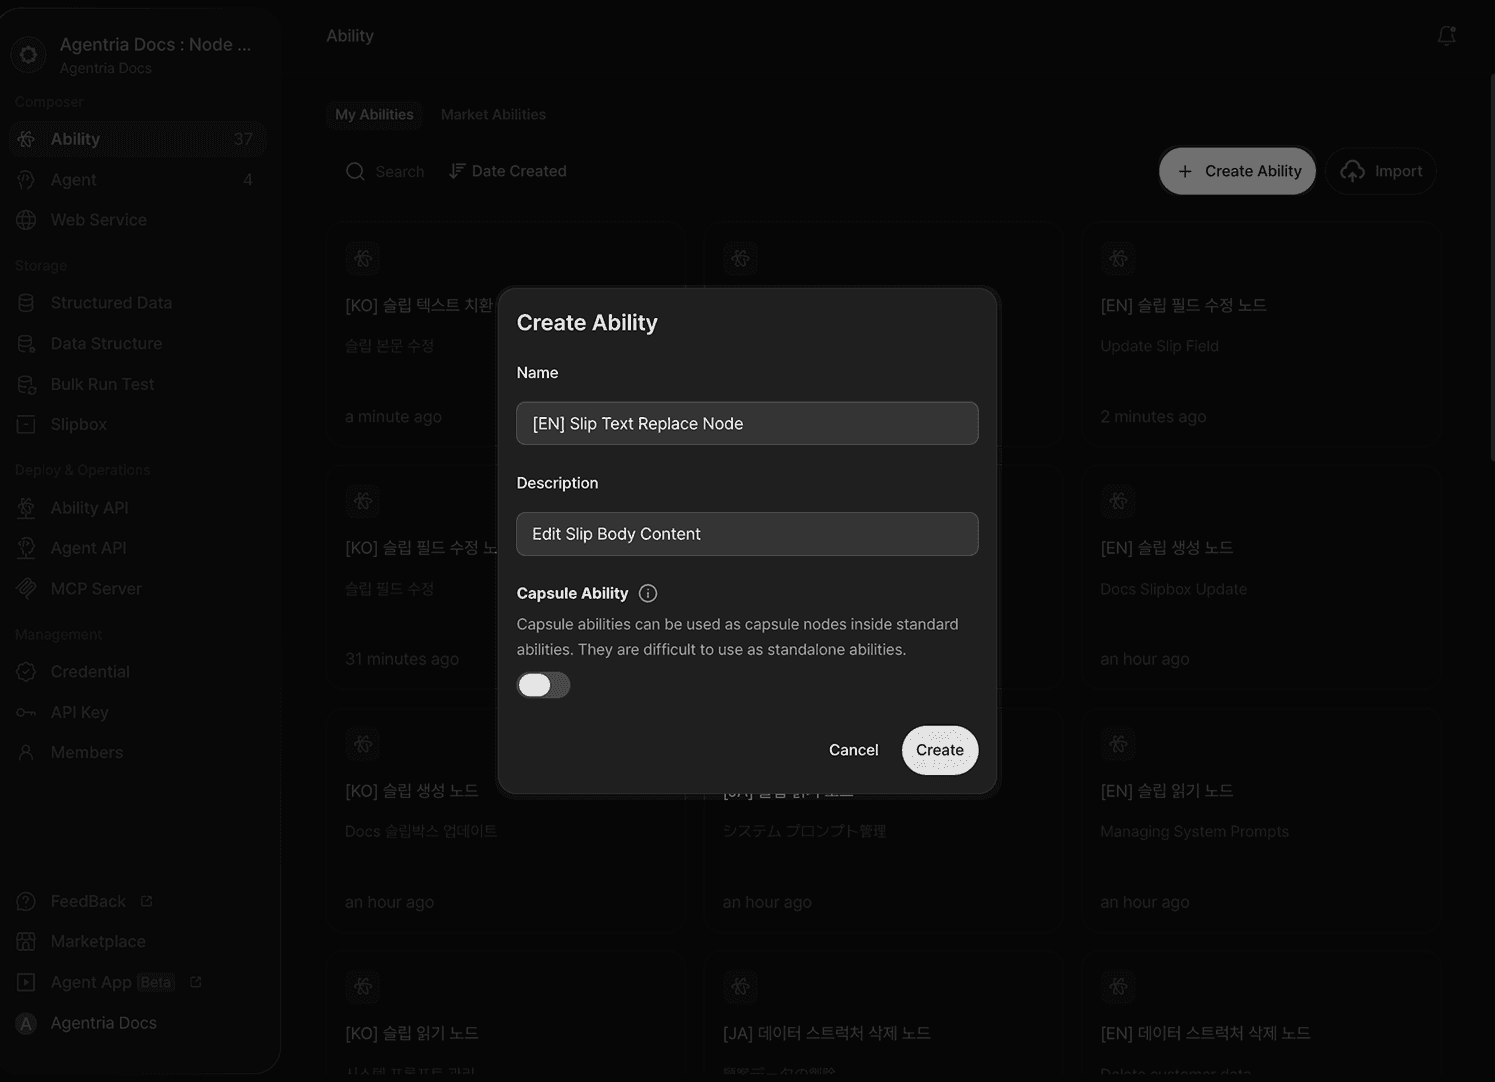
Create a new Ability. Enter Slip Text Replace node for Name and Edit slip body for Description.
Step 2: Configure the Start Node
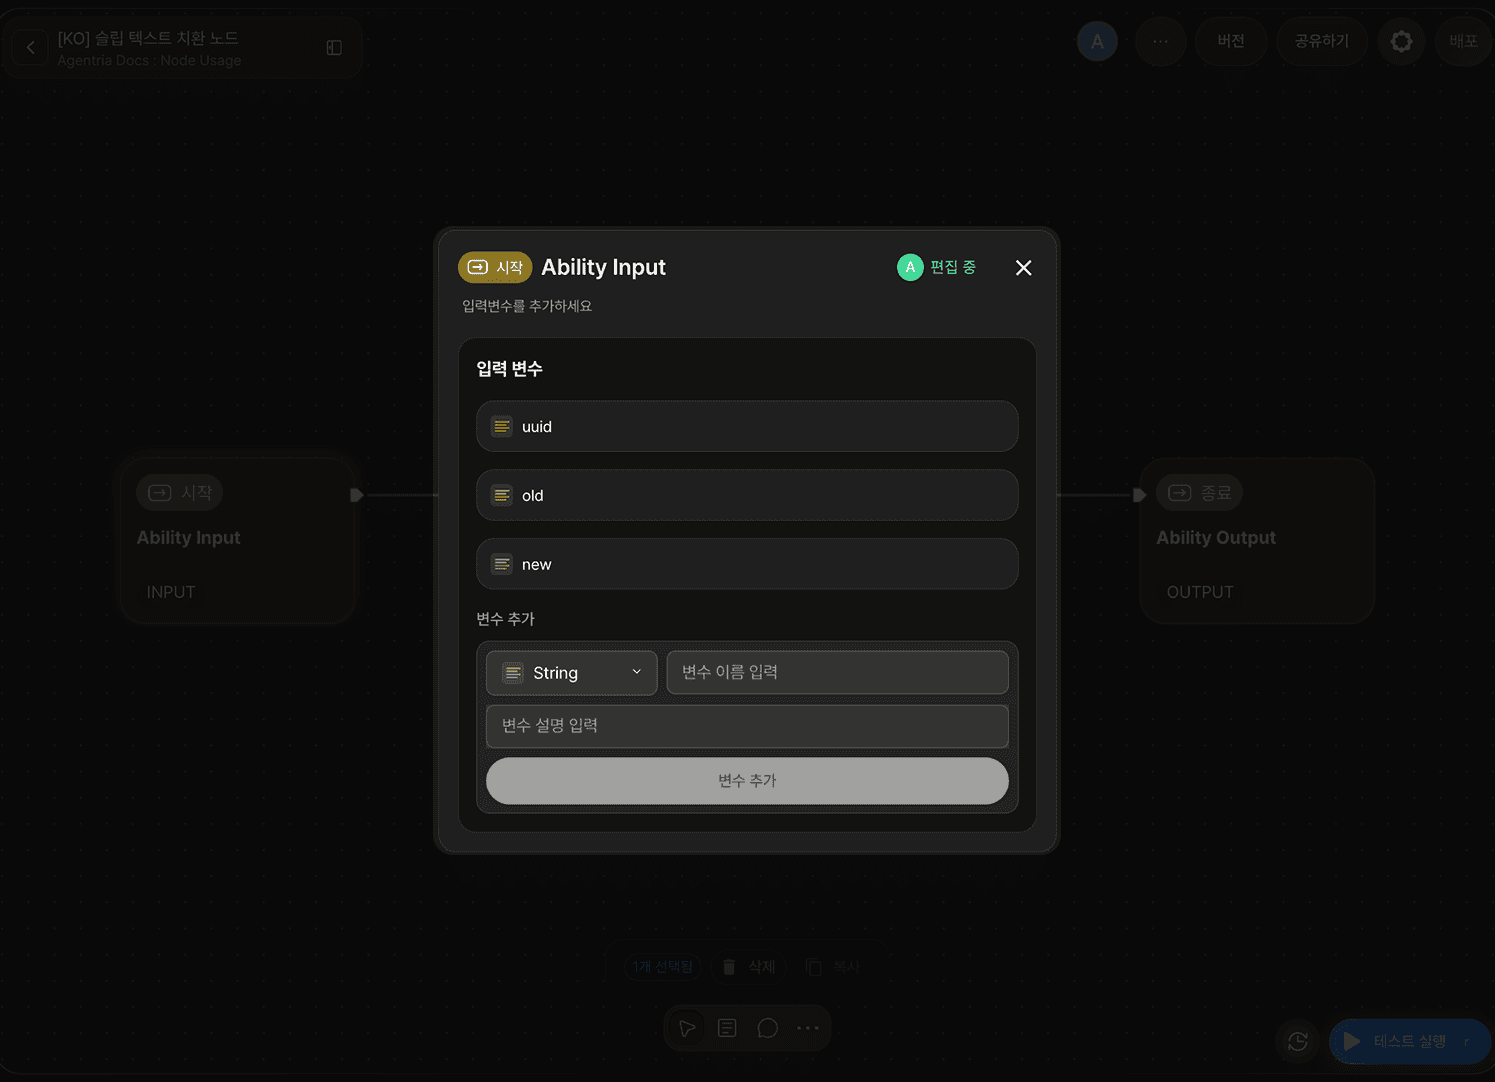
Double-click Start Node to enter the Node Editor. Add three String variables.
uuid: accepts the public UUID of the slip to apply the replacement to.old: accepts the existing text to replace.new: accepts the new replacement text.
Step 3: Configure the Slip Text Replace Node
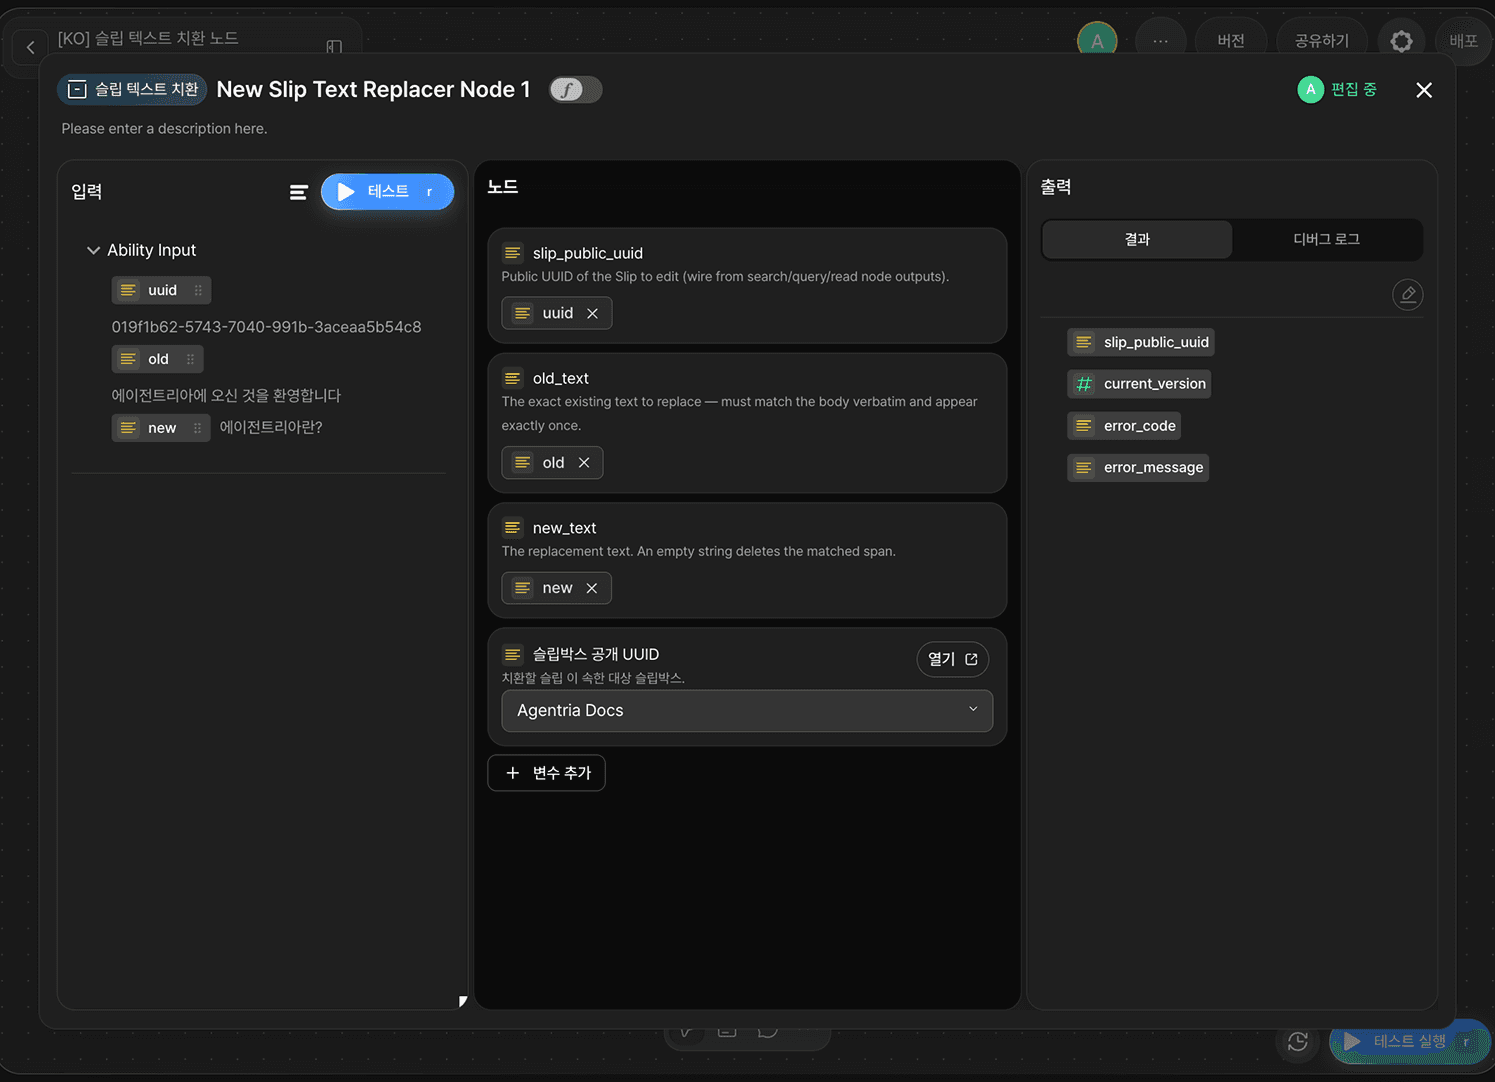
Double-click the Slip Text Replace node to enter the Node Editor. In Slipbox Public UUID, select the slipbox that the slip to update belongs to.
Drag and drop the Start Node's input values onto the remaining fields as follows.
Adapter Variable | Bound Value |
|---|---|
|
|
|
|
|
|
Once the node runs successfully, it outputs slip_public_uuid, current_version, error_code, and error_message.
Step 4: Configure the End Node
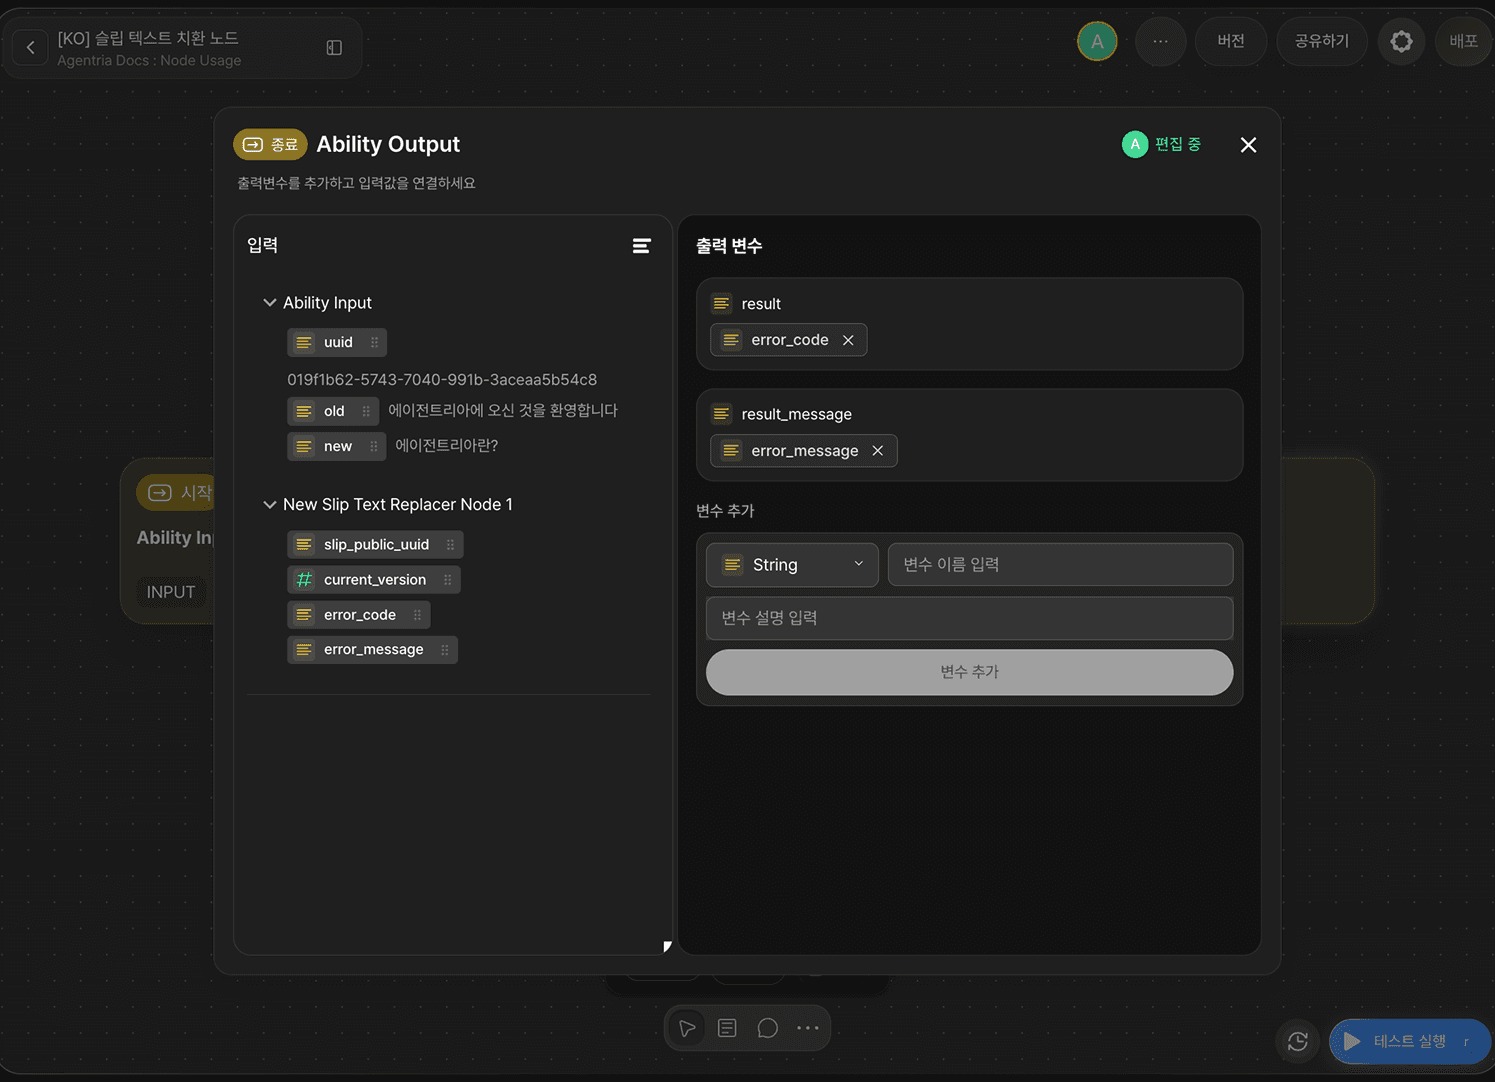
Double-click End Node to enter the Node Editor. Add a String output variable named result and drag and drop error_code from the Slip Text Replace node to bind it. Also declare an additional result_message variable and bind error_message to it.
Step 5: Check the UUID and Original Text of the Slip to Replace
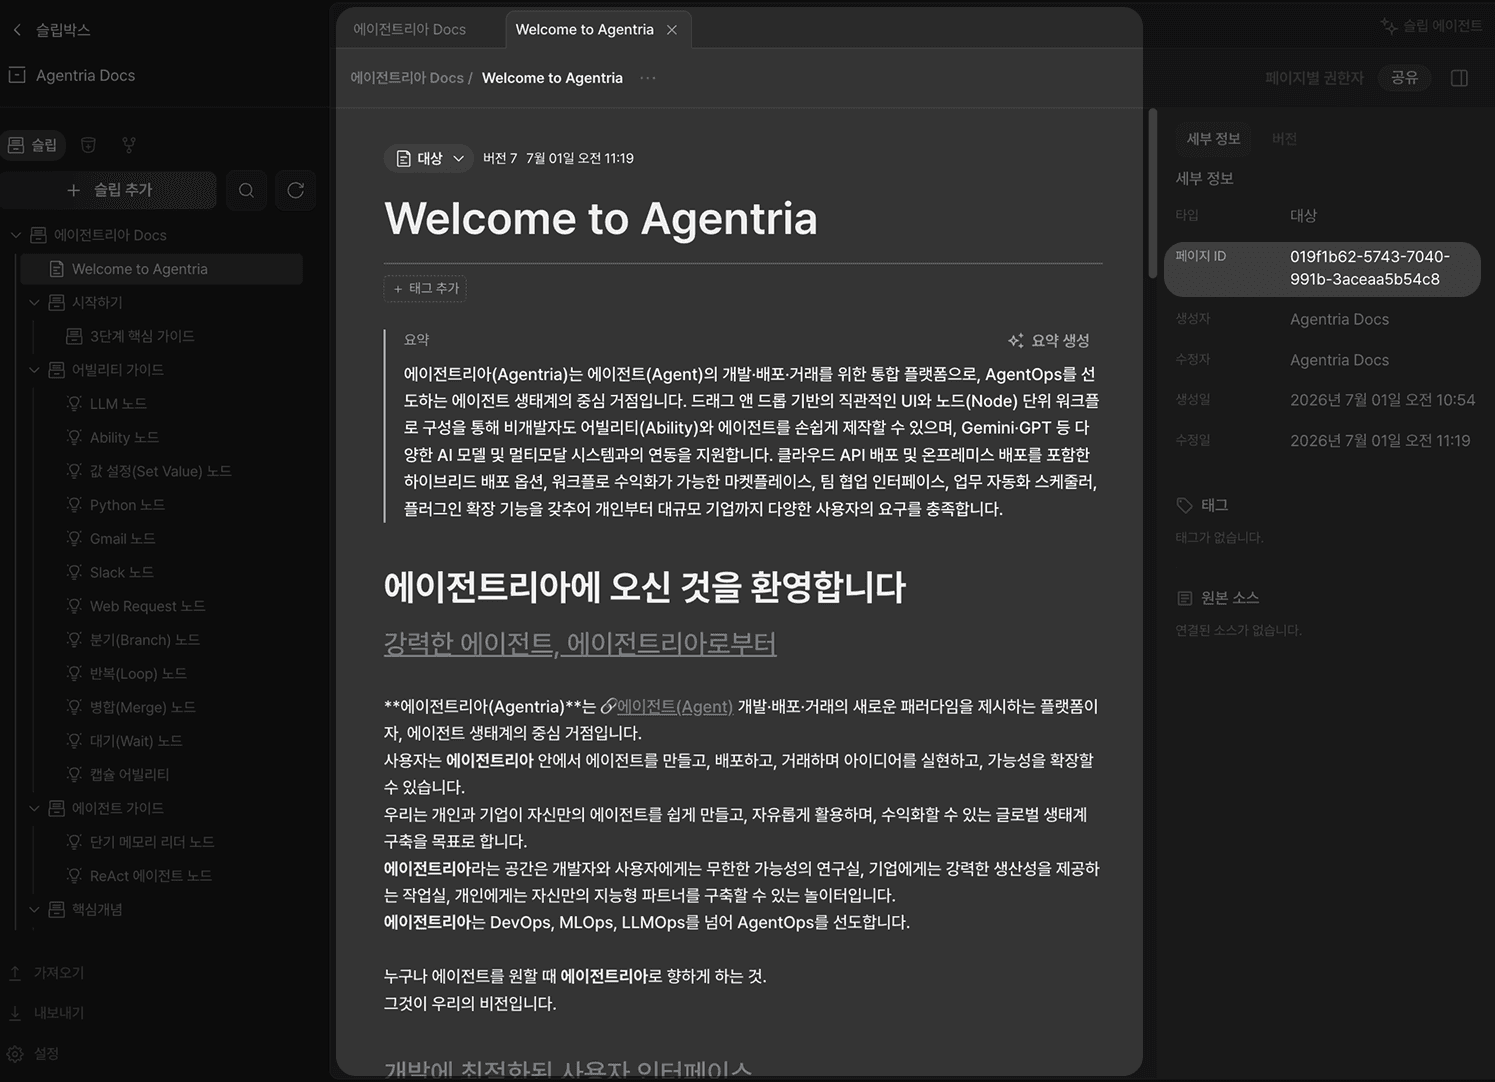
Open the slip you want to replace text in from the slipbox, and copy the Page ID value from the Details panel on the right. You'll use this value as the uuid input in the node test.
While you're there, it's a good idea to check the text you actually want to change with your own eyes, and confirm in advance that the phrase you plan to use as old_text is uniquely identified across the entire body. In this tutorial, you'll replace the heading phrase "Welcome to Agentria" with "What Is Agentria?".
Step 6: Run the Node Test
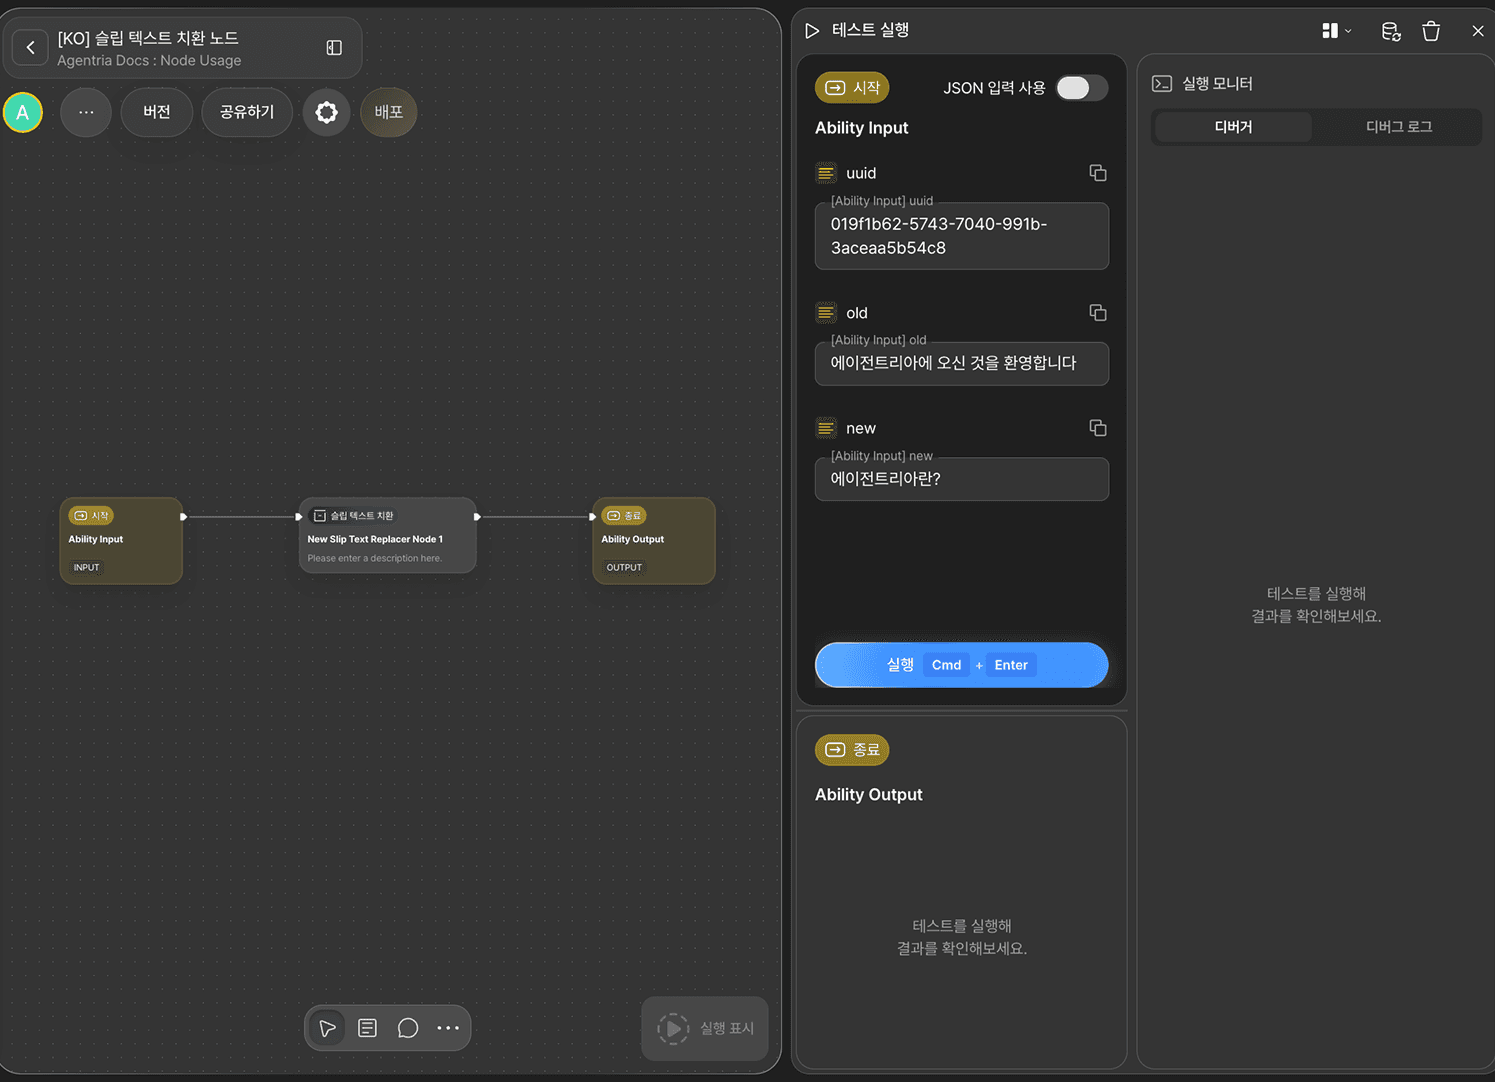
Paste the slip's public UUID you copied earlier into uuid, enter Welcome to Agentria for old, and What Is Agentria? for new, then click RUN TEST (Cmd+Enter).
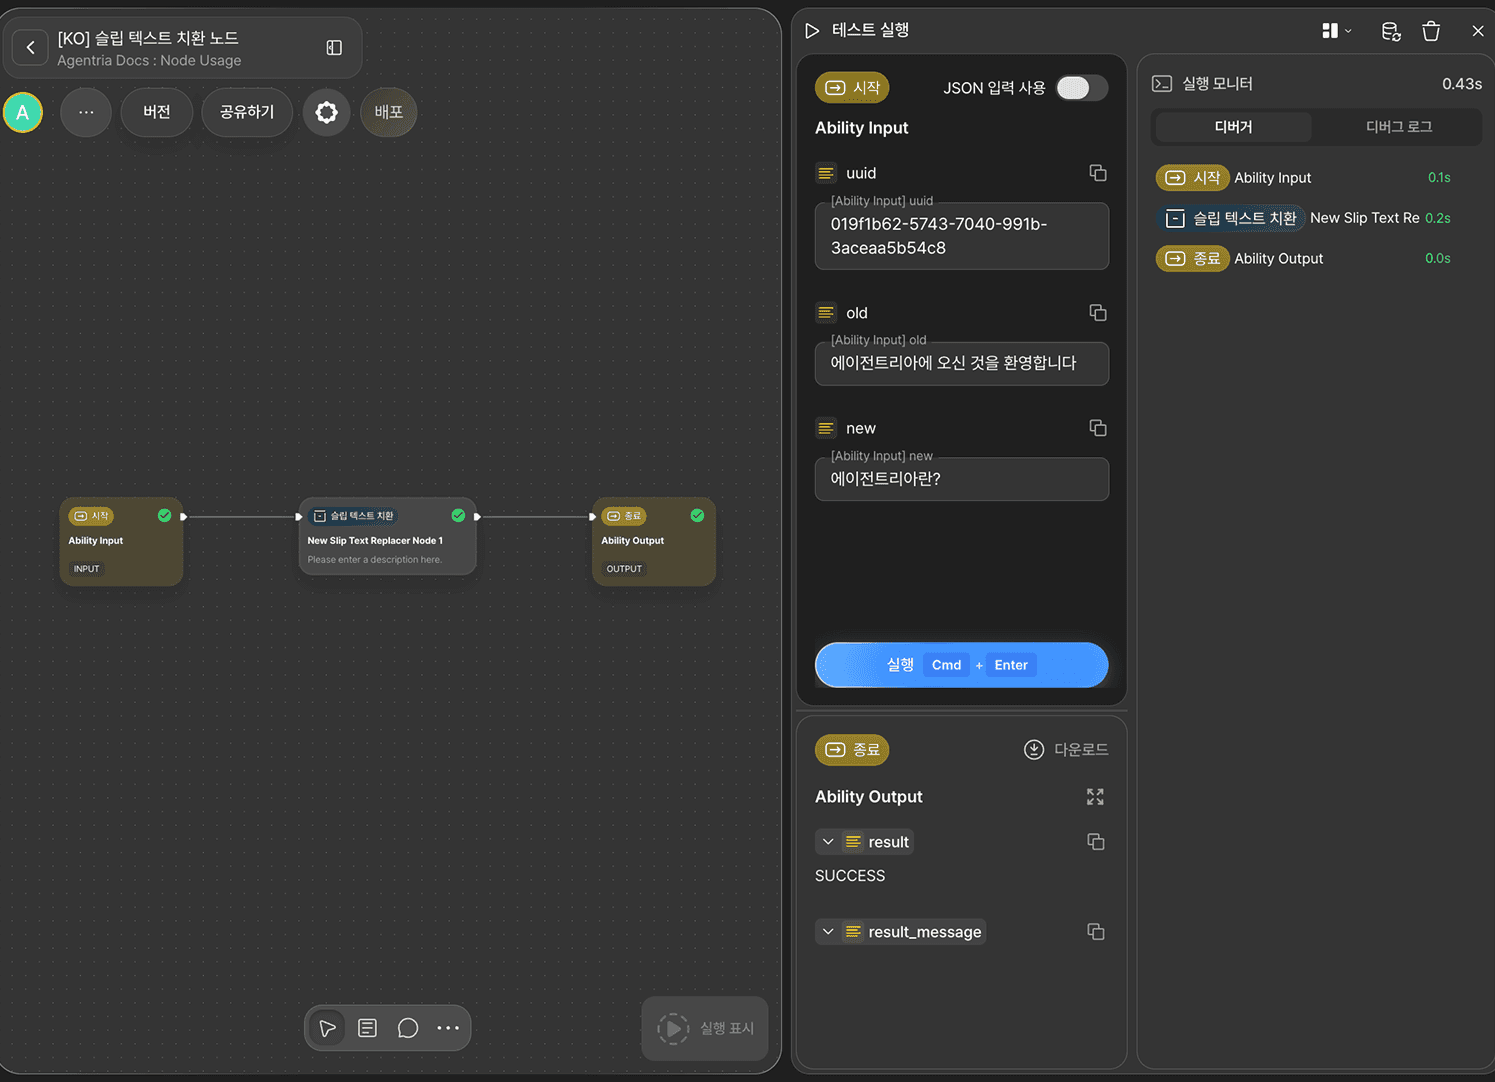
If all three nodes run successfully and the result output is SUCCESS, the test succeeded.
Step 7: Verify the Replacement in the Actual Slip
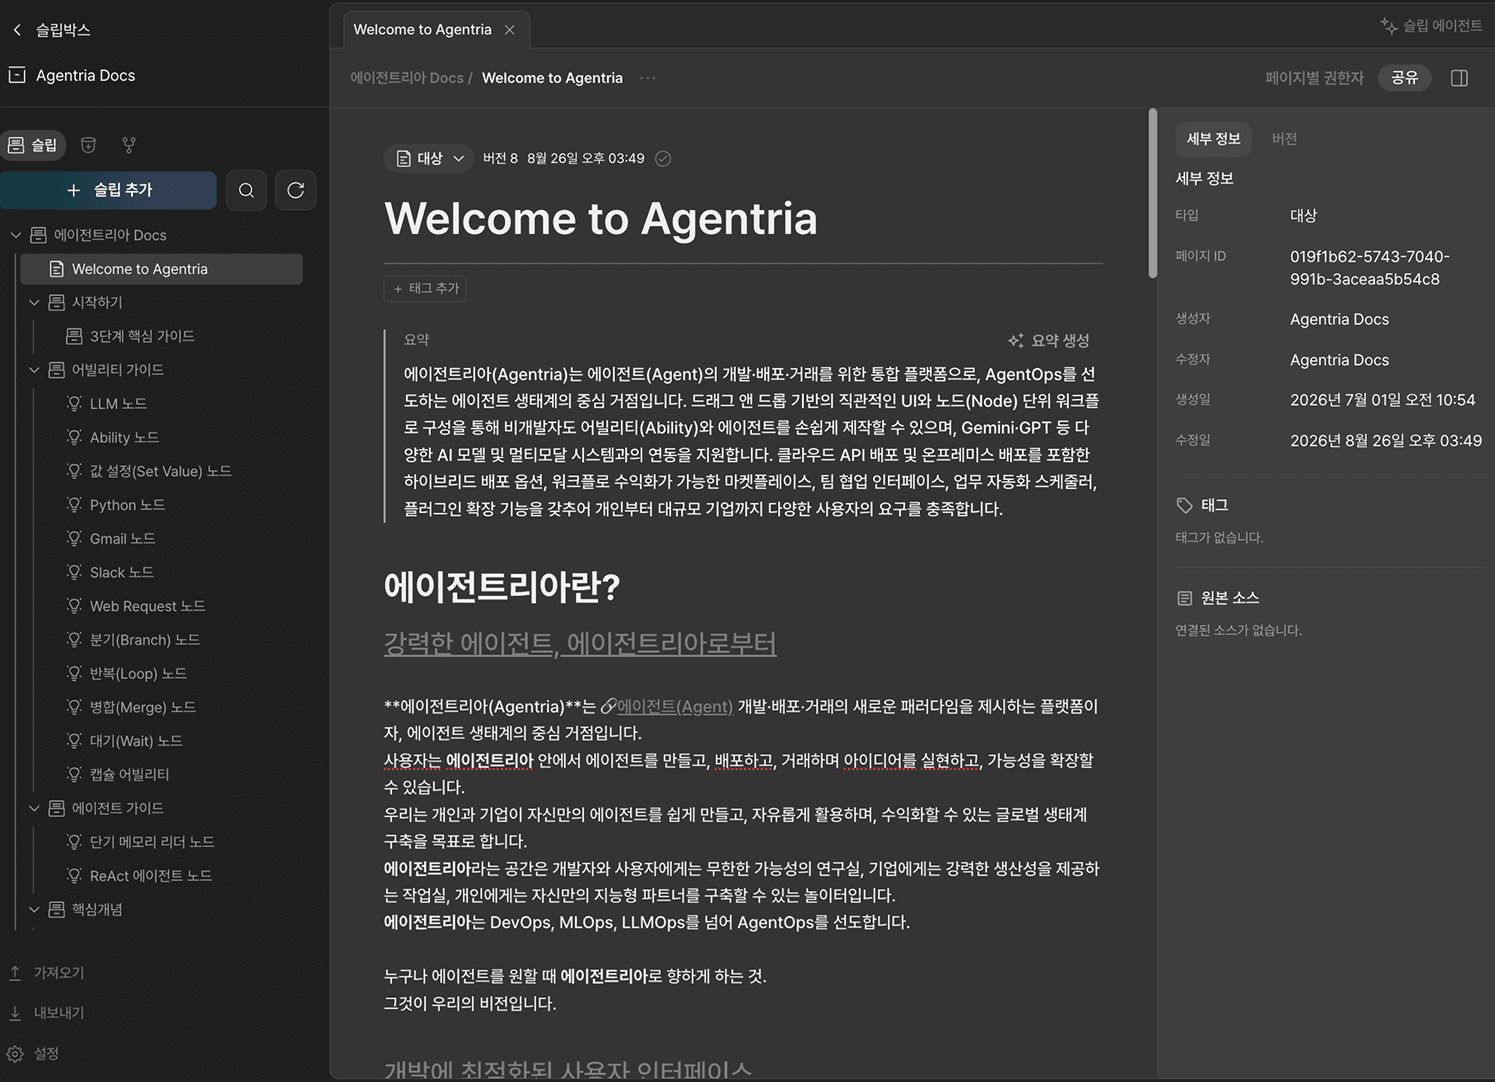
Go to the slipbox and open the slip — you'll see a new version was created and the heading phrase in the body has changed to What Is Agentria?.
Next Steps
🎉 Congratulations! You've successfully built the "Slip Text Replace" workflow using Agentria.
By applying the principle of specifying old_text as a phrase that's uniquely identified within a slip, you can extend this into a workflow that iterates over multiple slips and replaces a specific term or link across all of them in bulk.
Agentria is a place where ideas become reality—your workflow can expand infinitely with your creativity.
For more node examples, visit the 🔗Node Usage page.
Frequently Asked Questions
What does the Slip Text Replace node do?
The Slip Text Replace node finds specified text in the body of a slip stored in a Slipbox and replaces it with different text. It identifies the target slip by its public UUID, and replaces the part that matches old_text exactly with new_text.
Why does old_text have to appear exactly once in the body?
This node finds where to make the change purely by text matching, so if old_text is found in two or more places, it can't determine which occurrence to change, and the replacement fails. For example, if "Agentria" appears multiple times in the body, searching for just "Agentria" fails — you need to specify a phrase that includes enough context, like "Use Agentria," to make it appear only once across the entire body.
How is the Slip Text Replace node different from the Slip Field Update node?
The Slip Field Update node replaces an entire field — like the title, summary, or body — with a new value all at once. The Slip Text Replace node, on the other hand, doesn't change the whole body — it partially replaces just a specific sentence or word that matches uniquely within the body. Use the Slip Field Update node when you want to rewrite an entire field, and the Slip Text Replace node when you only want to fix part of the body.
Can I use this node to delete text as well?
Yes. Leaving new_text as an empty string deletes the part that matches old_text. Even in this case, old_text still has to match uniquely within the body.