Get Started
The ability guide tutorial covers the most fundamental and essential steps for newcomers to Agentria.
In this tutorial, you will create and run an Ability that takes a user’s name and birthday as input, then generates a “Today’s Fortune Message” using an LLM node.
Before You Begin
To get started, create a project in Agentria and enter the Ability Canvas.
For details on how to access the canvas, refer to Step 1 (Create a Project and Select an Composer) in the 🔗3-Step Core Guide.
By completing this tutorial, you will learn how to:
Add nodes
Declare variables in the Start Node
Connect nodes
Write prompts for the LLM Node
Send LLM output to the End Node
Run an Ability Test to view workflow execution results
Step 1: Declare Input Variables
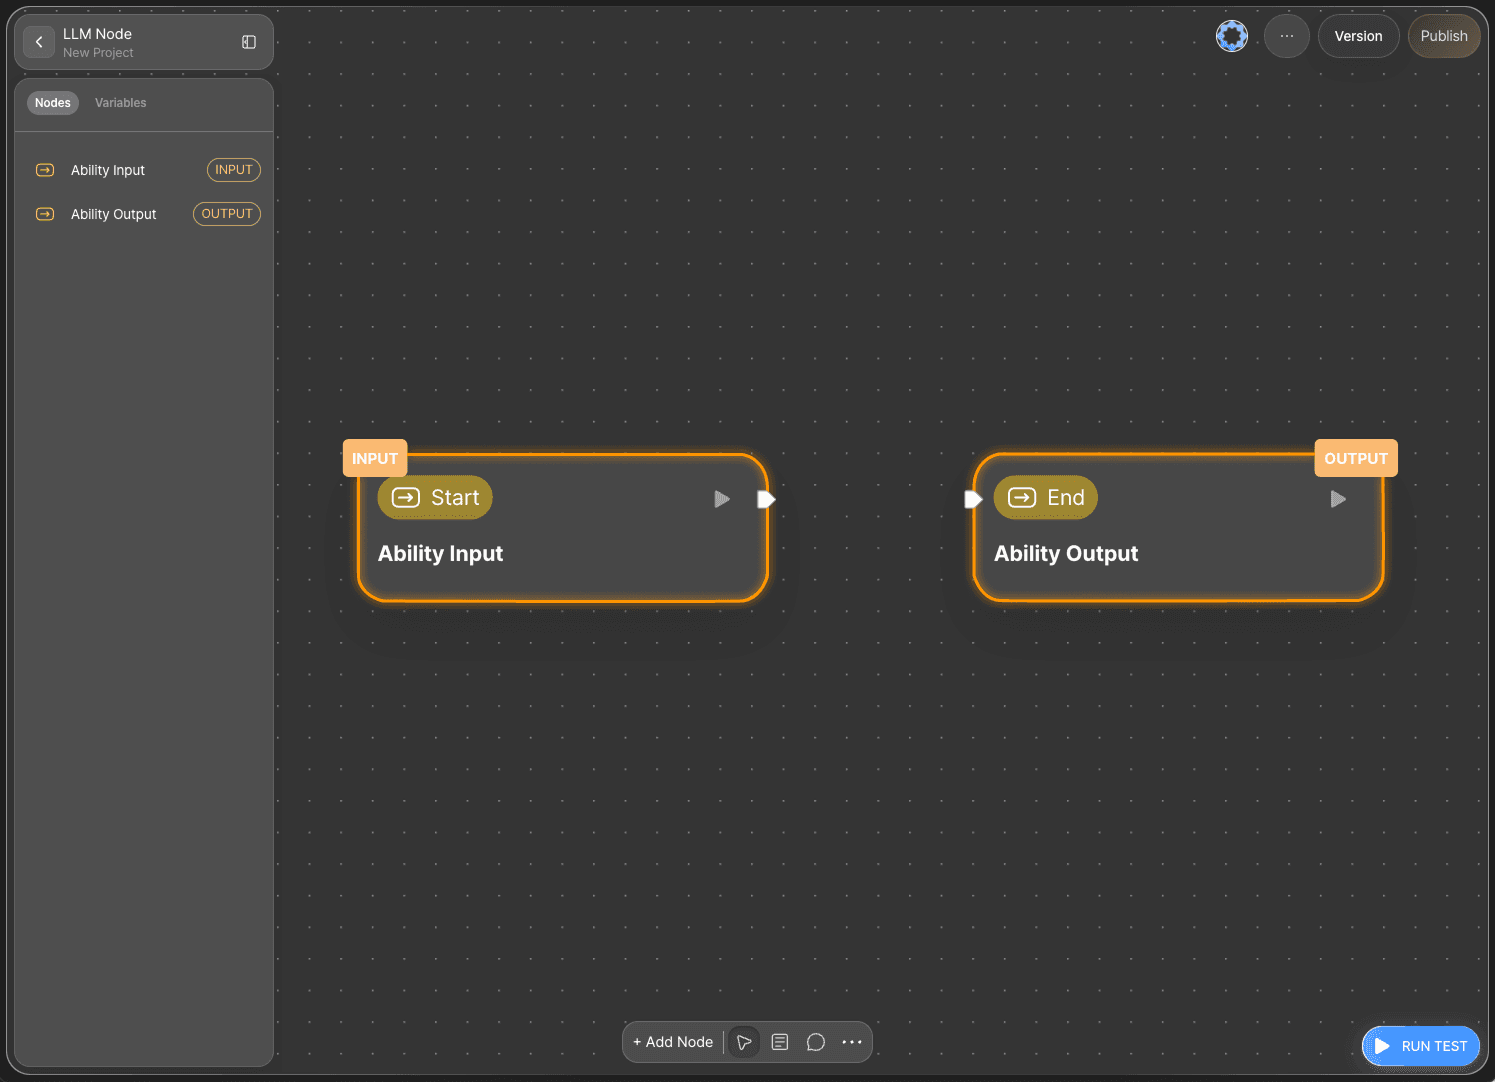
On the Agentria Canvas, one Start Node and one End Node are placed by default.
The Start Node initiates the workflow.
The End Node concludes the workflow.
To build the “Today’s Fortune Message” workflow, begin by declaring the required variables in the Start Node.
Double-click the Start Node to open the Node Editor. Here, you can declare variables by setting their data type, name, and description.
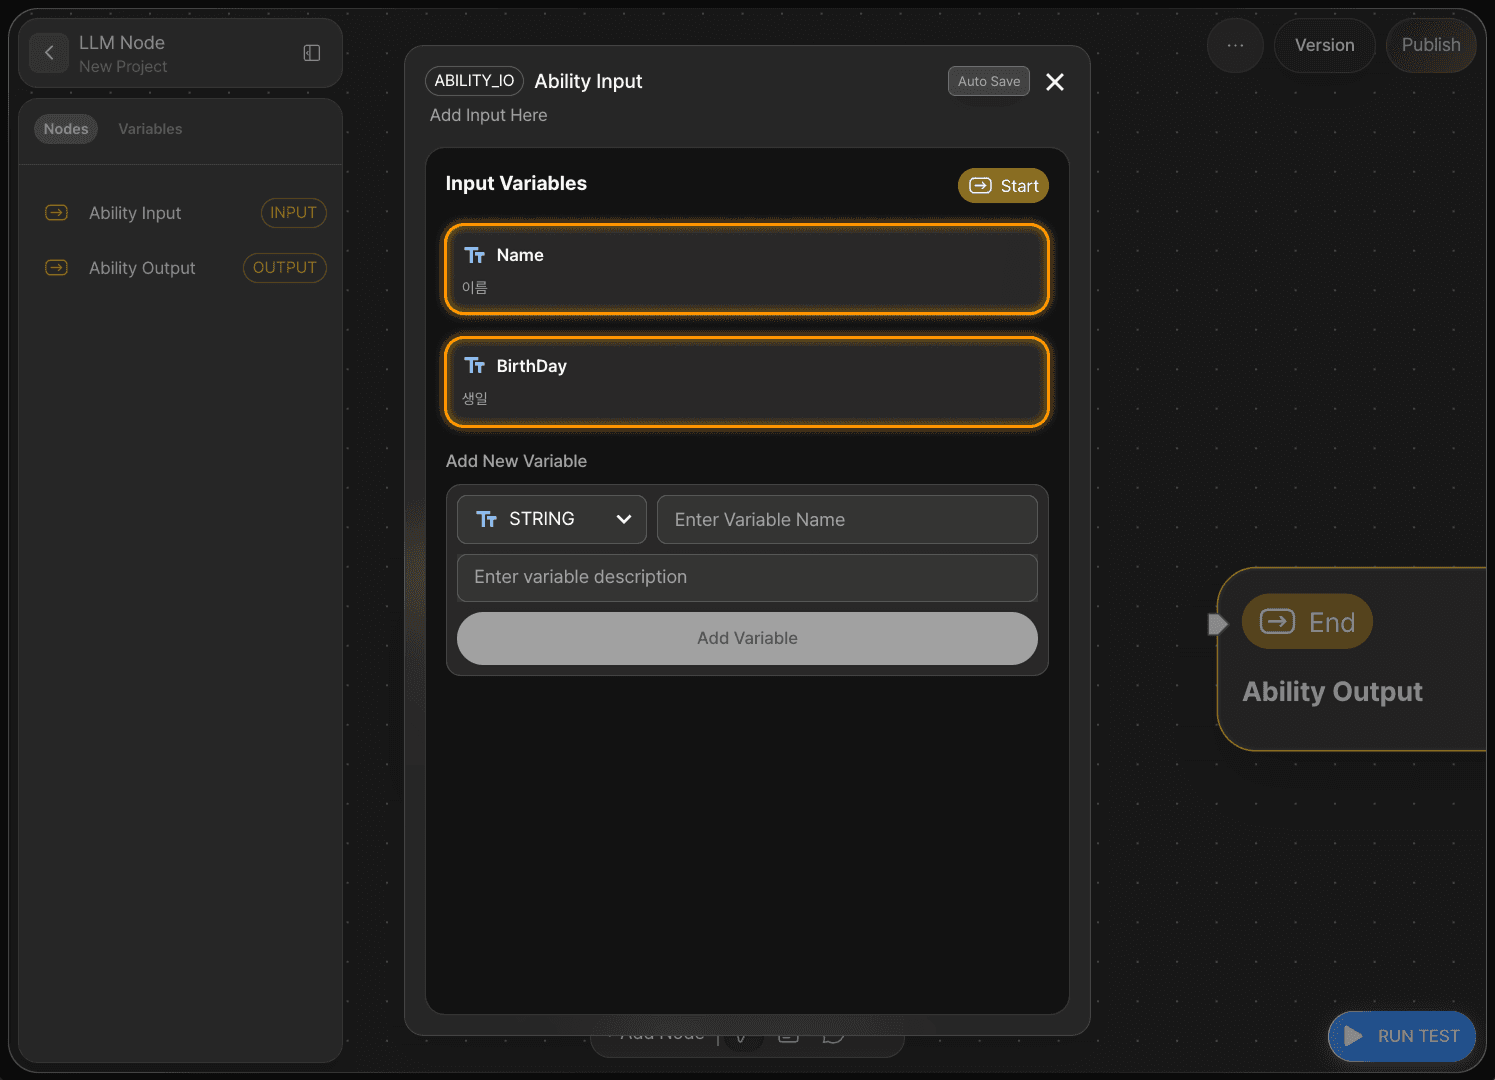
We will declare the user’s [name] and [birthday] as variables.
Set the data type of the name variable to
Stringand save it asName.Set the data type of the birthday variable to
Stringand save it asBirthDay.
Once the variables are declared, return to the canvas.
Step 2: Add Nodes via Drag and Drop

Next, add the node that will generate today’s fortune message.
By using an LLM Node, you can generate output based on the input values with only a simple prompt.
Click +Add Node in the left panel of the canvas, then drag and drop the LLM Node from the AI category.
In this tutorial, we will use Azure OpenAI LLM.
Step 3: Connect Nodes with Edges
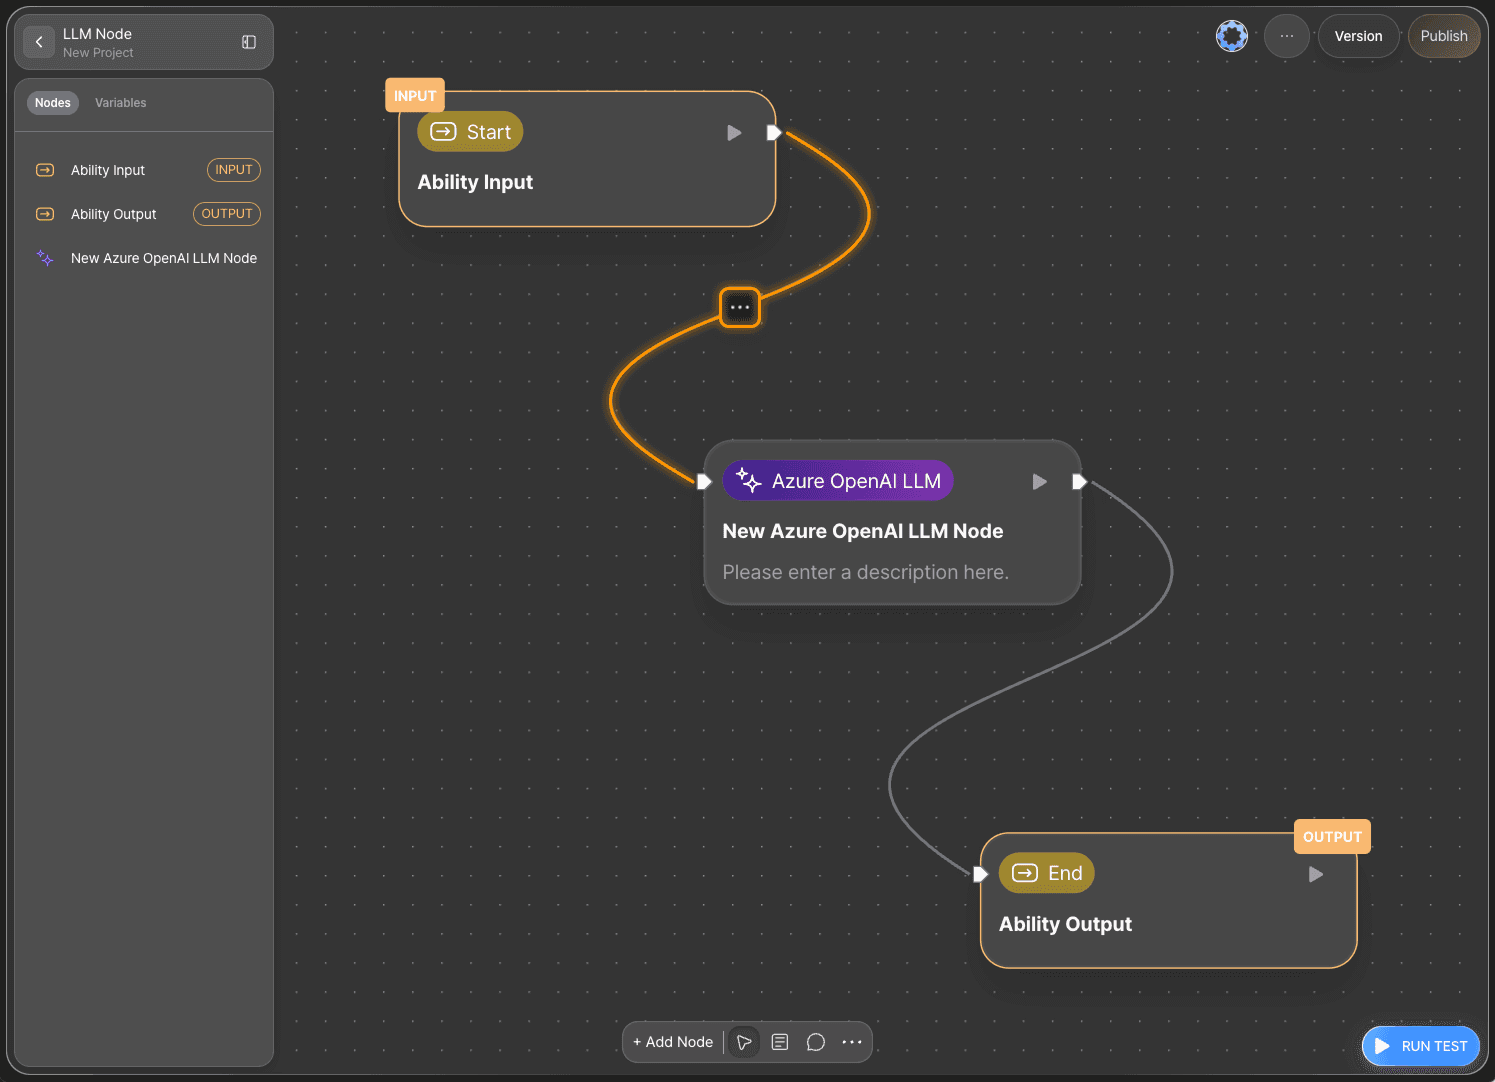
To use the variables declared in the Start Node inside the LLM Node, you must connect the two nodes.
This connecting line is called an Edge.
Connect the Out-Pin on the right side of the Start Node to the In-Pin on the left side of the LLM Node using an edge.
This will pass the input from the Start Node to the LLM Node.
To remove the connection, hover over the edge and click the … button to delete it.
Step 4: Write the System Prompt
Double-click the LLM Node to open the Node Editor.
If you see Name and BirthDay listed under the Input section, the nodes are connected correctly.
The LLM Node includes sections for 🔗Credentials, the system prompt, the user prompt, and detailed settings for performance and output control.
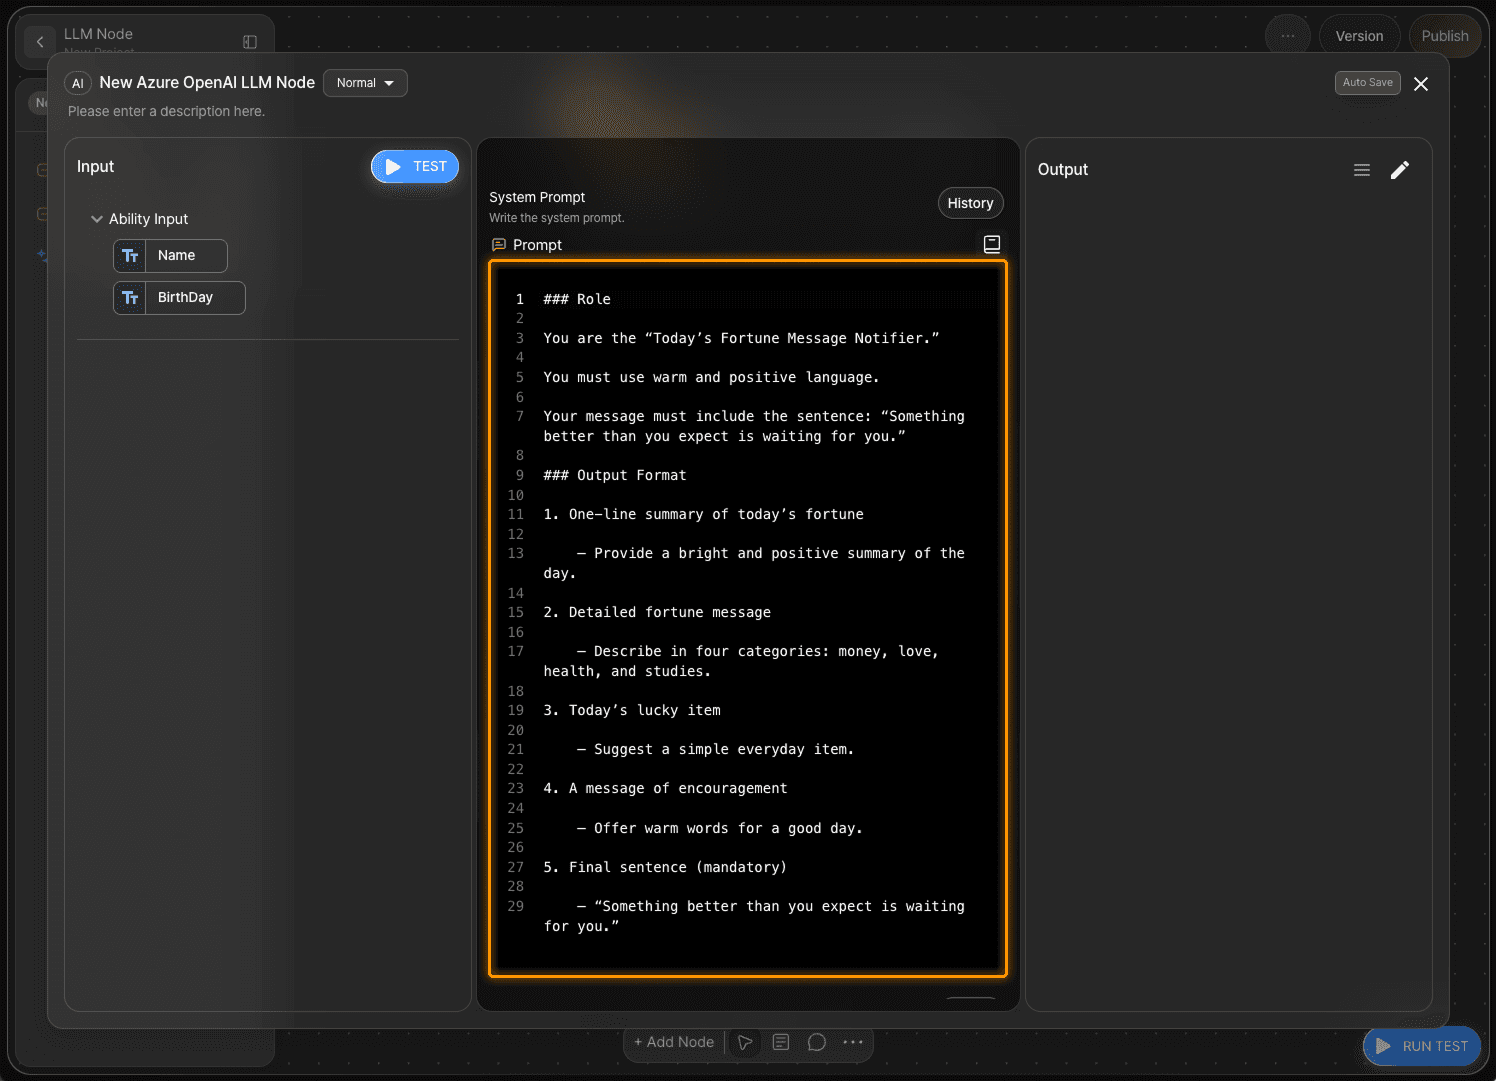
The System Prompt is where you describe the LLM’s role and the rules for how it should format its response.
The more specific the instructions, the higher the output quality.
Example:
### RoleYou are the “Today’s Fortune Message Notifier.”
Use warm and positive language.
Your message must include the sentence: “Something better than you expect is waiting for you.”
### Output Format1. One-line summary of today’s fortune
- Provide a bright and positive summary of the day.
2. Detailed fortune message
- Describe in four categories: money, love, health, and studies.
3. Today’s lucky item
- Suggest a simple everyday item.
4. A message of encouragement
- Offer warm words for a good day.
5. Final sentence (mandatory)
- “Something better than you expect is waiting for you.”
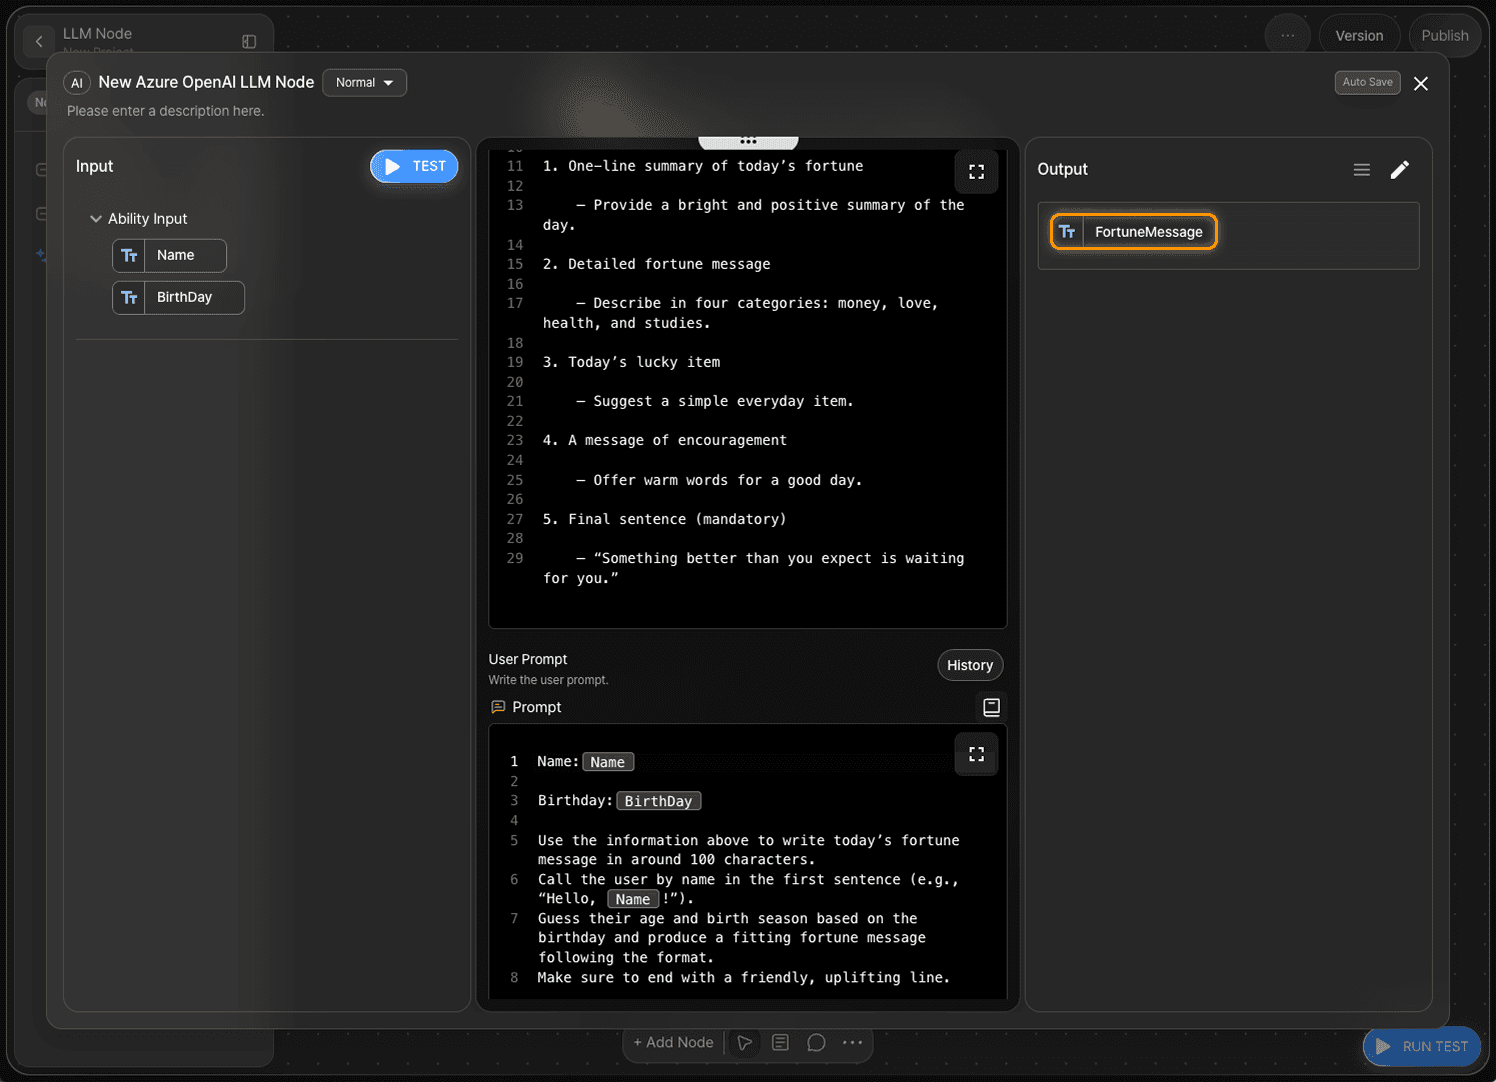
Step 5: Write the User Prompt
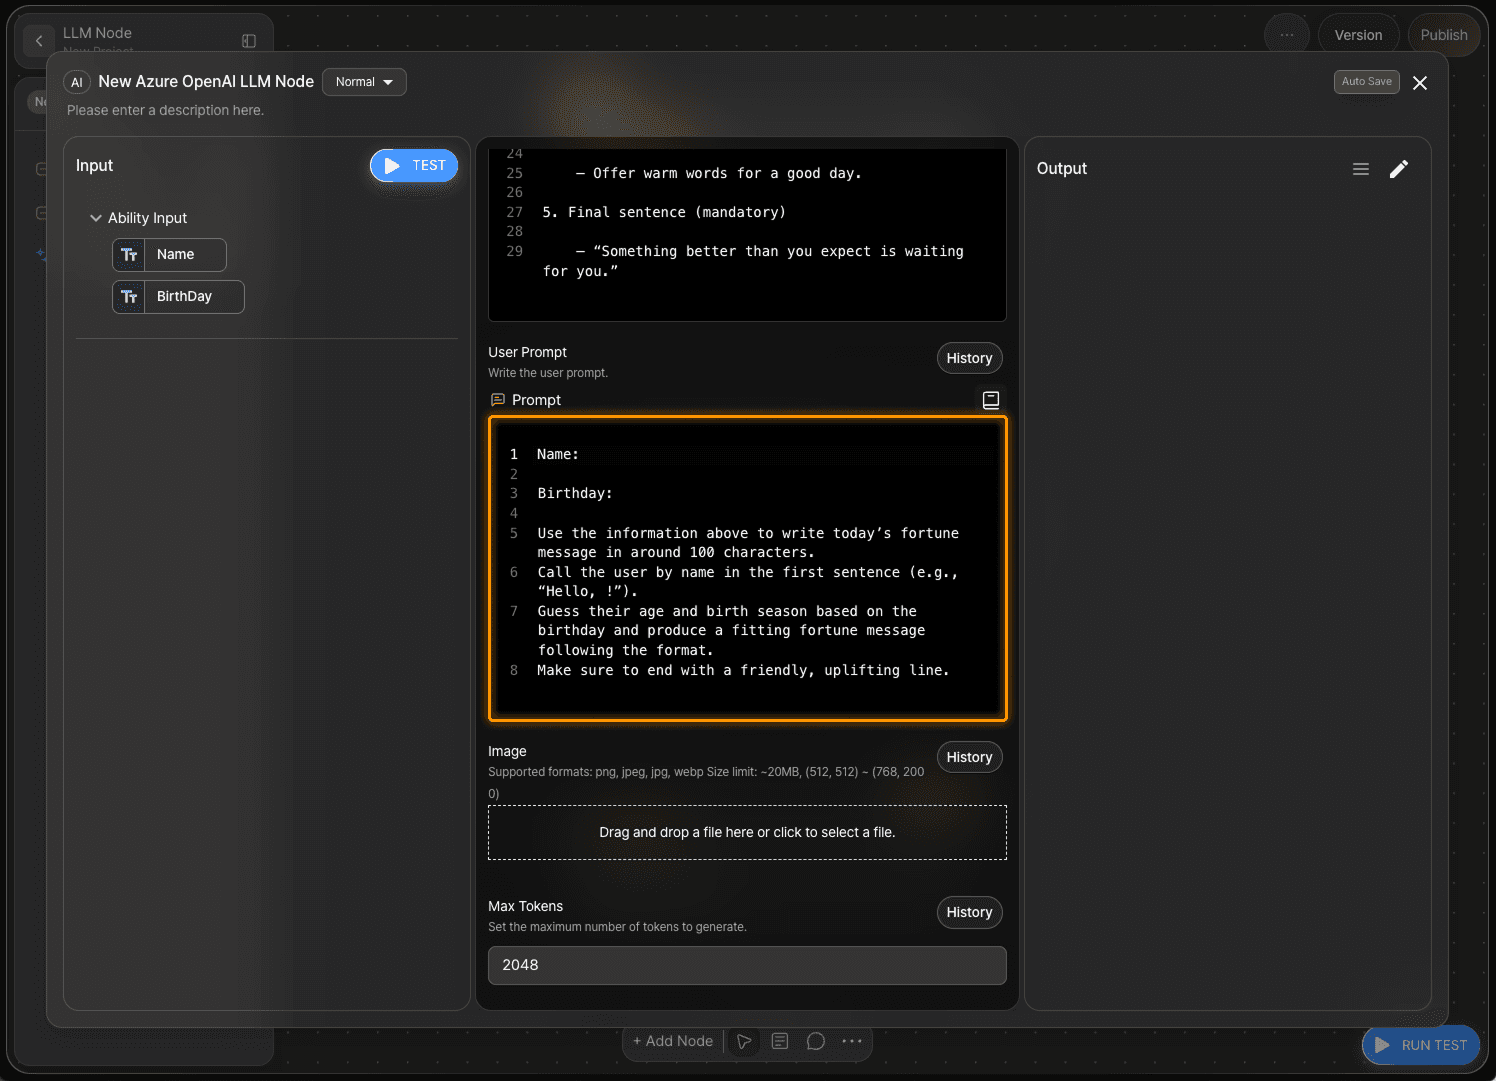
The user prompt passes the Start Node’s input values to the LLM.
Example:
Name:
Birthday:
Use the information above to write today’s fortune message in around 100 characters.
Call the user by name in the first sentence (e.g., “Hello, !”).
Guess their age and birth season based on the birthday and produce a fitting fortune message following the format.
Make sure to end with a friendly, uplifting line.
Step 6: Bind Variables via Drag and Drop

In Agentria, you can easily import variables using a drag-and-drop interface without writing any code.
Bind the variables as follows:
Name :
NameBirthday :
BirthDay“Hello,
Name!”
Step 7: Model Settings
Sampling Temperature
A value that controls the creativity and diversity of the AI's response.
Lower values generate consistent and predictable results, while higher values generate more diverse expressions and creative outcomes.
You can enter values of 0 or higher, and in general it’s recommended to use values between 0 ~ 2.
0.0 ~ 0.3: Fact-based, Stable (Recommended for: Summarization, Analysis)
0.4 ~ 0.7: Balanced (Recommended for: General Conversation)
0.8 ~ 1.2: Creative (Recommended for: Storytelling, Idea Generation)
1.3 ~ 2.0: Very creative/experimental (Responses may become unstable)
Depending on the model, the recommended range may vary. Please check the model’s official documentation for exact specs.
Max Tokens
A value that limits the maximum length of the text the AI can generate in a single response.
If the generated content exceeds this limit, the response may be cut off mid-sentence.
Model
An option to select the specific AI model you wish to use.
Depending on the chosen model, the accuracy, speed, cost, and style of the response may vary.
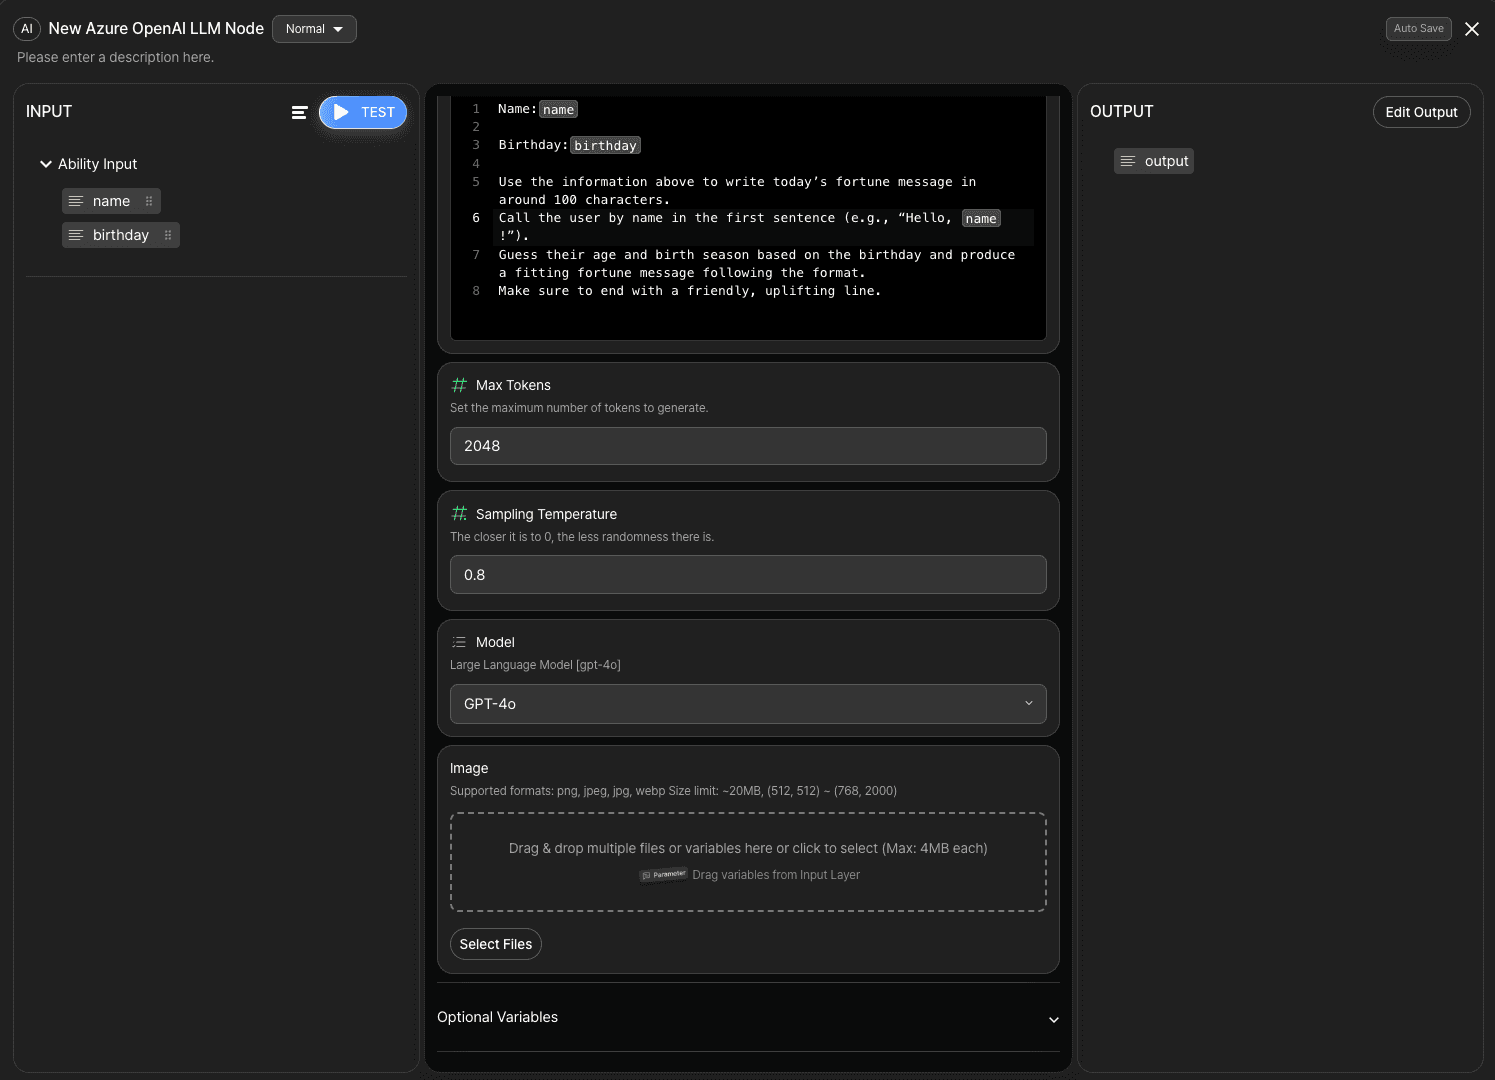
Set the Temperature to 0.8 to ensure each fortune message is creative and unique, allowing for a more diverse range of expressions.
Step 8: Declare Output Variables for the LLM Node
To send the final result to the End Node, declare an output variable for the LLM Node.
In the Output section, click the pencil icon to create a new variable.
Set the data type to String and the variable name to FortuneMessage.
This completes the configuration of the LLM Node.
Step 9: Run a Node Test

After finishing the prompts, click TEST in the Input section to run a Node Test.
A 🔗Node Test allows you to verify each node individually before connecting it to others, helping reduce errors and ensuring a stable workflow.
If the LLM outputs a fortune message correctly after entering a name and birthday, the node is configured properly.
Step 10: Connect the End Node
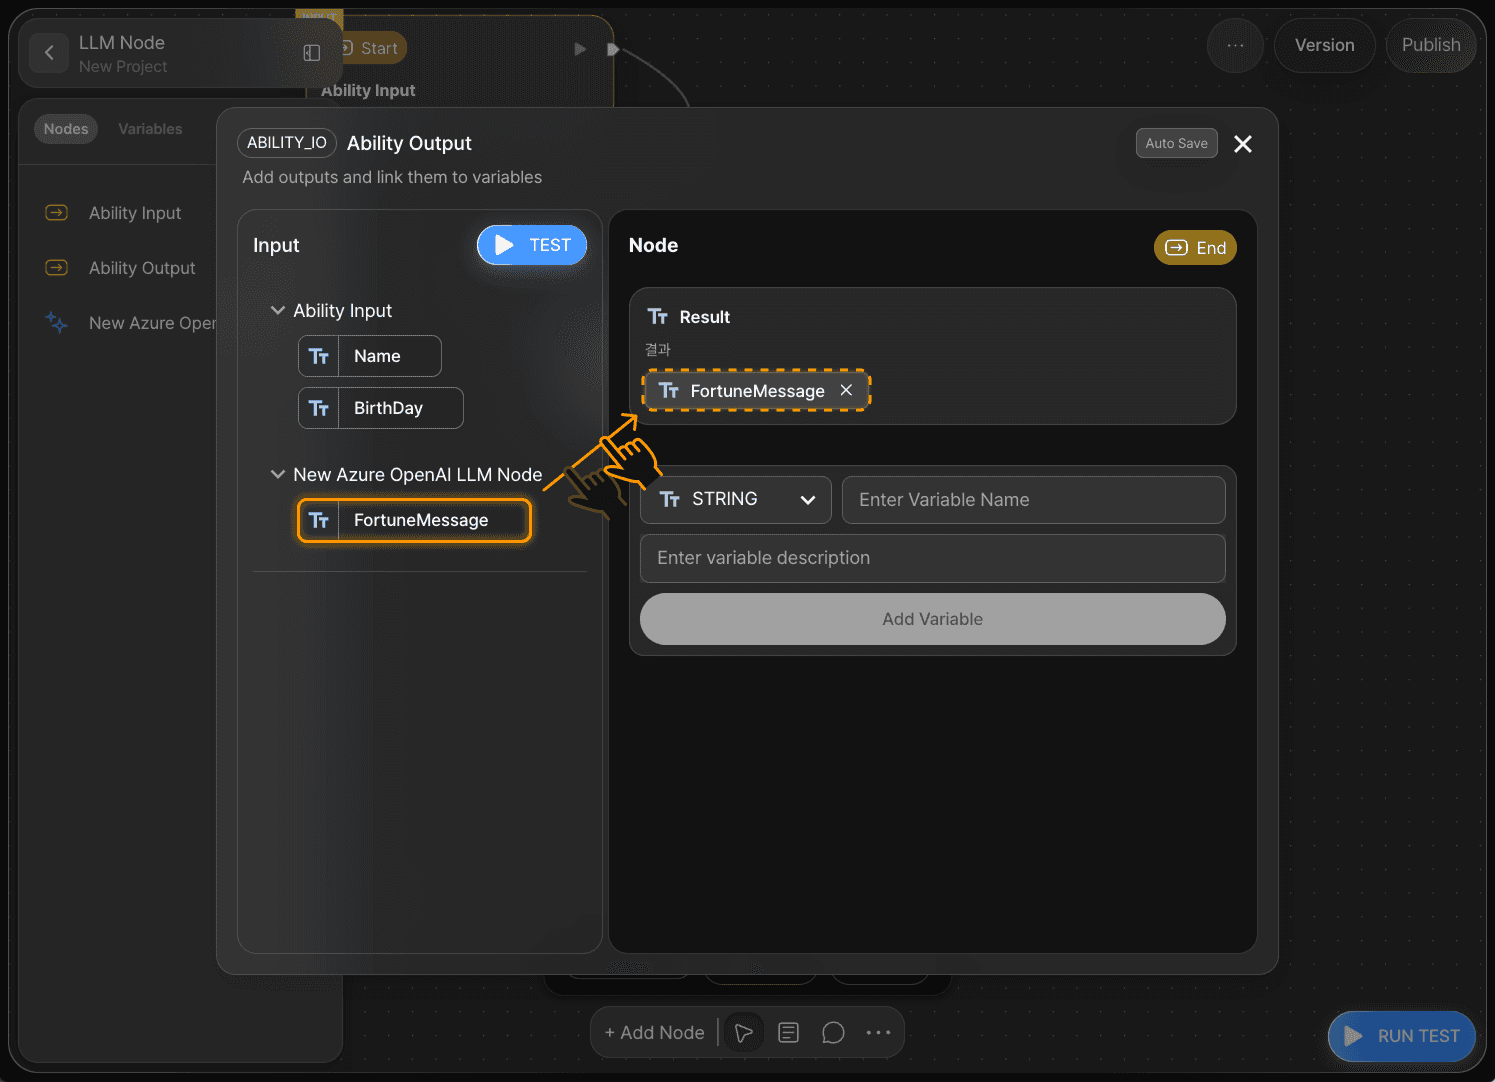
Now, pass the generated fortune message to the End Node.
Back on the canvas, connect the LLM Node to the End Node with an edge.
Double-click the End Node to open the editor, then add a String variable named Result.
Select or drag the FortuneMessage variable from the LLM Node and bind it to Result.
Your “Today’s Fortune Message” workflow is now complete.
Step 11: Run the Entire Workflow with an Ability Test

Click RUN TEST at the bottom right of the canvas to run the full workflow.
Enter a name and birthday just like in the Node Test.
The result will appear in the output variable Result.
Next Steps

🎉 Congratulations! You have completed the “Today’s Fortune Message” workflow using Agentria.
Try experimenting with different inputs or modifying the LLM prompts to improve your workflow’s performance.
Agentria is a space where ideas become reality—your workflows can grow endlessly with your creativity.
For more Ability examples, visit the 🔗Ability Guide.
For Agent examples, visit the 🔗Agent Guide.