Agent Loop Node
Learning to Use Nodes - Agent Loop Node
The Agent Loop node is the core node of an agent: it understands the user's request, decides on its own which of the connected tools it needs right now and calls it, and generates a final answer once it has enough information. It's only used in the Agent composer, not in an Ability.
In this tutorial, you'll connect a web search tool and a Slipbox query tool to the Agent Loop node together, so it can answer using both up-to-date web information and internal documents stored in a Slipbox, then use CHAT TEST to talk to it directly and check the result.
Before You Begin
Before starting this tutorial, create an Agent in your project and enter the Canvas. For instructions on accessing the canvas, see the 🔗Core Guide: Get Started in 3 Steps.
This tutorial also uses a tool that queries a Slipbox, so a Slipbox must already be set up in your project. For instructions on building a Slipbox, see the 🔗Slipbox Guide.
After completing this tutorial, you will be able to:
Connect multiple tools to the Agent Loop node so the agent can choose the right one for the situation on its own.
Understand how to connect an LLM node to the
LLM ModelandFallback LLM Modelconnection points.Use CHAT TEST to talk to the agent directly and verify its behavior.
Use the debugger to trace which tools the agent called, and how many times, during execution.
Workflow Overview
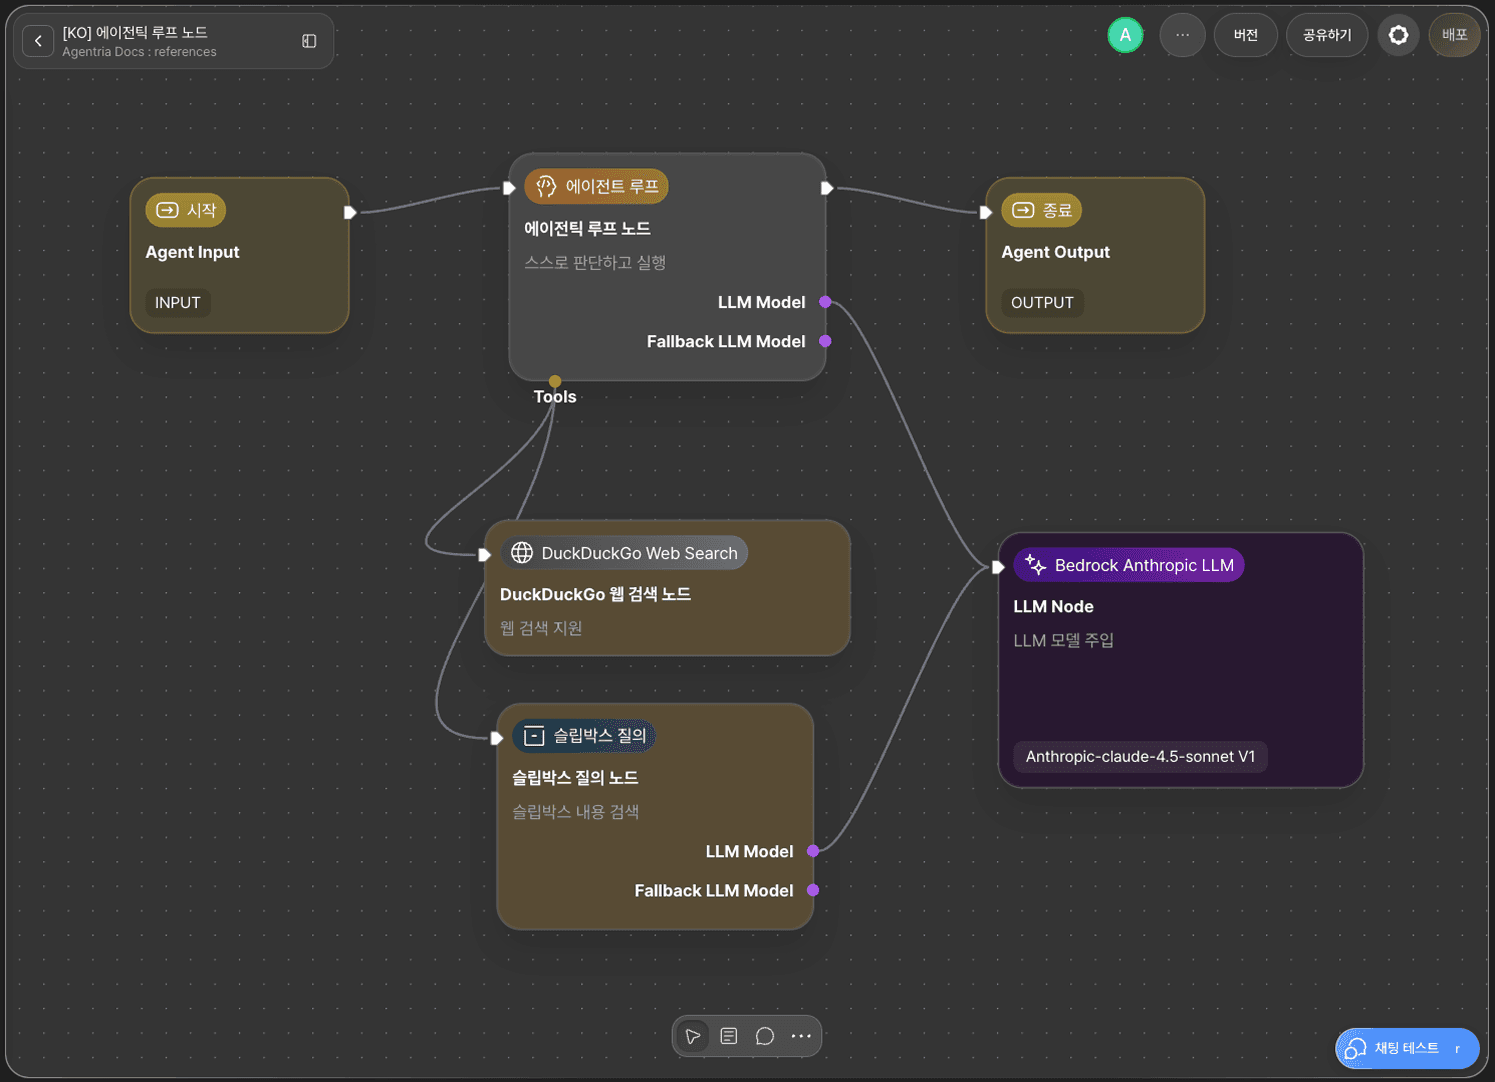
The core of this tutorial is the Agent Loop node.
The Agent Loop node takes user input (user_input), reads the descriptions of the tools connected to Tools, and chooses on its own which tool it needs right now to call it. Based on the tool's result, it either calls another tool if needed, or generates a final answer (final_answer) once it decides it has enough.
Tools, LLM Model, and Fallback LLM Model aren't ordinary fields you type a value into — they're separate connection points where you attach other nodes with an edge. Connect the nodes you want to use as tools to Tools, and connect the LLM node the agent should use for its reasoning to LLM Model.
The tool nodes that appear alongside it play the following roles. See each node's own documentation for detailed usage.
DuckDuckGo Web Search: A tool node that performs real-time web search.Slip Query node: A tool node that searches a Slipbox for relevant documents to use in the answer. See the 🔗Slip Query Node document for details.LLM node: Specifies the model that the Agent Loop node and the Slip Query node use internally. See the 🔗LLM Node document for details.
Agent Loop Node Basic Info
The Agent Loop node provides the following basic inputs.
Input | Required | Description |
|---|---|---|
| Required | The user input text to send as the request to the agent. |
Max Steps | Optional | Maximum number of Agent Loop iterations (default: 10). |
Max Execution Time | Optional | Maximum execution time in seconds (default: 120). |
Max Previous Chat Count | Optional | Maximum number of previous chat turns to include in the context (default: 10). |
Max Observation Characters | Optional | Maximum number of characters per tool result. Truncated if exceeded (default: 8000). |
Max Tools in Prompt | Optional | Maximum number of tools to include in the prompt. Tools beyond this limit are lazy-loaded automatically and can be found via |
Clicking Add Variable lets you additionally connect the following optional inputs.
Optional Input | Description |
|---|---|
| The list of previous conversations between the agent and the user, ordered from oldest to newest. If not passed, it's retrieved automatically from Room Memory. |
| Files the agent can access. Accepts a |
| Defines the agent's role and personality. |
| The agent's behavior rules and guidelines. If empty, the default instructions apply. |
| Guidelines for response format and tone. |
| Whether the connected LLM model accepts image input. Setting this to |
| Whether the connected LLM model accepts audio input. |
| Whether the connected LLM model accepts video input. |
The Agent Loop node outputs the following.
Output | Description |
|---|---|
| The final answer generated by the agent. |
| Data on the process the agent went through to reason and call tools. |
| The list of tools that were actually called. |
| Metrics about the execution. |
This tutorial only connects user_input, uses the default values for the remaining basic inputs as-is, and doesn't add any optional inputs.
Step 1: Create an Agent
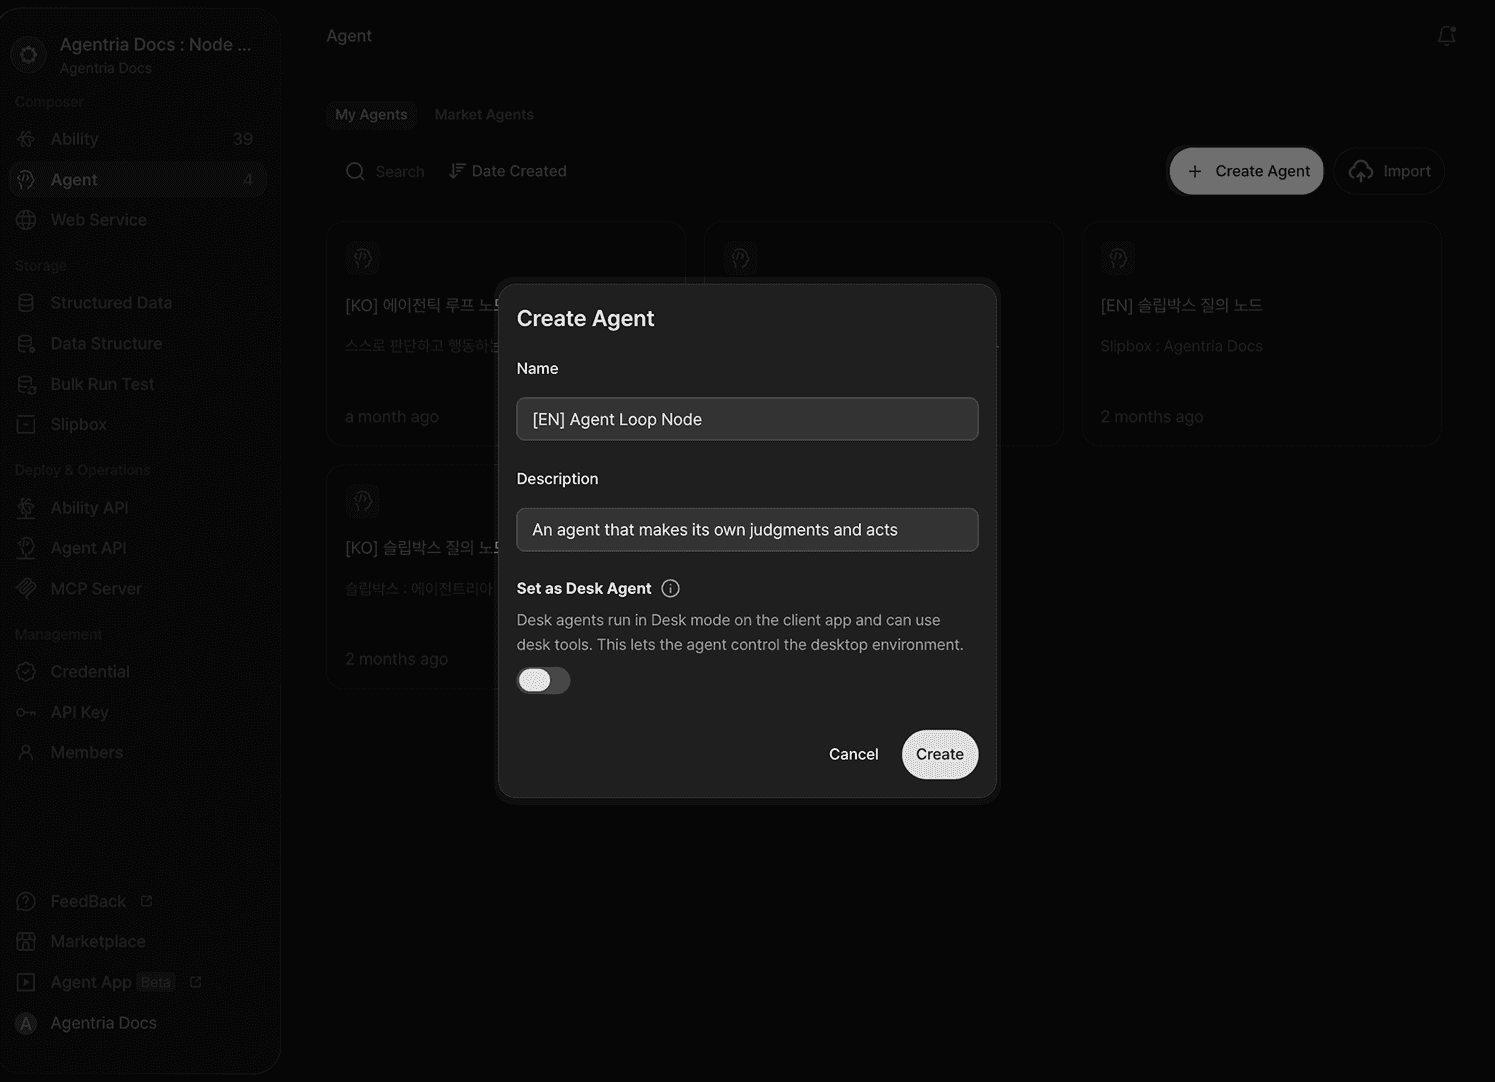
Create a new Agent. Enter Agent Loop node for Name and An agent that judges and acts on its own for Description.
The Set as Desk Agent toggle makes the agent run in the client app's Desk mode and use Desk tools, letting the agent control the desktop environment. Leave it off for this tutorial.
Step 2: Check the Start Node (Agent Input)
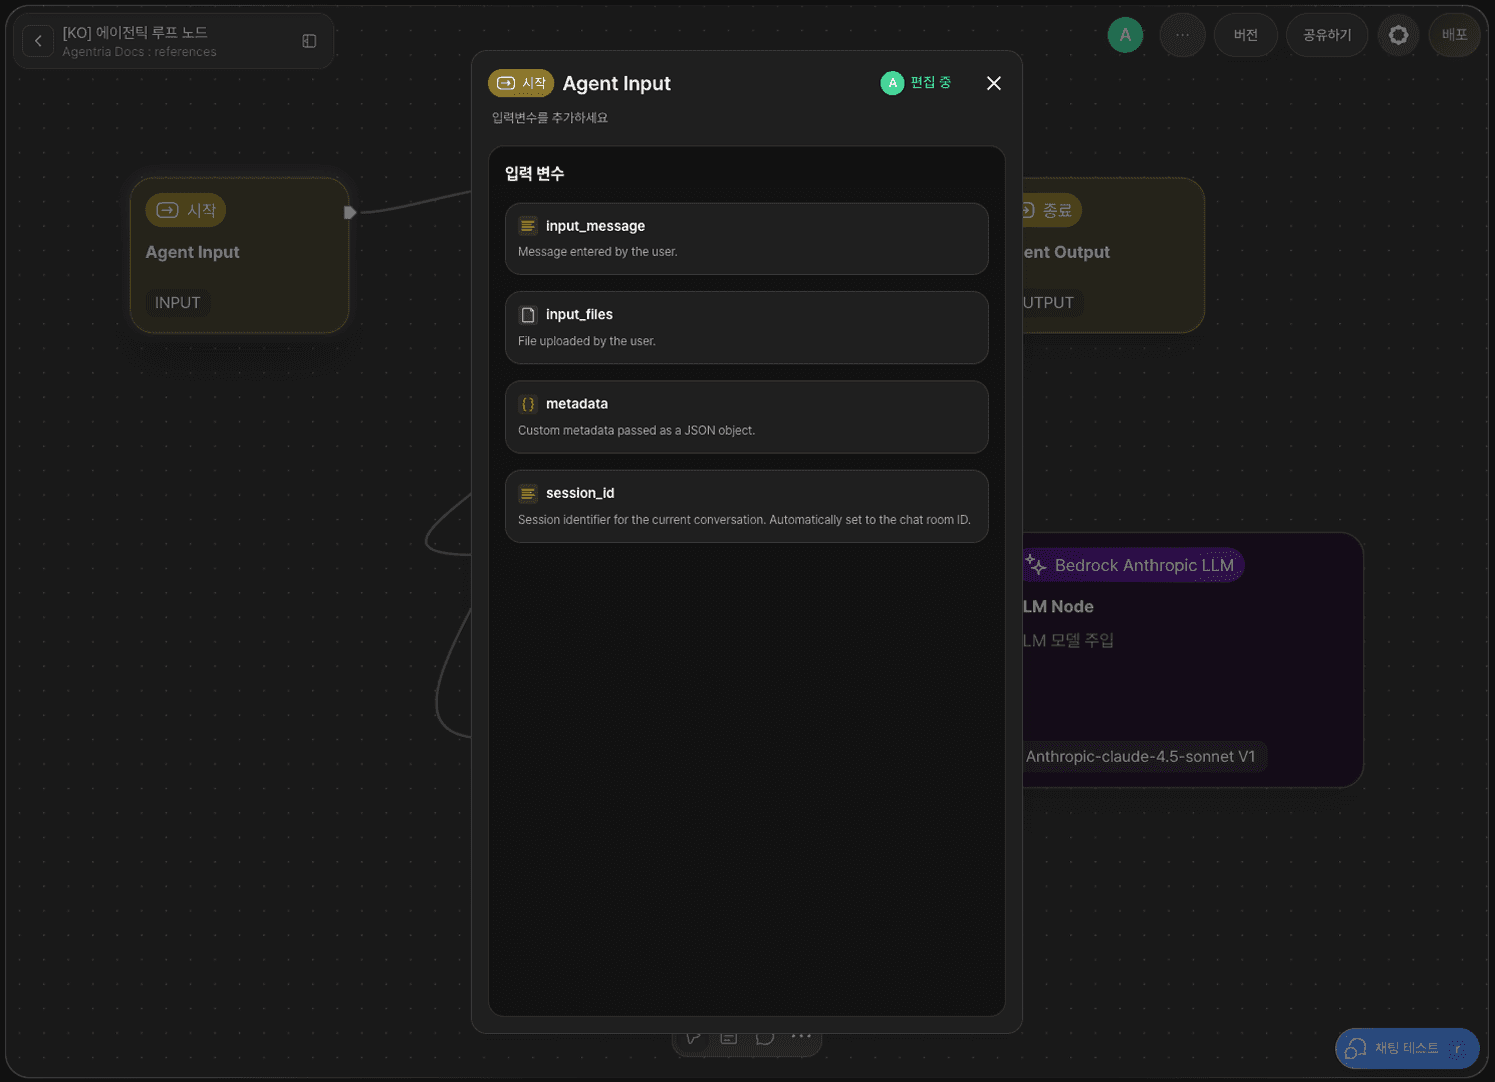
Double-click the Agent Input node to open the Node Editor. Its four input variables — input_message, input_files, metadata, and session_id — are fixed and can't be added to or edited directly.
This tutorial uses input_message as-is, which carries the message the user enters in chat.
Step 3: Add an Agent Loop Node
Click +Add Node to place an Agent Loop node on the canvas.
Step 4: Add Tool Nodes (DuckDuckGo Web Search, Slip Query)
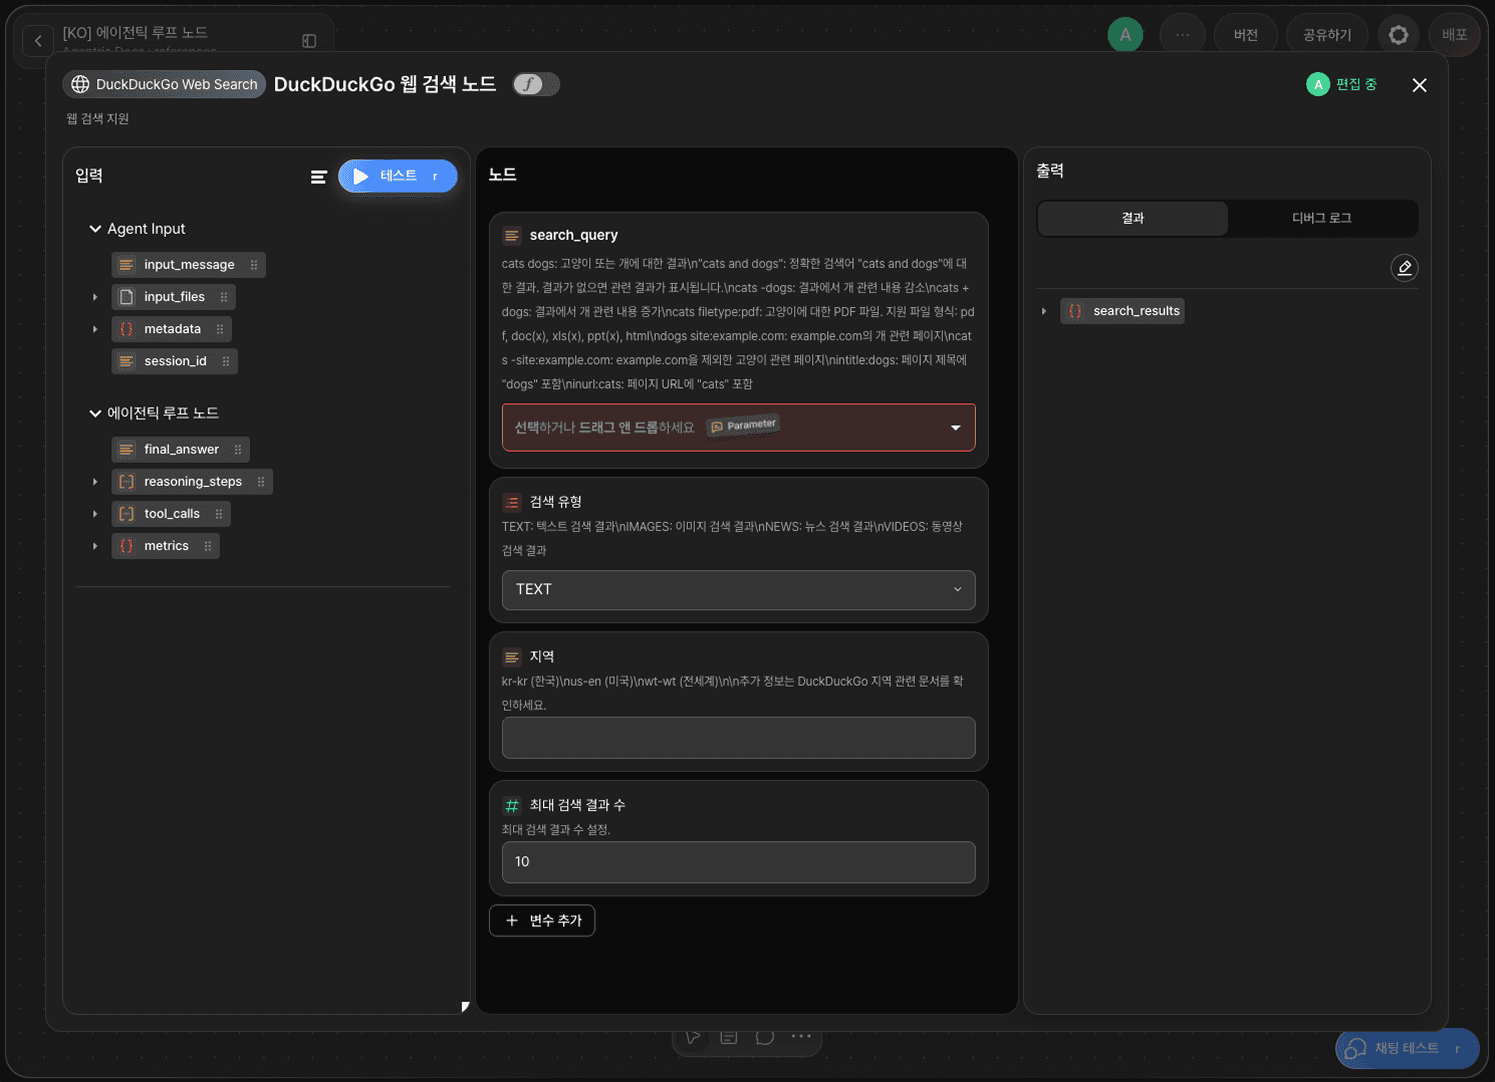
Click +Add Node to place a DuckDuckGo Web Search node and a Slip Query node on the canvas. Placing both below the Agent Loop node makes it easier to connect them as tools later.
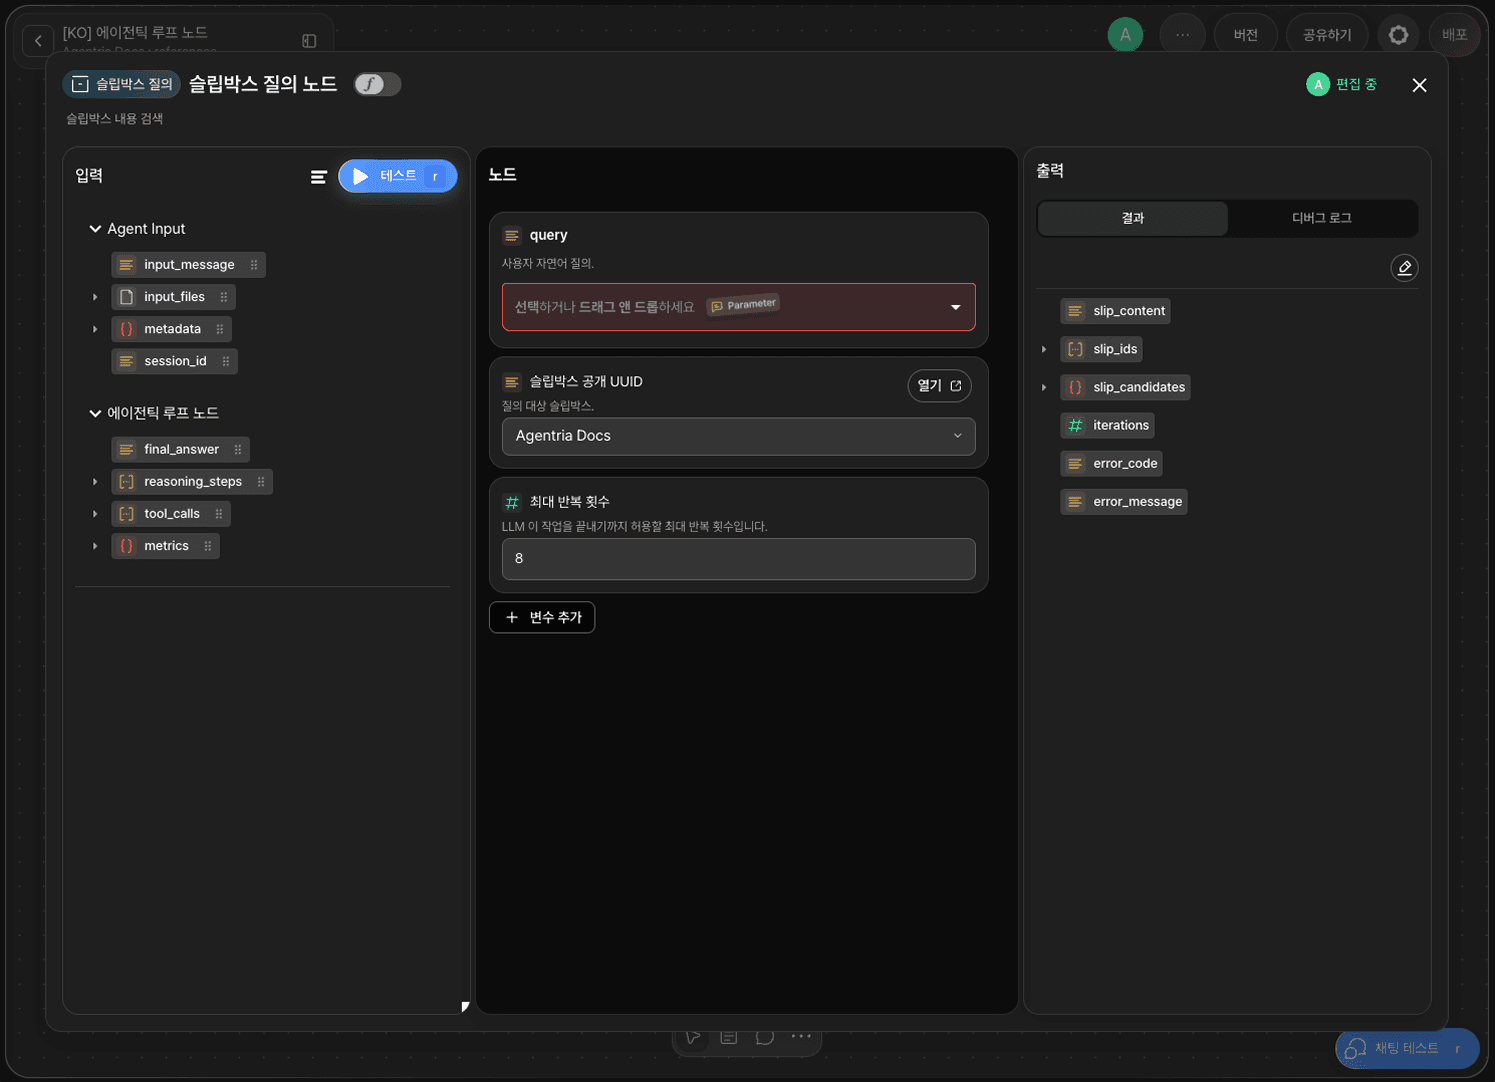
Double-click the Slip Query node to open the Node Editor, and select the Slipbox to query in Slipbox Public UUID. This tutorial selects the Agentria Docs Slipbox.
For both nodes, you don't need to bind input variables like query or search_query that get filled in at execution time. Simply connecting the node as a tool to the Agent Loop is enough — the agent fills in the appropriate value on its own when it calls the tool.
Step 5: Add an LLM Node and Select a Model
Click +Add Node to place an LLM node on the canvas. In LLM Model, select Anthropic-claude-4.5-sonnet V1. Leave the remaining fields (max tokens, sampling temperature, etc.) at their default values.
Step 6: Connect the Tools to the Agent Loop Node
Connect an edge from the Tools connection point at the bottom of the Agent Loop node to the In-Pin of the DuckDuckGo Web Search node. Connect another edge from Tools to the Slip Query node the same way.
You can connect multiple tools to Tools, and the agent automatically chooses and calls whichever tool fits the user's request.
Step 7: Connect the LLM Node to the Agent Loop and Slip Query Nodes
Connect the LLM node to the LLM Model connection point of the Agent Loop node. Connect the same LLM node to the LLM Model connection point of the Slip Query node as well. The Slip Query node uses an LLM internally to find relevant slips, so it needs its own model connection separate from the Agent Loop node's.
This tutorial doesn't connect anything to Fallback LLM Model.
Step 8: Configure the End Node (Agent Output)
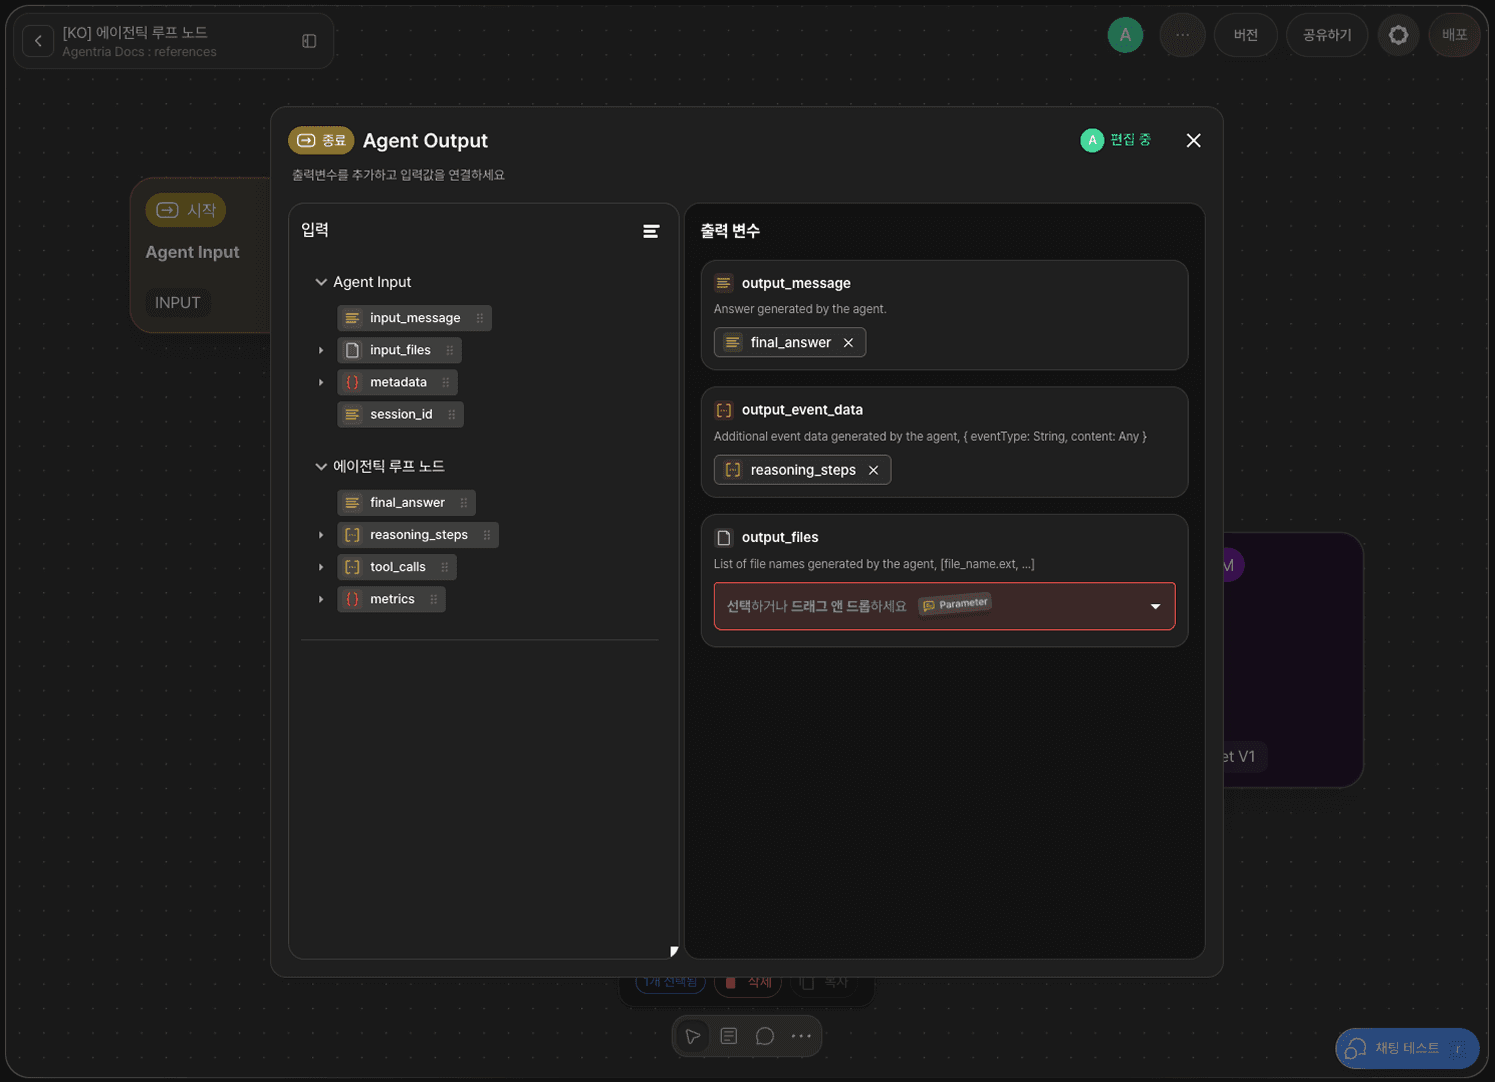
Double-click the Agent Output node to open the Node Editor. Drag and drop final_answer from the Agent Loop node onto the output_message output variable to bind it. Bind reasoning_steps to output_event_data.
Step 9: Run the Workflow with a Chat Test
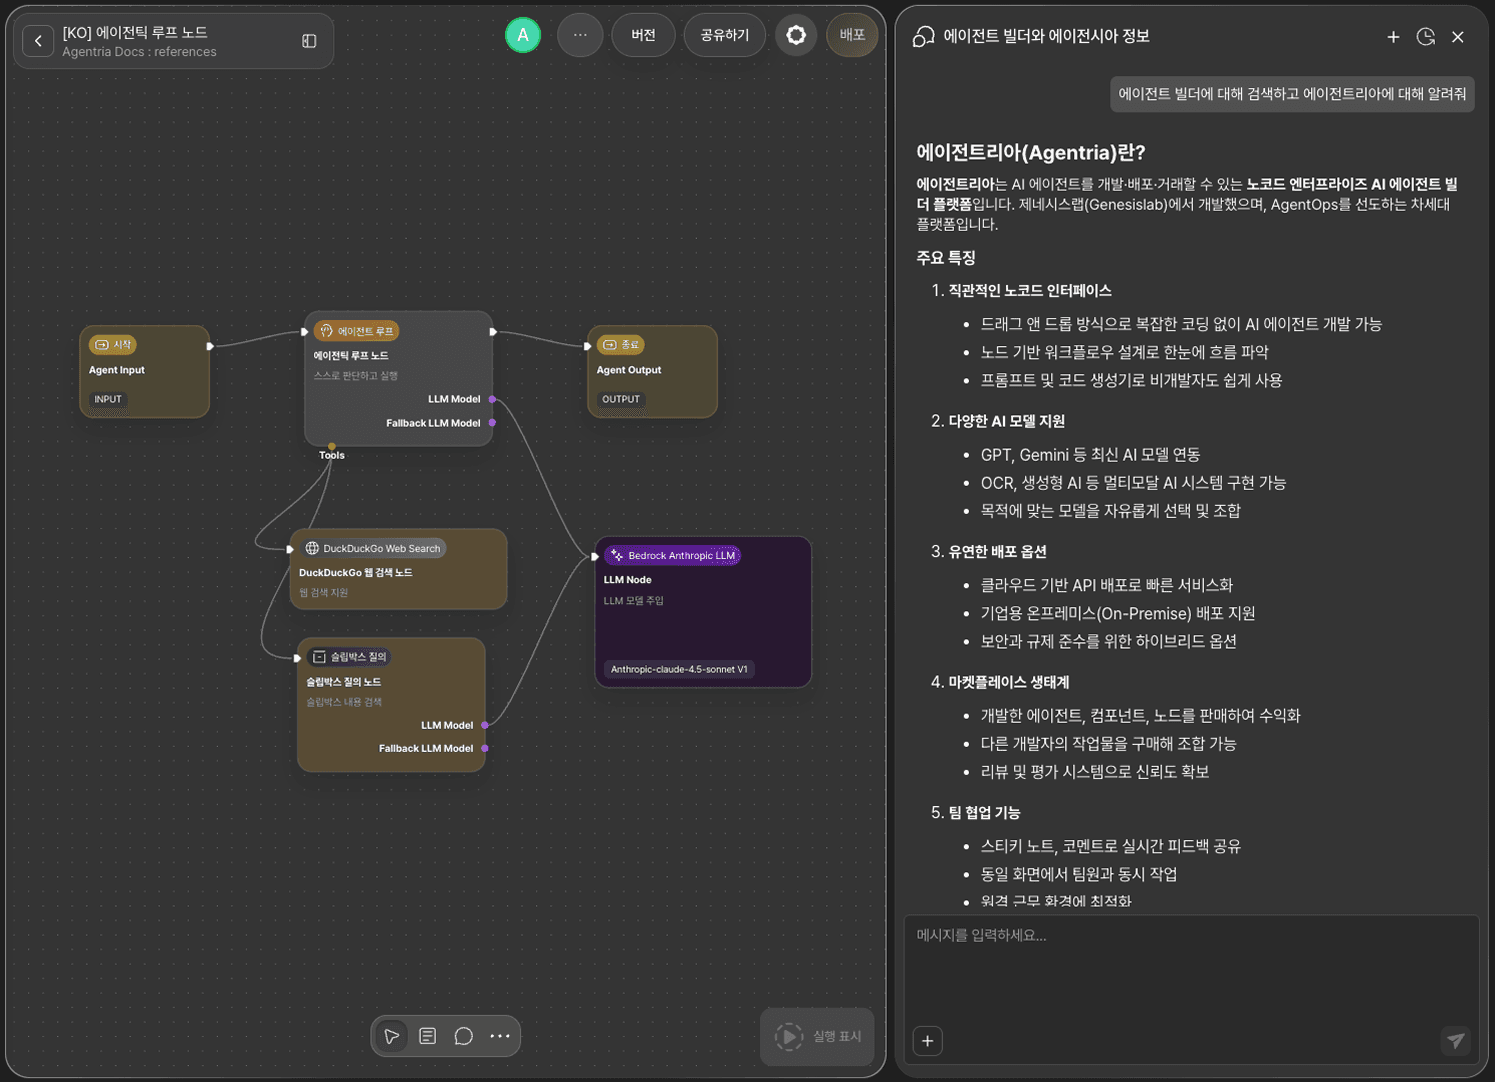
Click the CHAT TEST button, and enter the following message in the chat input to run it.
If the agent combines the web search and Slipbox query results into an answer that starts with "What Is Agentria?", it's working correctly.
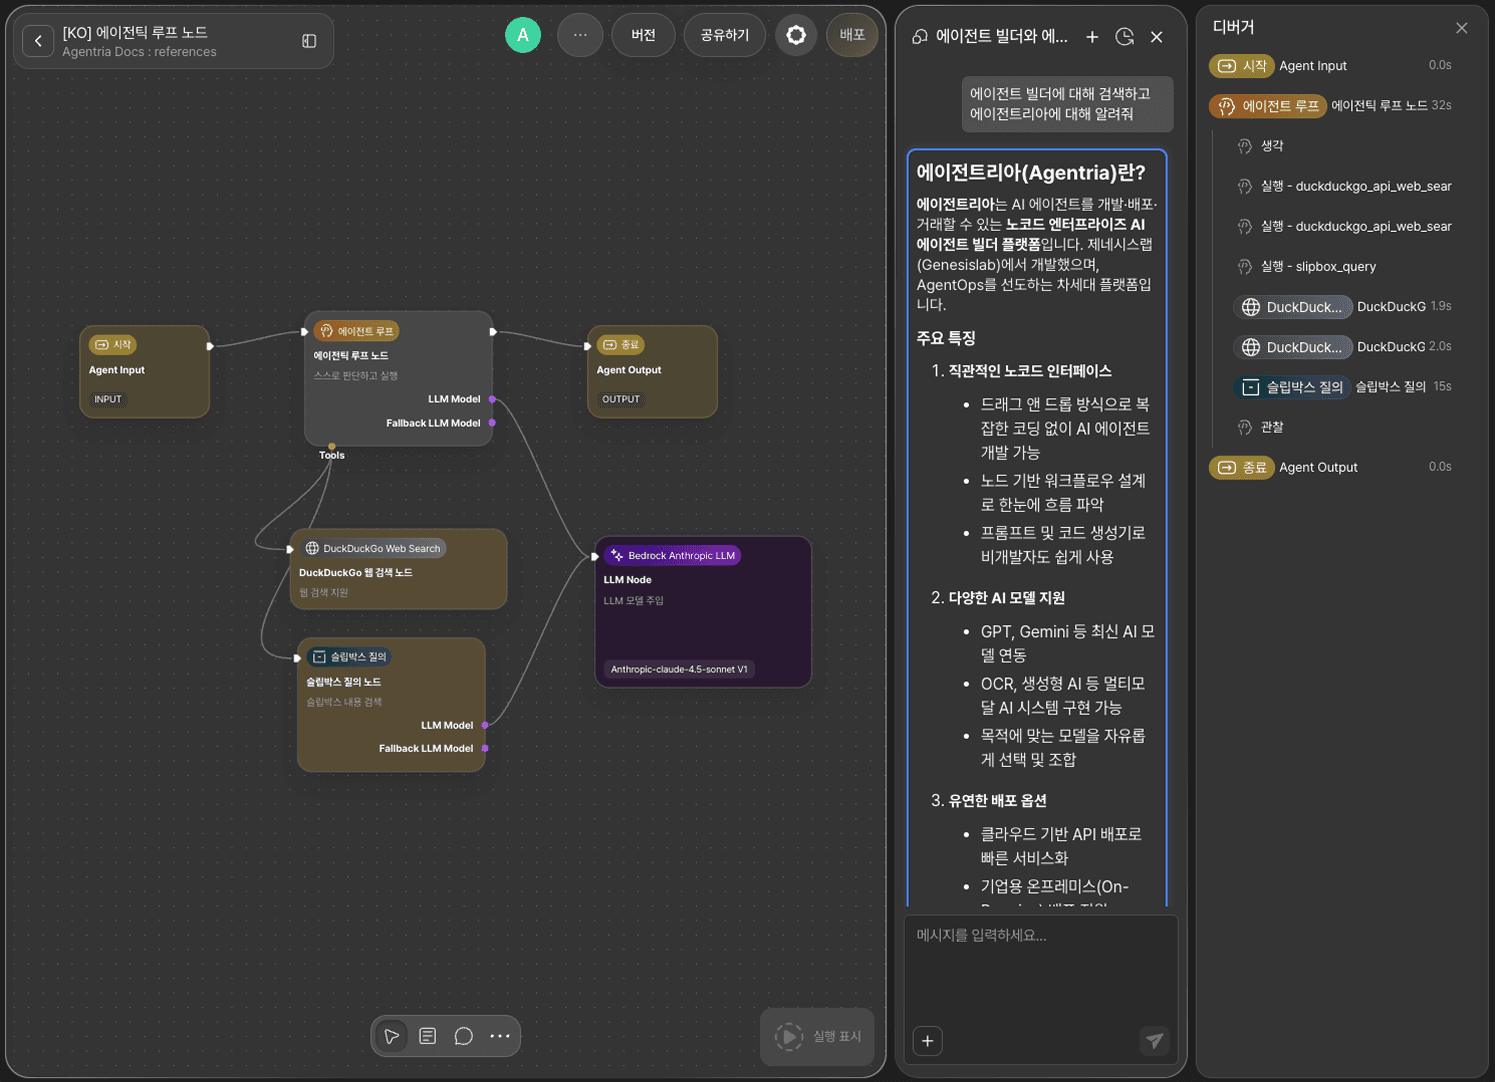
The Debugger panel on the right lets you see the process the agent went through, in order. In this example, the agent called DuckDuckGo Web Search twice to look up web information, then called Slip Query once to reference documents stored in the Slipbox, and combined the results into a final answer.
Next Steps
🎉 Congratulations! You've successfully built the "Agent Loop" workflow using Agentria.
By connecting more tools to Tools, you can extend a single agent to handle a wider range of tasks on its own — search, document lookup, file creation, and more — depending on the situation.
Agentria is a place where ideas become reality—your workflow can expand infinitely with your creativity.
For more node examples, visit the 🔗Node Usage page.
Frequently Asked Questions
What does the Agent Loop node do?
The Agent Loop node is the core node of an agent: it understands the user's request, decides on its own which of the connected tools it needs right now and calls it, and generates a final answer once enough information has been gathered. It's only used in the Agent composer, not in an Ability.
How many tools can I connect to the Agent Loop node?
There's no fixed limit. However, if you connect more tools than Max Tools in Prompt (default: 10), the excess is automatically lazy-loaded and made available through tool_search.
What's the difference between LLM Model and Fallback LLM Model?
LLM Model is where you connect the model the agent uses by default. Fallback LLM Model is where you connect a backup model to use if the default model call fails — it doesn't have to be connected.
Does the Slip Query node also need its own LLM node connected?
Yes. The Slip Query node uses an LLM internally to find relevant slips based on the query, so it needs an LLM node connected to its own LLM Model connection point, separate from the Agent Loop node's. You can connect the same LLM node to multiple places at once.
How is a chat test different from a node test?
A node test runs a single node on its own to check its input and output. A chat test runs the entire agent workflow as an actual conversation, letting you check the conversation flow and tool-calling process across multiple turns all at once.