Structured Data Reader Node
Using Database Nodes (DB Reader)
This tutorial covers how to use the DB Reader node in Agentria. The DB Reader node retrieves data stored in Data Storage. Set a search condition to return records that match the criteria.
In this tutorial, you will build a workflow that accepts a customer name as input, queries the customer Data Storage for matching records, and outputs the results.
Before You Begin
For instructions on accessing the Agentria canvas, refer to the 🔗3-Step Core Guide.
The DB Reader node requires Data Storage to be configured in advance. Refer to the 🔗Data Storage Guide.
After completing this tutorial, you will be able to:
Use the DB Reader node to retrieve records from Data Storage.
Write search conditions by combining columns, operators, and variables.
Set the query range with page size and page number.
Process and output query results using an LLM node.
Workflow Overview
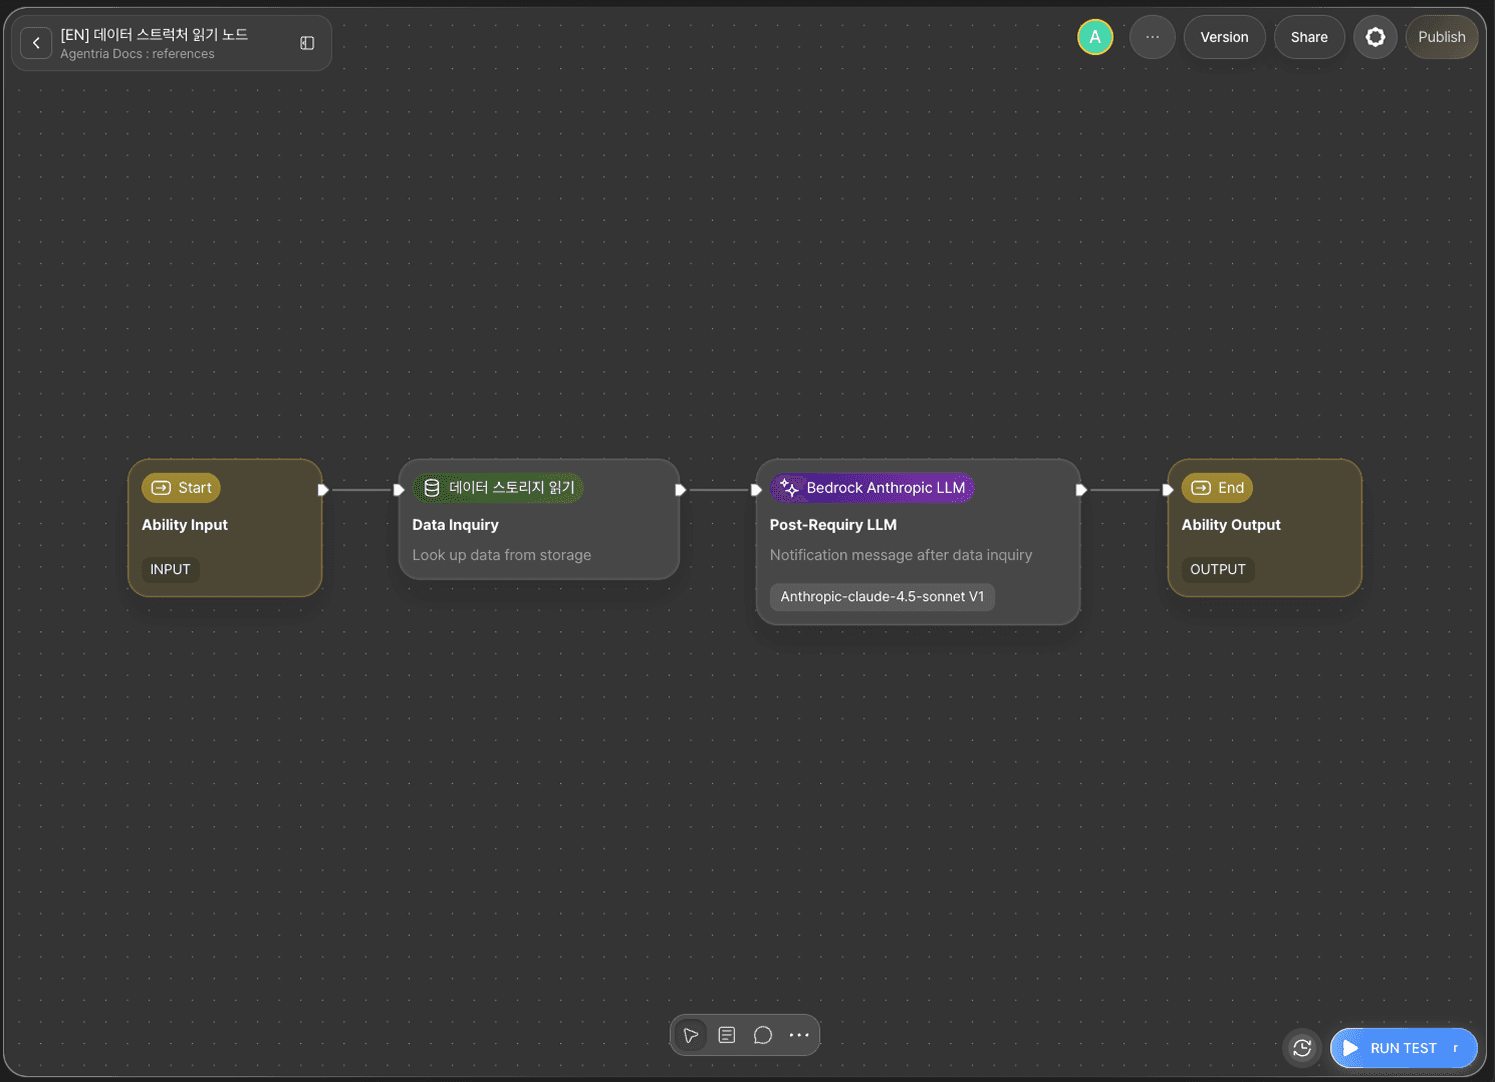
The core of this tutorial is the DB Reader node.
The DB Reader node retrieves records from the specified storage that match the search condition. Search conditions are built by clicking columns, operators, and variables into place, and you can also type them directly. When typing, combine $ (references a storage column) and @ (references an input variable) to write condition expressions.
DB Reader Node Basic Info
The DB Reader node uses the following fields to set the query target and range.
Field/Option | Required | Description |
|---|---|---|
| Required | Select the storage to query |
| Optional | Search condition (build by clicking columns, operators, and variables; typing also supported) |
| Optional | Sort the data returned by the search condition. Only indexed columns are selectable, and multiple conditions are applied in the order they're added |
| Optional | Maximum number of records per page |
| Optional | Page number to retrieve (starts at 0) |
The query expression is built in the search condition field by clicking columns, operators, and variables into place. You can also type it directly using these two symbols.
$— references a column in the Data Storage@— references an input variable
This tutorial uses storage, query, order_by, page_size, and page_number.
Step 1: Create an Ability
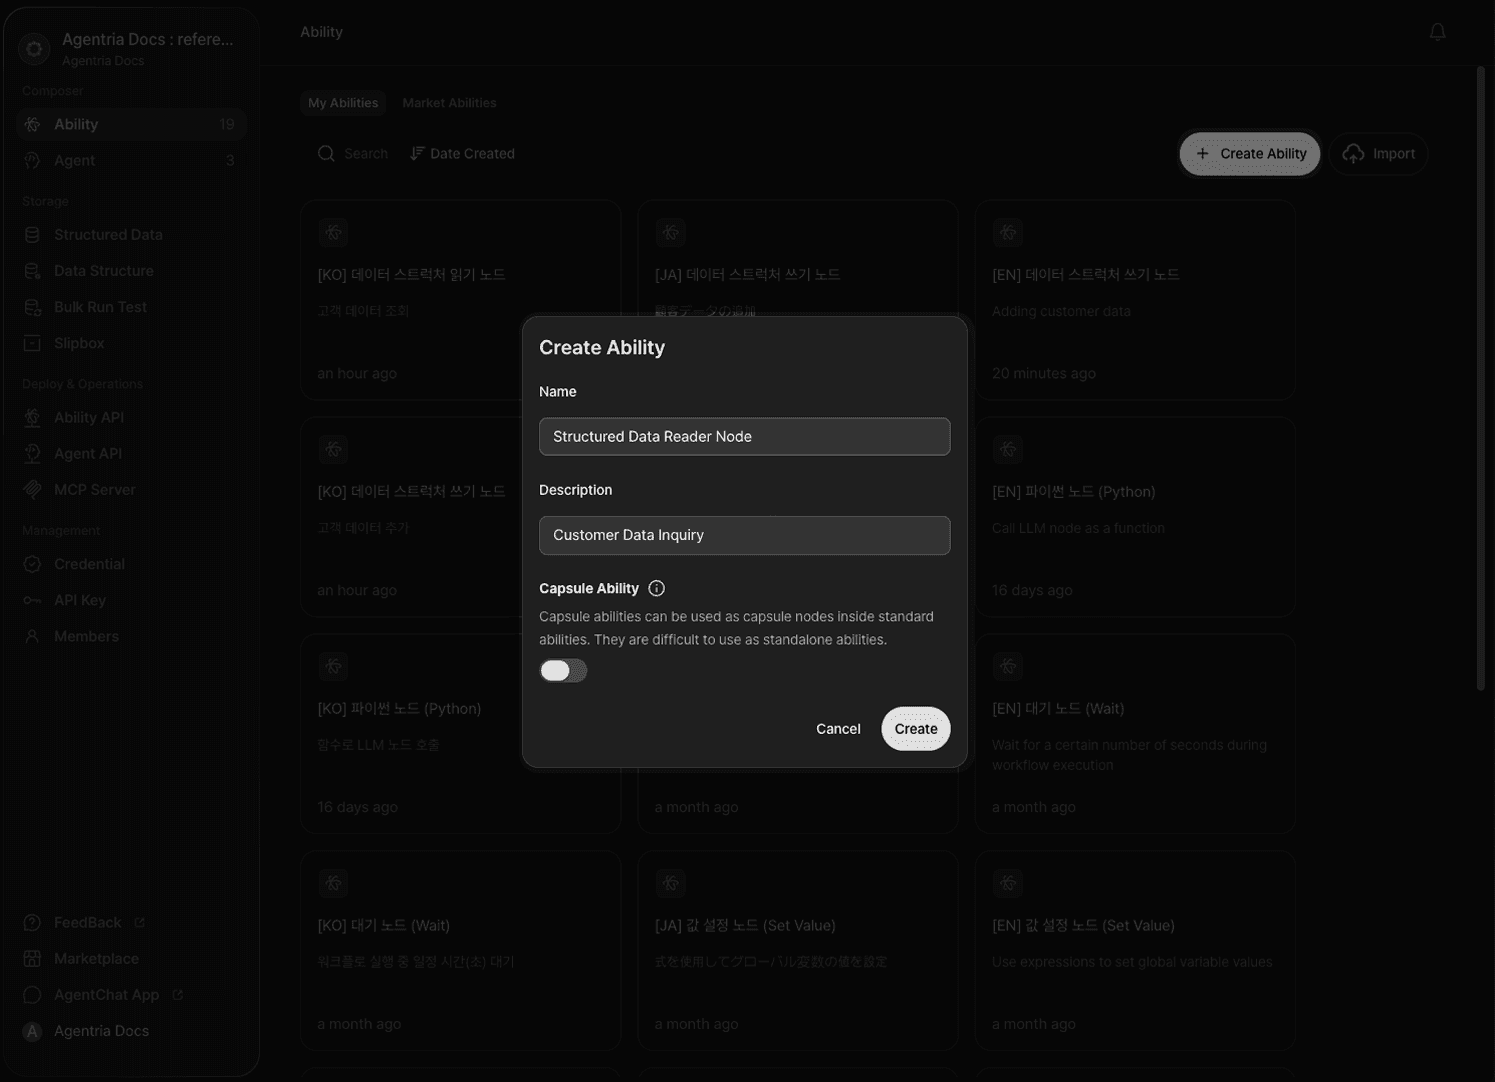
Create a new Ability on the Agentria canvas.
Use the +Add Node button to add a DB Reader node and an LLM node to the canvas.
Step 2: Declare Input Variables
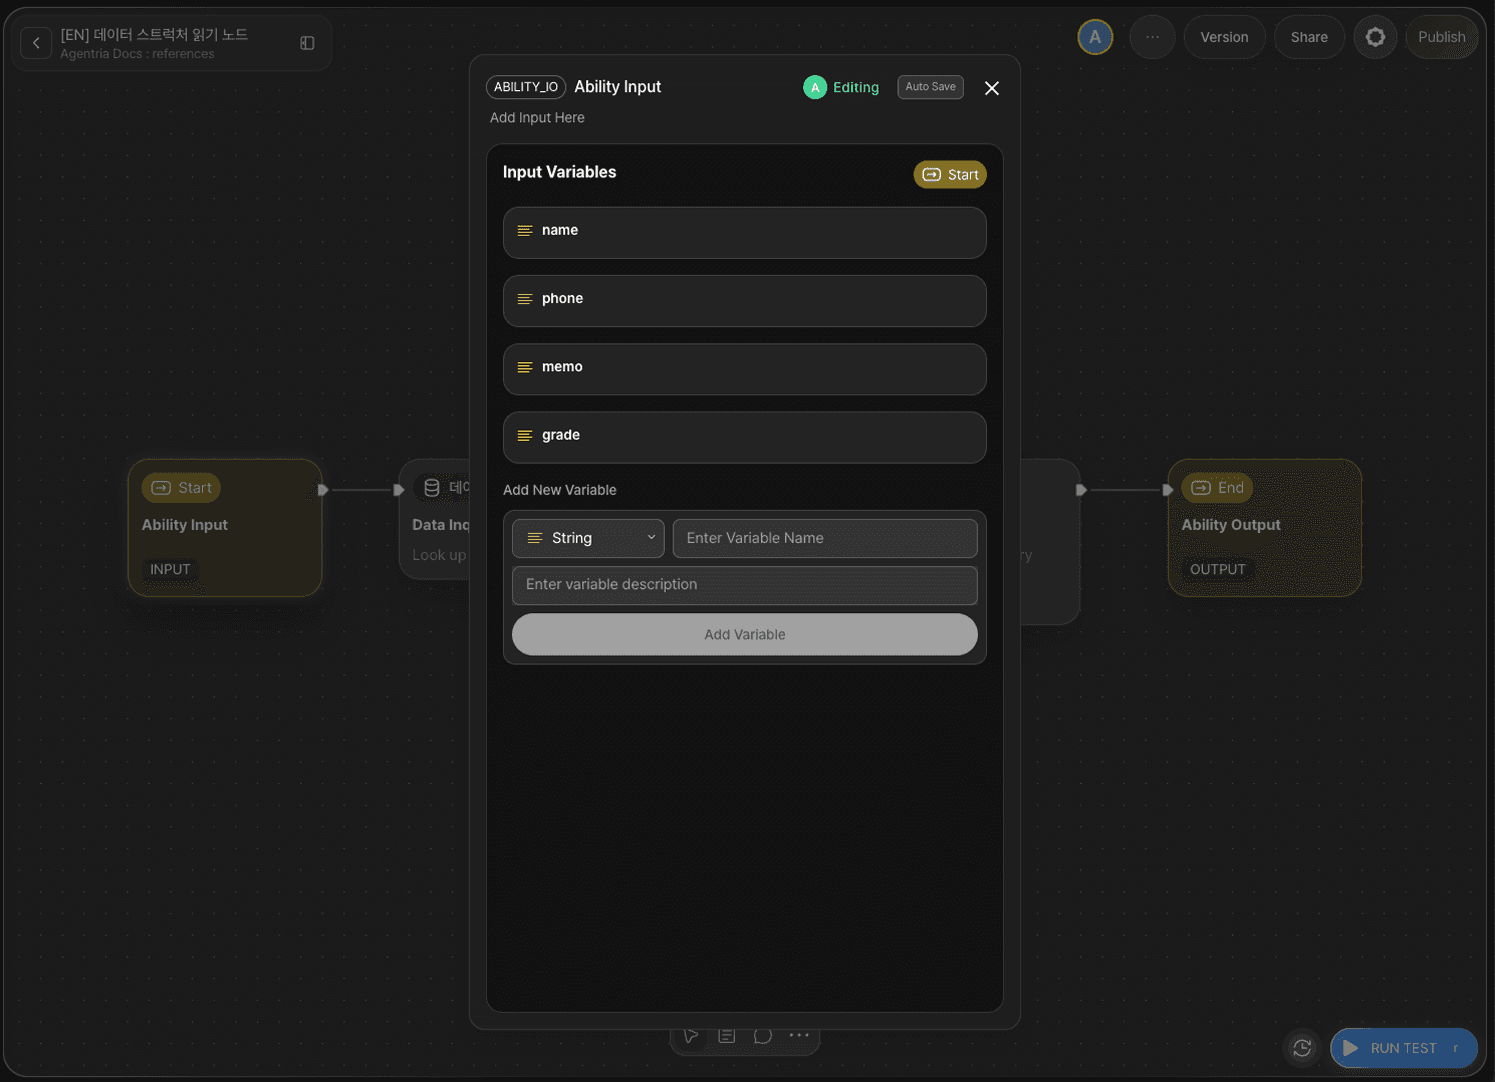
Double-click the Input Node to open the Node Editor.
The storage used in this tutorial is Customer Data, with the column structure below. Declare input variables to match the columns you want to search by.
Variable | Type | Description |
|---|---|---|
| String | Customer name |
| String | Phone number |
| String | Customer grade |
| String | Memo |
Step 3: Configure the DB Reader Node
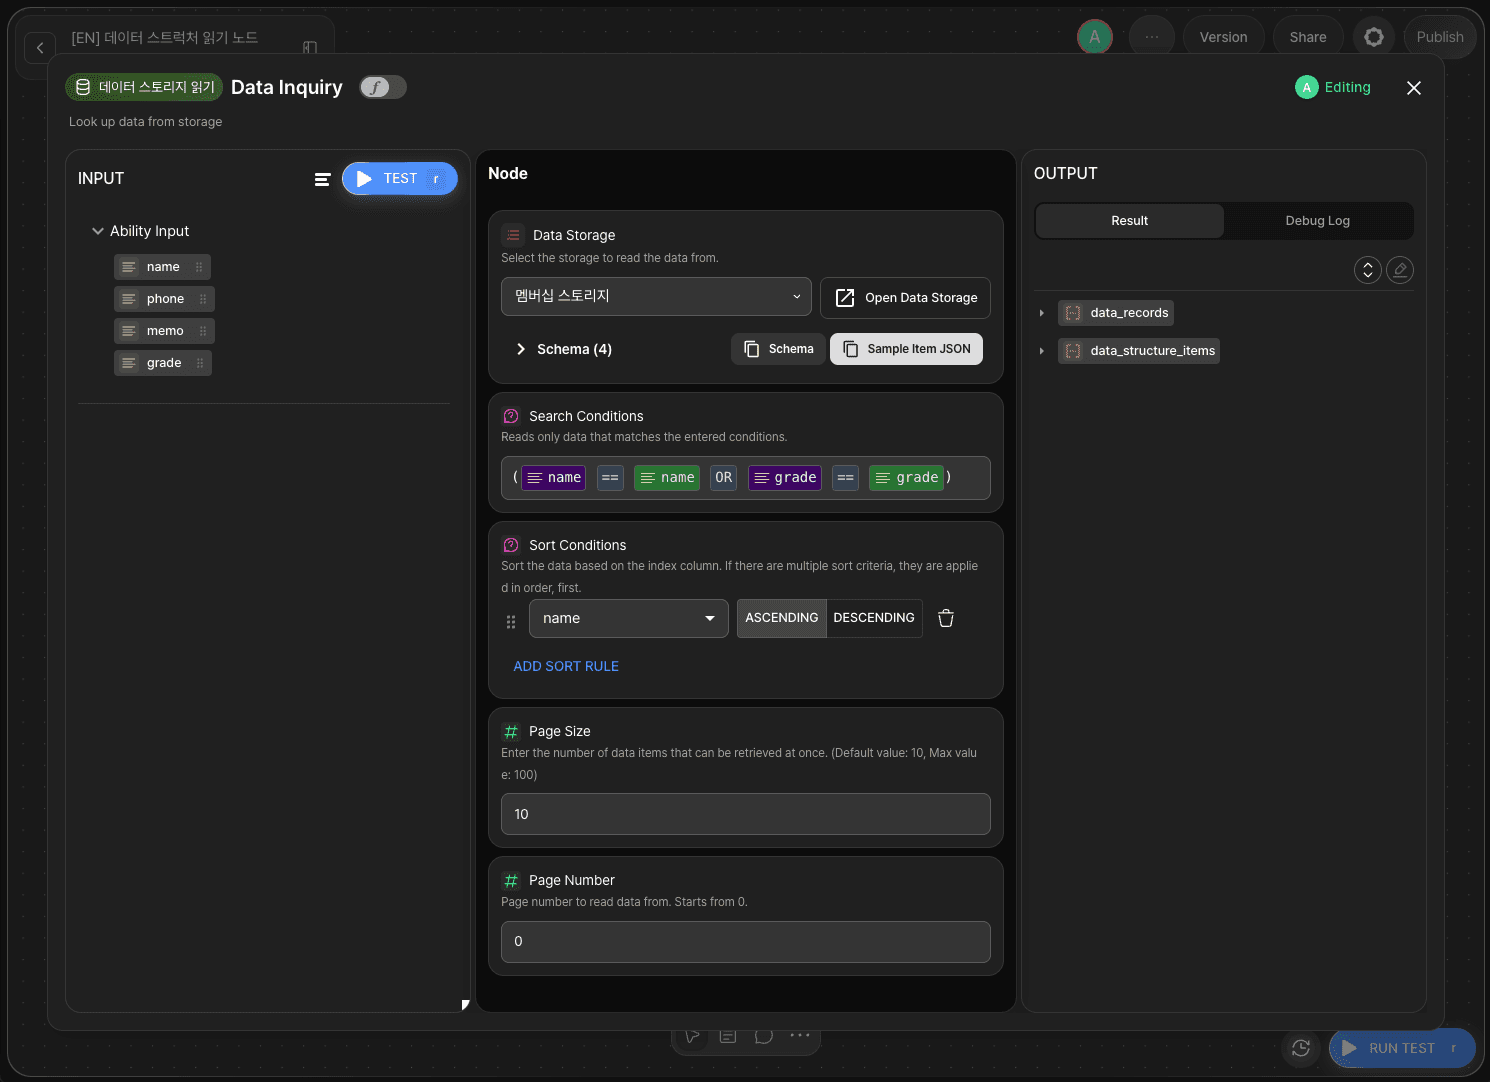
Double-click the DB Reader node to open the Node Editor.
The DB Reader node provides the following options.
Option | Required | Description |
|---|---|---|
| Required | Select the storage to query |
| Optional | Search condition (build by clicking columns, operators, and variables; typing also supported) |
| Optional | Sort the data returned by the search condition. Only indexed columns are selectable, and multiple conditions are applied in the order they're added |
| Optional | Number of records to retrieve at once (default 10, maximum 100) |
| Optional | Page number to retrieve. Pages are divided based on |
This tutorial configures storage, query, order_by, page_size, and page_number.
Select Storage
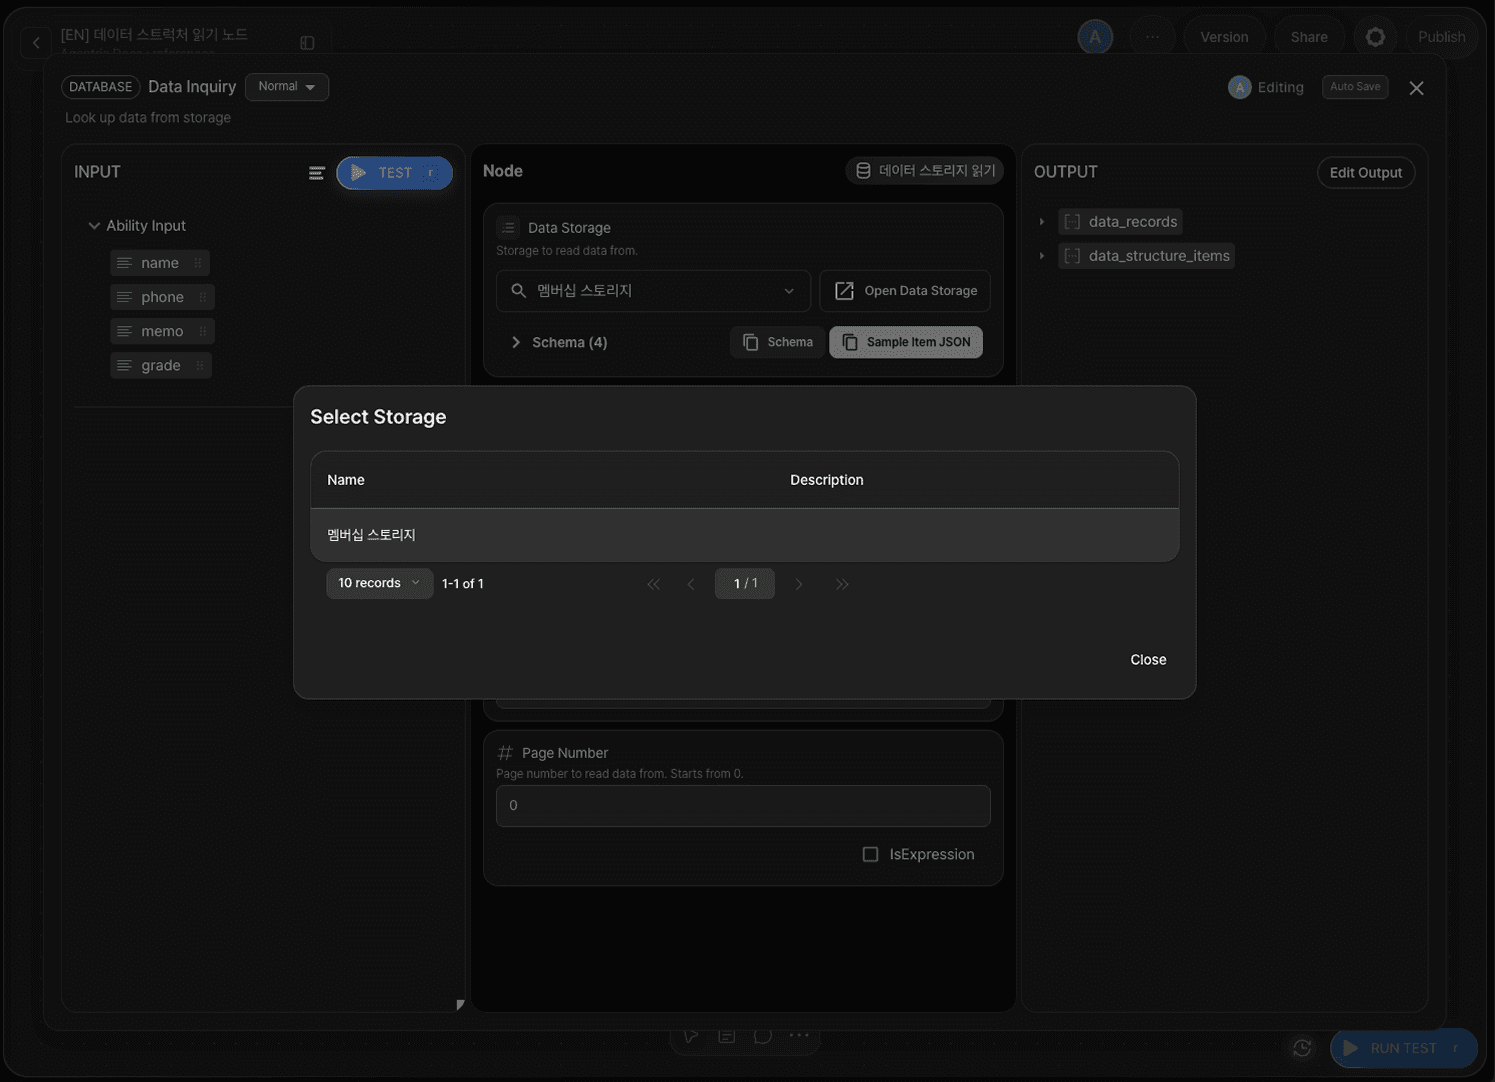
Click the Select Storage button to open the selection screen. Select the storage that holds the customer data.
Write the Search Condition
Build the condition expression in the query field by clicking columns, operators, and variables into place. To search by name, select name for the column, == for the operator, and name for the variable. You can also type it directly, as shown below.
You can also combine multiple conditions. Connect conditions with AND when all of them must be met, or OR when only one needs to be met.
When you have several conditions, you can group them with () to control how they're combined. The example below queries records where the name or phone number matches, and the grade also matches.
Sort Condition (order_by, Optional)
To sort the data returned by the search condition, add a rule under order_by. You can only sort by indexed columns, and you can choose ascending or descending order for each.
Click Add Sort Condition to register multiple rules. Sorting applies in the order the rules are added. The data is sorted by the first rule; then, only the records tied on that value are sorted again by the second rule; if there's a third rule, records still tied after the second rule are sorted once more by it.
For example, say you register grade (ascending) then name (ascending) as sort conditions.
All records are first sorted by
grade.Customers with the same
gradearen't yet ordered relative to each other, so only within that group are they sorted byname.Customers with different
gradevalues aren't affected by thenamerule — the order from step 1 is preserved.
The result is data grouped by grade, sorted by name within each grade.
Page Settings
Option | Value | Description |
|---|---|---|
|
| Maximum records to retrieve at once |
|
| First page (starts at 0) |
page_size can be set up to 100. To retrieve more than 100 records, increment page_number and repeat the query. Take page_size and page_number as input variables and call the node repeatedly using a Loop node — when the number of returned records is smaller than page_size, you've reached the last page and can stop.
Rather than collecting every page before processing, process each page as soon as it's retrieved. Accumulating the full dataset in memory can cause performance issues when the volume is large.
Step 4: Configure the LLM Node (Optional)
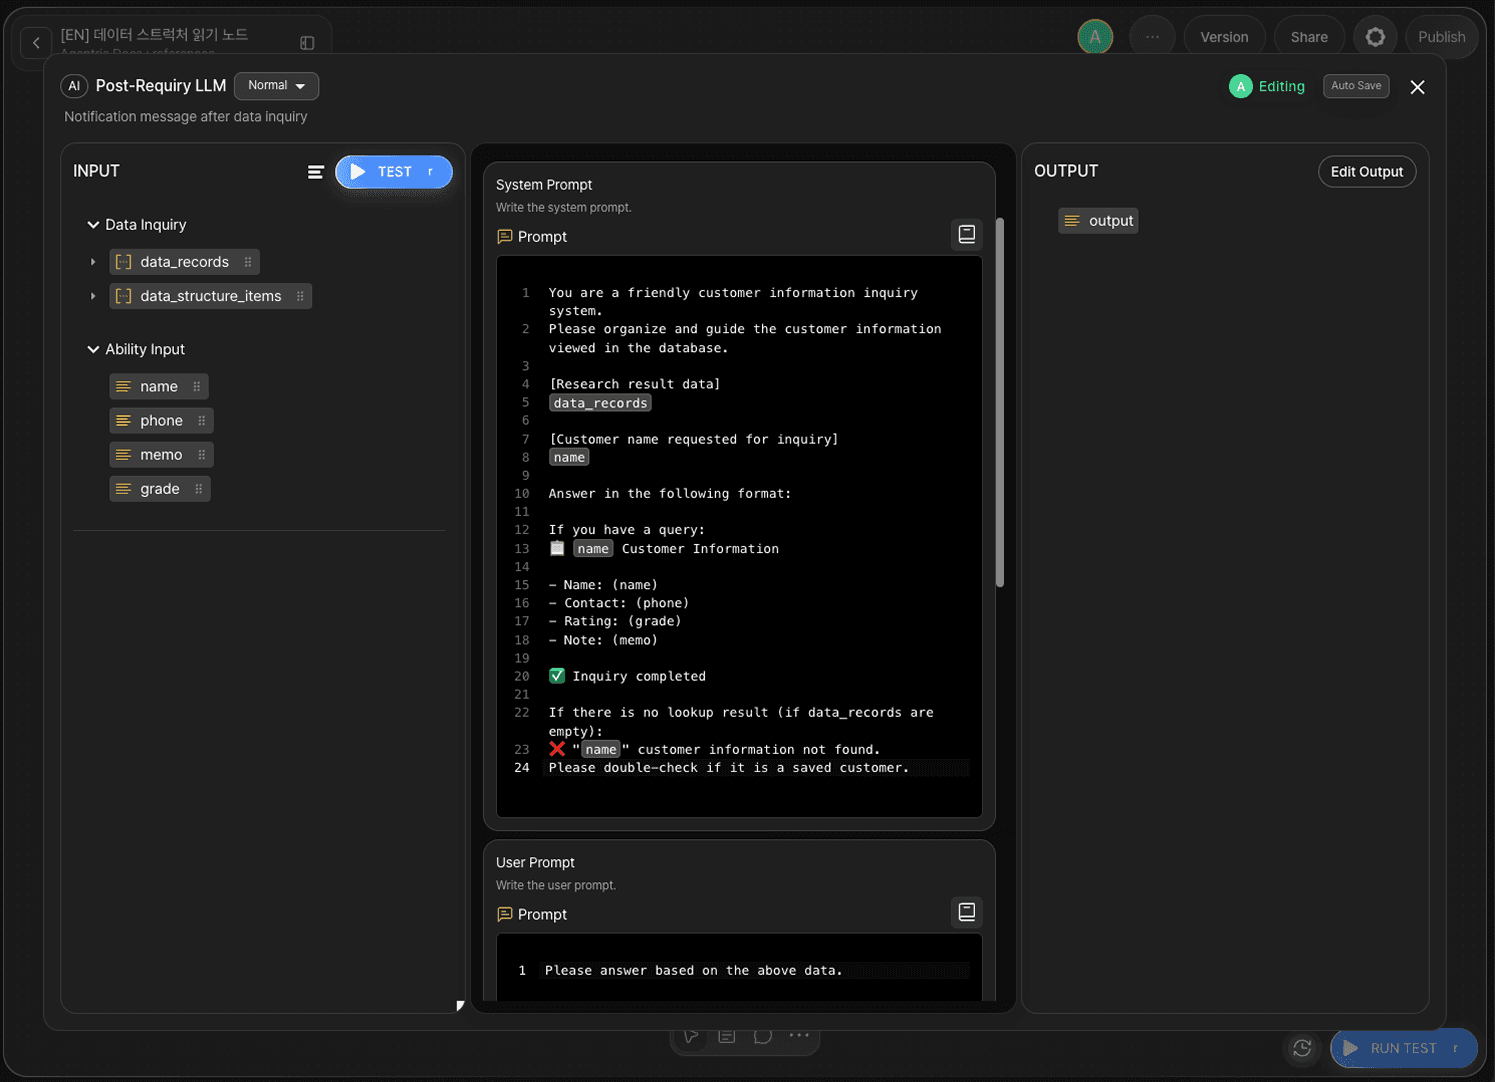
To format the retrieved data as a natural language message, add a prompt to the LLM node. Double-click the LLM node to open the Node Editor and enter the following in the System Prompt field.
The LLM node is optional. If omitted, connect the DB Reader node's Out-Pin directly to the Output Node.
Step 5: Configure the Output Node
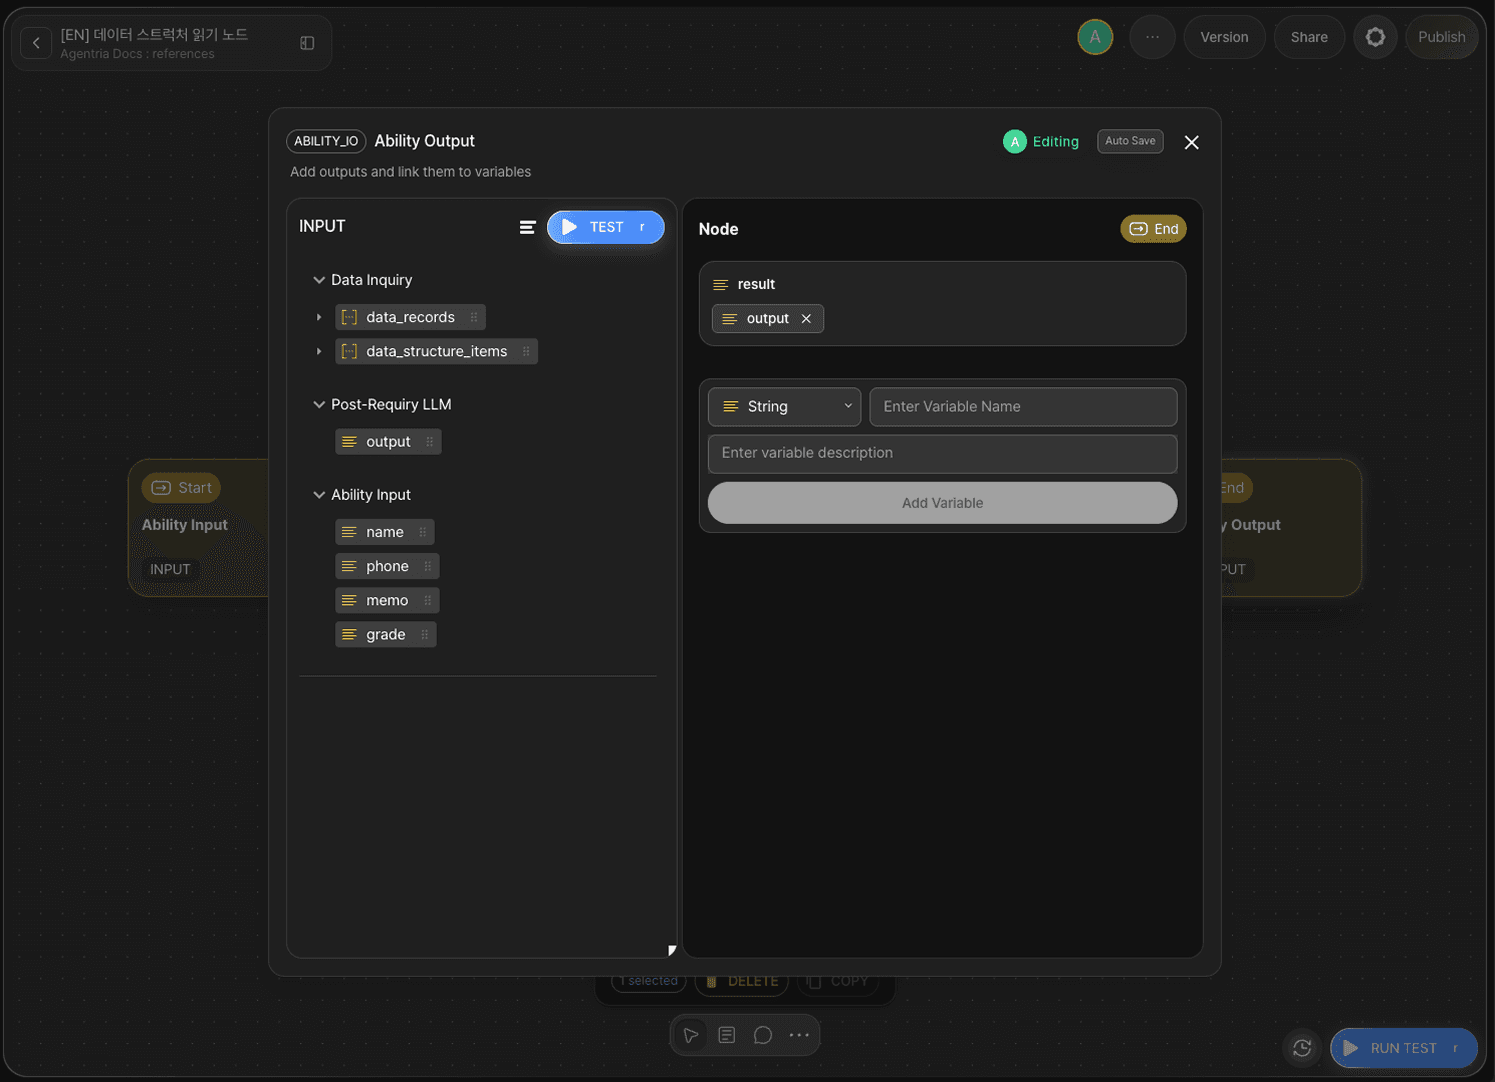
Double-click the Output Node to open the Node Editor. Add the following variable to the Output Section.
Variable | Type |
|---|---|
| String |
Drag and drop the output variable from the LLM node onto the result variable in the Output Node.
Connect the edges.
Out-Pin of
Input Node→ In-Pin ofDB Reader nodeOut-Pin of
DB Reader node→ In-Pin ofLLM nodeOut-Pin of
LLM node→ In-Pin ofOutput Node
Step 6: Run Test
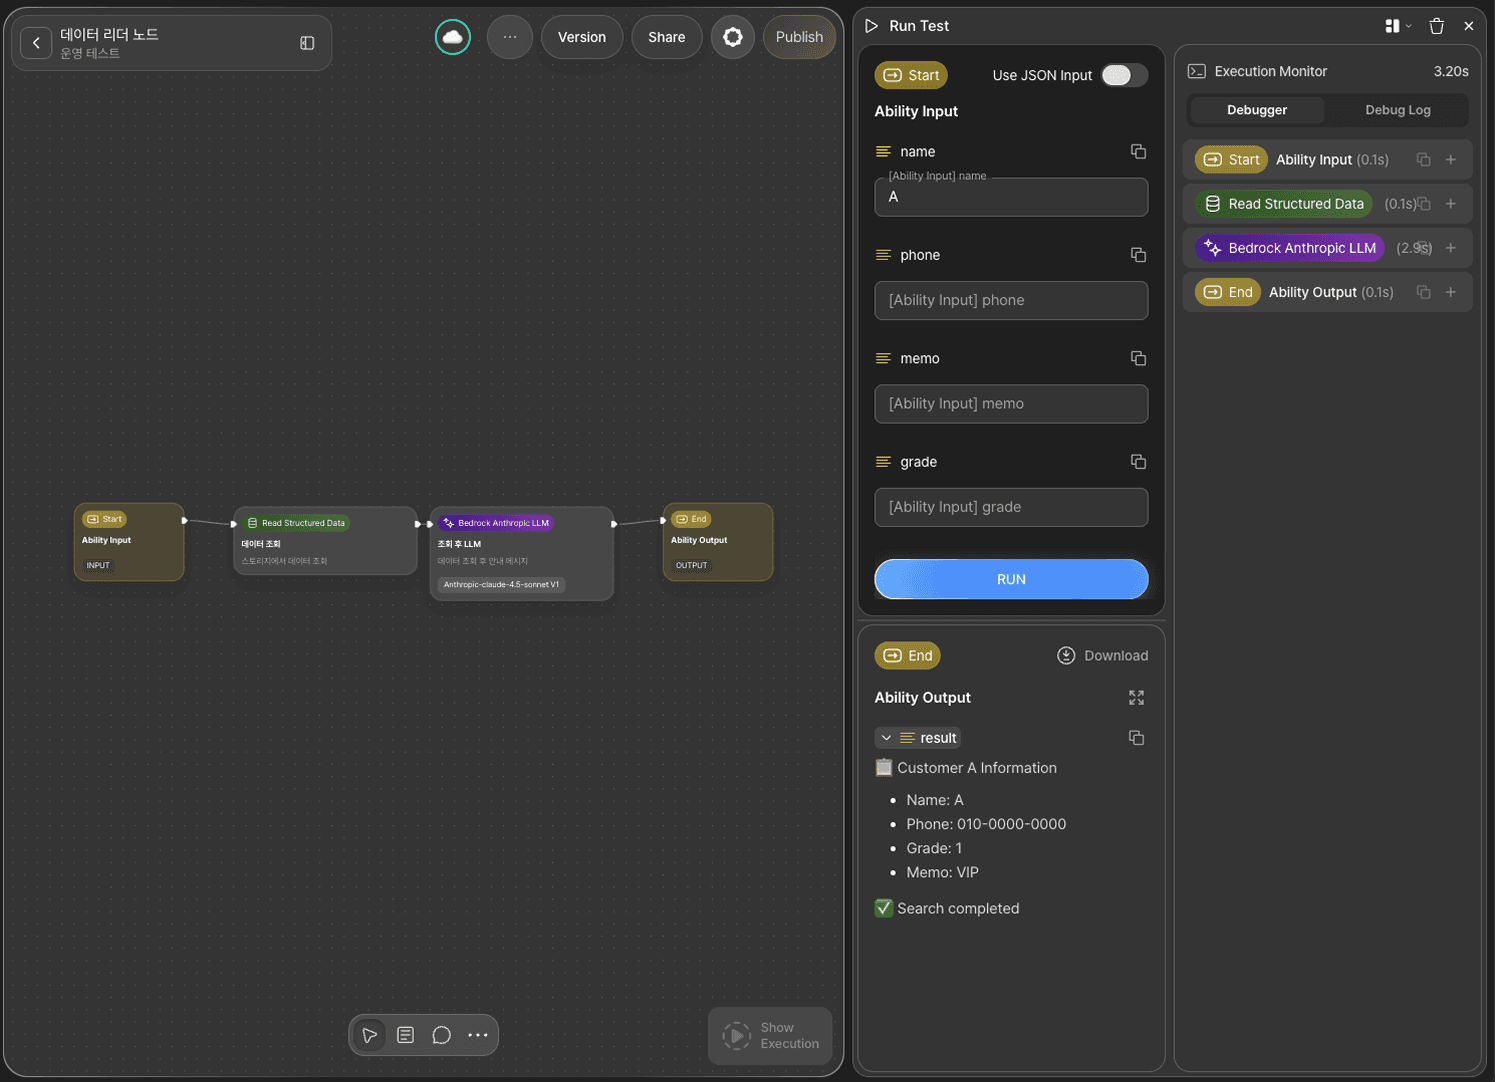
Click the RUN TEST button at the bottom right of the canvas.
Enter the customer name to search for in the name field and run the test — the matching customer's information will be returned as output.
Next Steps
🎉 Congratulations! You've successfully built the "Customer Data Query" workflow using Agentria.
Try combining multiple search conditions, or extend the workflow by passing the retrieved results to a DB Updater node for editing.
Agentria is a place where ideas become reality—your workflow can expand infinitely with your creativity.
For more node examples, visit the 🔗Node Usage page.