Get Started
Learn Node Usage - Ability Node
This tutorial explains how to use the Ability node in Agentria. The Ability node loads and runs another Ability you created in advance as a node inside the current workflow. Once you build an Ability that handles a specific function, you can reuse it across multiple workflows as a node.
In this tutorial, you will first create an “Exchange Rate Converter” Ability that converts USD amounts to KRW and publish a version of it. Then you will load it with the Ability Node and complete a workflow that converts product prices into KRW.
Prerequisites
For how to enter the Agentria canvas, refer to 🔗3-Step Core Guide.
To use the Ability Node, the Ability you want to load must already be completed and have a version created. Therefore, this tutorial is divided into two parts.
A. Create a prerequisite Ability: Build the “Exchange Rate Converter” Ability to be loaded and create a version.
B. Use the Ability Node: Load the Ability as a node and run it.
After completing this tutorial, you will be able to:
Create a reusable Ability and publish a version.
Place an
Ability Nodeon the canvas and select the Ability to load.Use Binding to connect variables in the current workflow to the Ability’s input variables.
Pass the
Ability Nodeoutput to the End node.
💡 When is the Ability Node useful?
If you have functionality that repeats across many workflows—such as currency conversion, date formatting, or internal terminology translation—create it as a single Ability and reuse it via theAbility Node. Managing logic in one place makes maintenance easier: update the Ability, publish a new version, and apply it across workflows by switching the version in the node.
A. Create a prerequisite Ability
First, create the Ability that the Ability Node will load. Here, we will build a simple Ability named USD→KRW Exchange Rate Converter that converts USD to KRW.
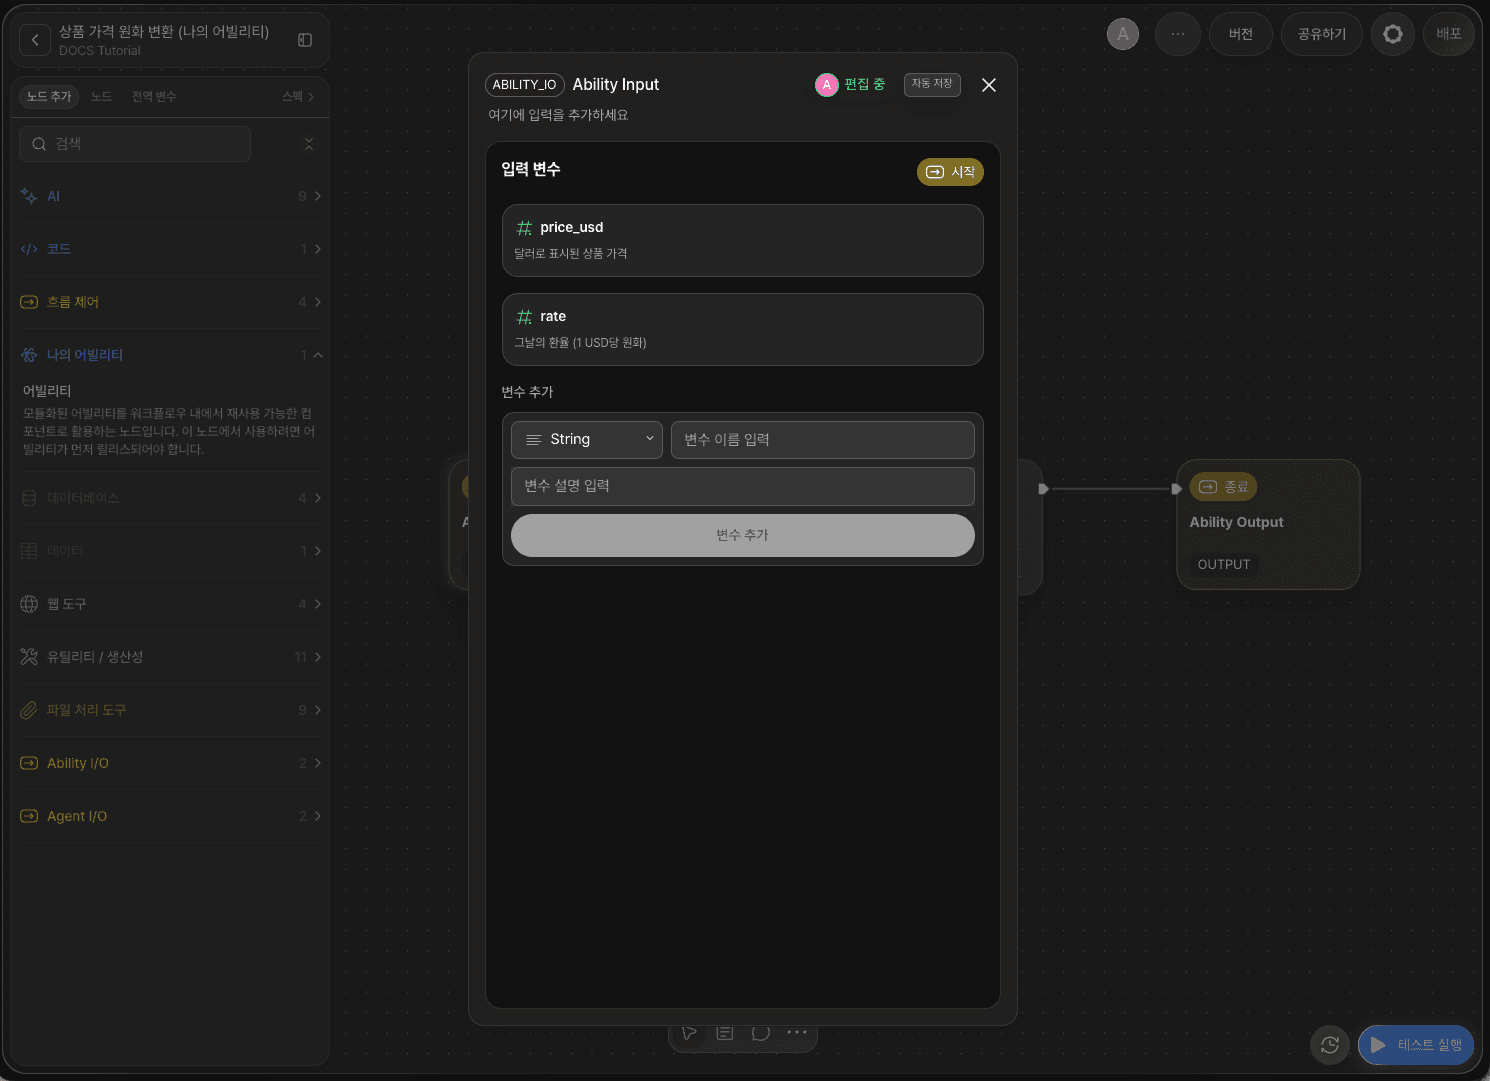
Step A-1: Declare input variables
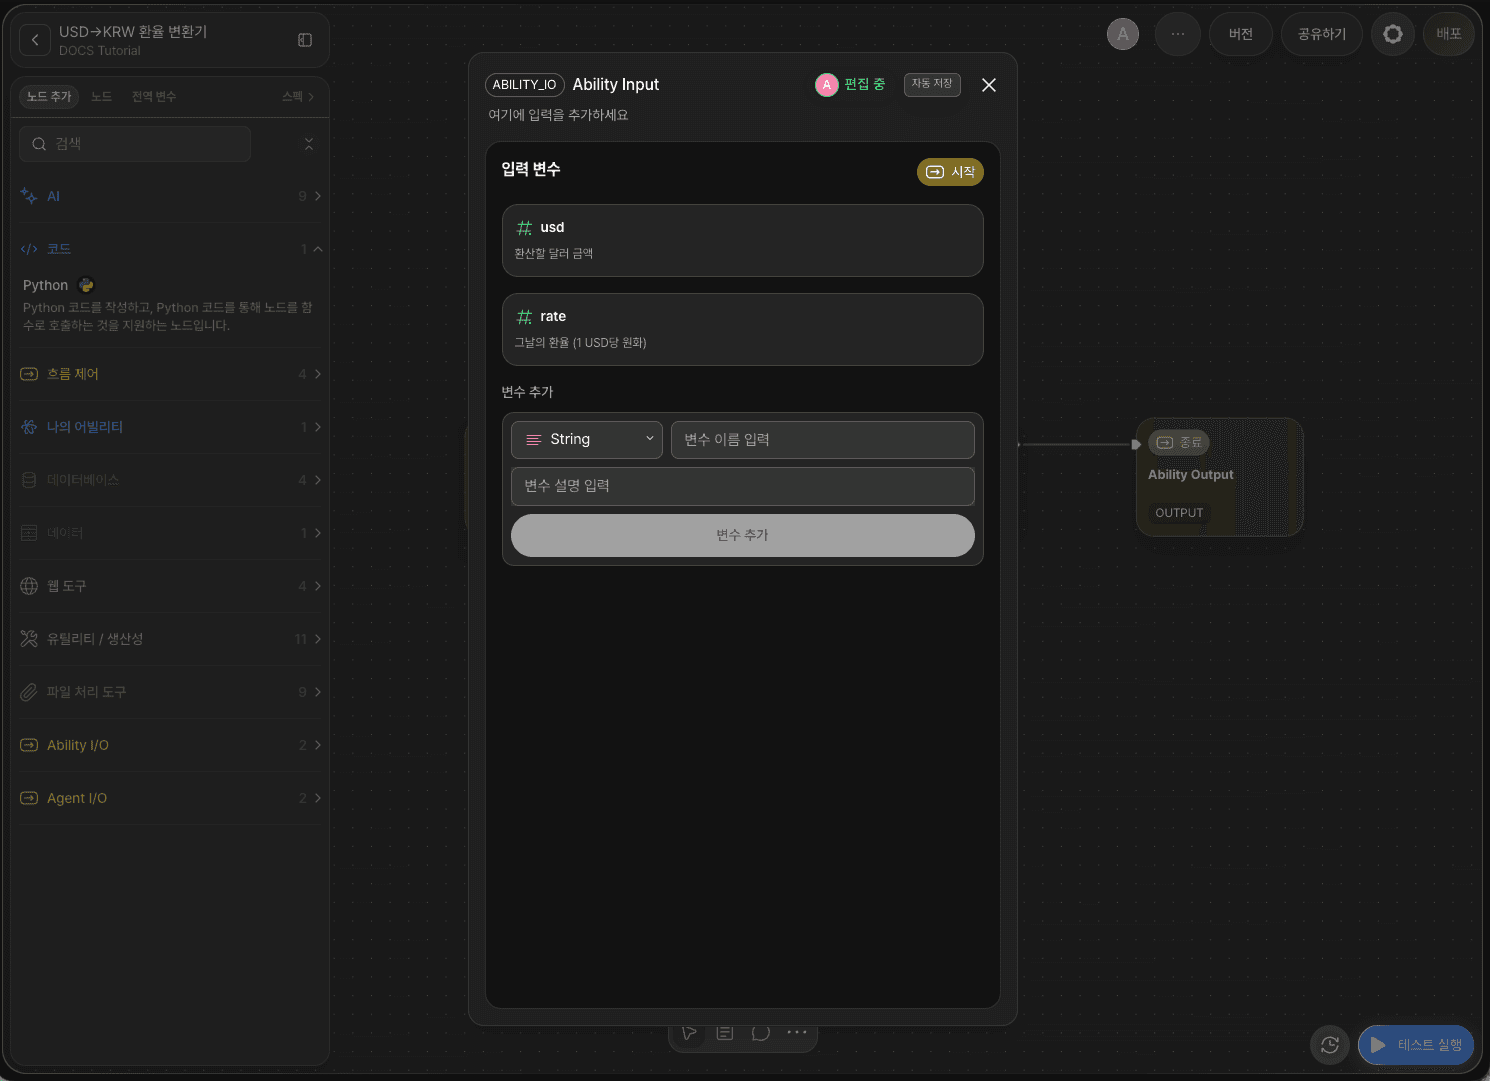
Create a new Ability, then double-click the Start Node to open the Node Editor.
Add the following variables under Input Variables.
Variable | Type |
|---|---|
| Float |
| Float |
usd is the USD amount to convert, and rate is the exchange rate for the day (KRW per 1 USD). Because exchange rates change daily, we will receive it as an input rather than using a fixed value.
You can choose between Float and Integer for number types. Because USD amounts and exchange rates may include decimals (e.g.,
19.99,1352.5), define them as Float.
Step A-2: Write the conversion logic with a Python node
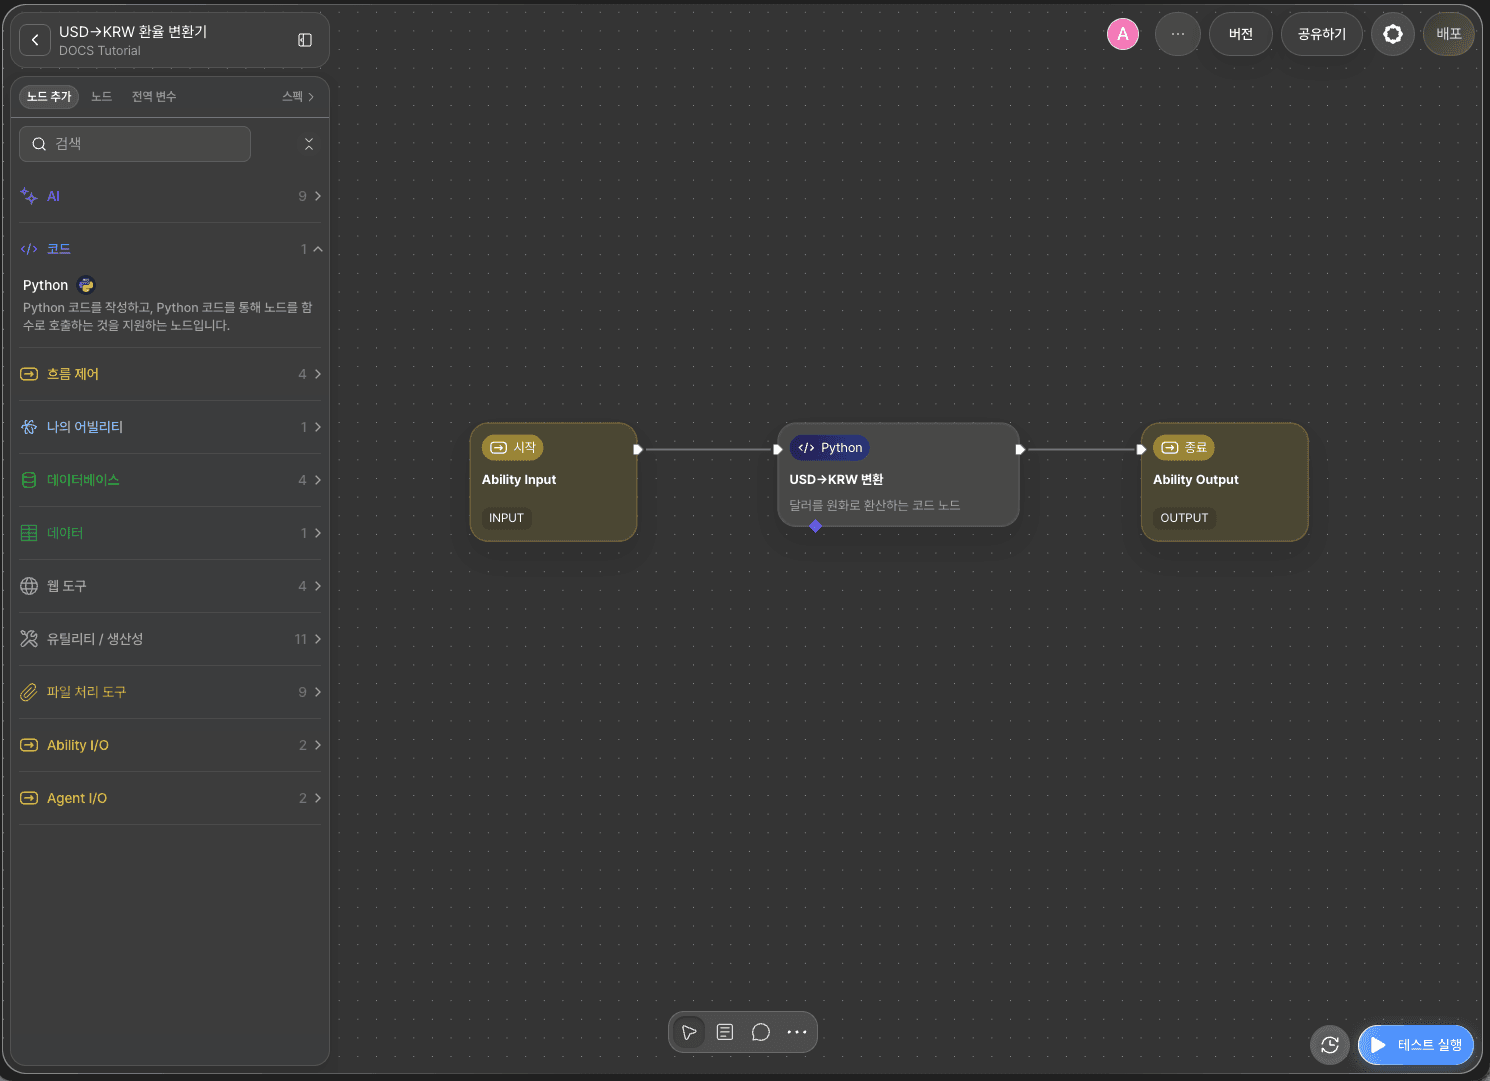
Go to + Add Node → Code, place a Python node, and connect it to the Start Node with an edge.
Double-click the Python node and enter the following code.

After writing the code, add an output variable in the Output Section with the same name as the key returned by return.
Variable | Type |
|---|---|
| Integer |
Code nodes return results in the form
return {"key": value}. You must declare an output variable with the same name as the returned key. For Code node authoring rules (available libraries, unsupported functions, etc.), refer to 🔗Using Code Nodes (Python).
Step A-3: Connect the End node
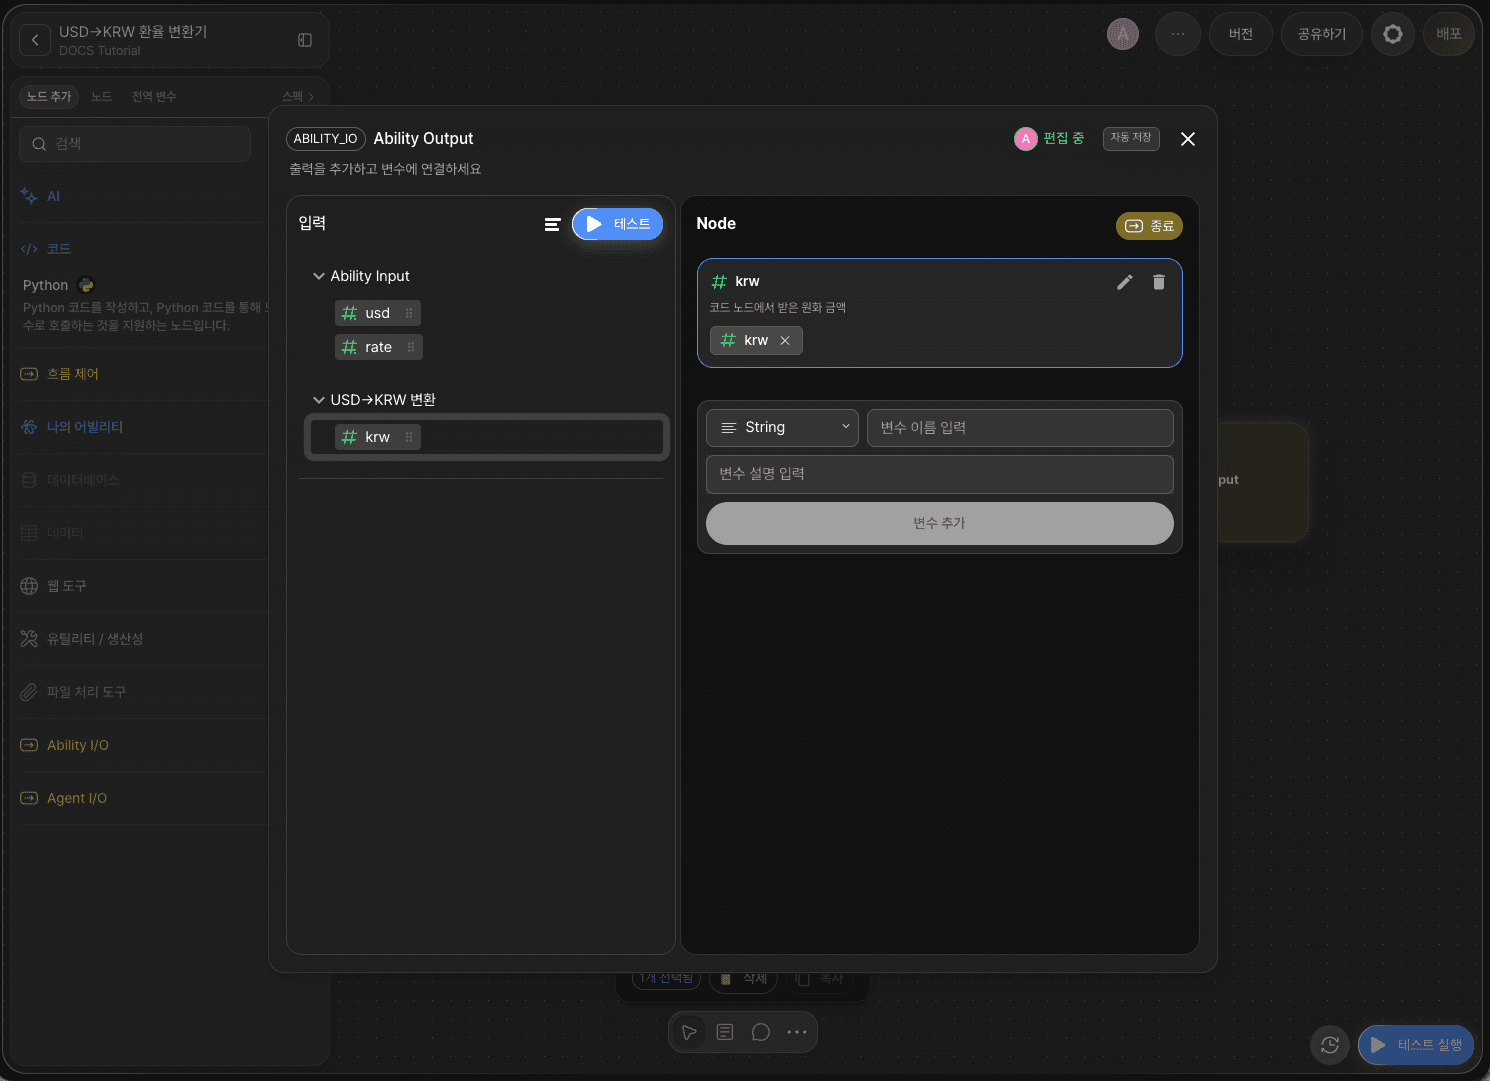
Connect the Python node and the End Node with an edge.
Double-click the End Node, add krw (Integer) under Outputs, then connect it to the Python node’s krw output via drag and drop.
You have now completed an exchange-rate converter Ability that receives usd and returns krw.
Step A-4: Create a version (required)

The Ability Node can only load Abilities that have a version created.
Click Version in the top-right of the canvas to open the version history panel. Click the + icon, enter the version number and change log, then click Create.
Field | Example |
|---|---|
Version |
|
Change Log |
|
You can later select a version to roll back if needed. For versioning guidelines and how to roll back, refer to 🔗Managing Versions.
Now you are ready to use the Ability Node.
B. Use the Ability Node
Next, create a new Ability and load the USD→KRW Exchange Rate Converter you just created as an Ability Node.
Workflow overview
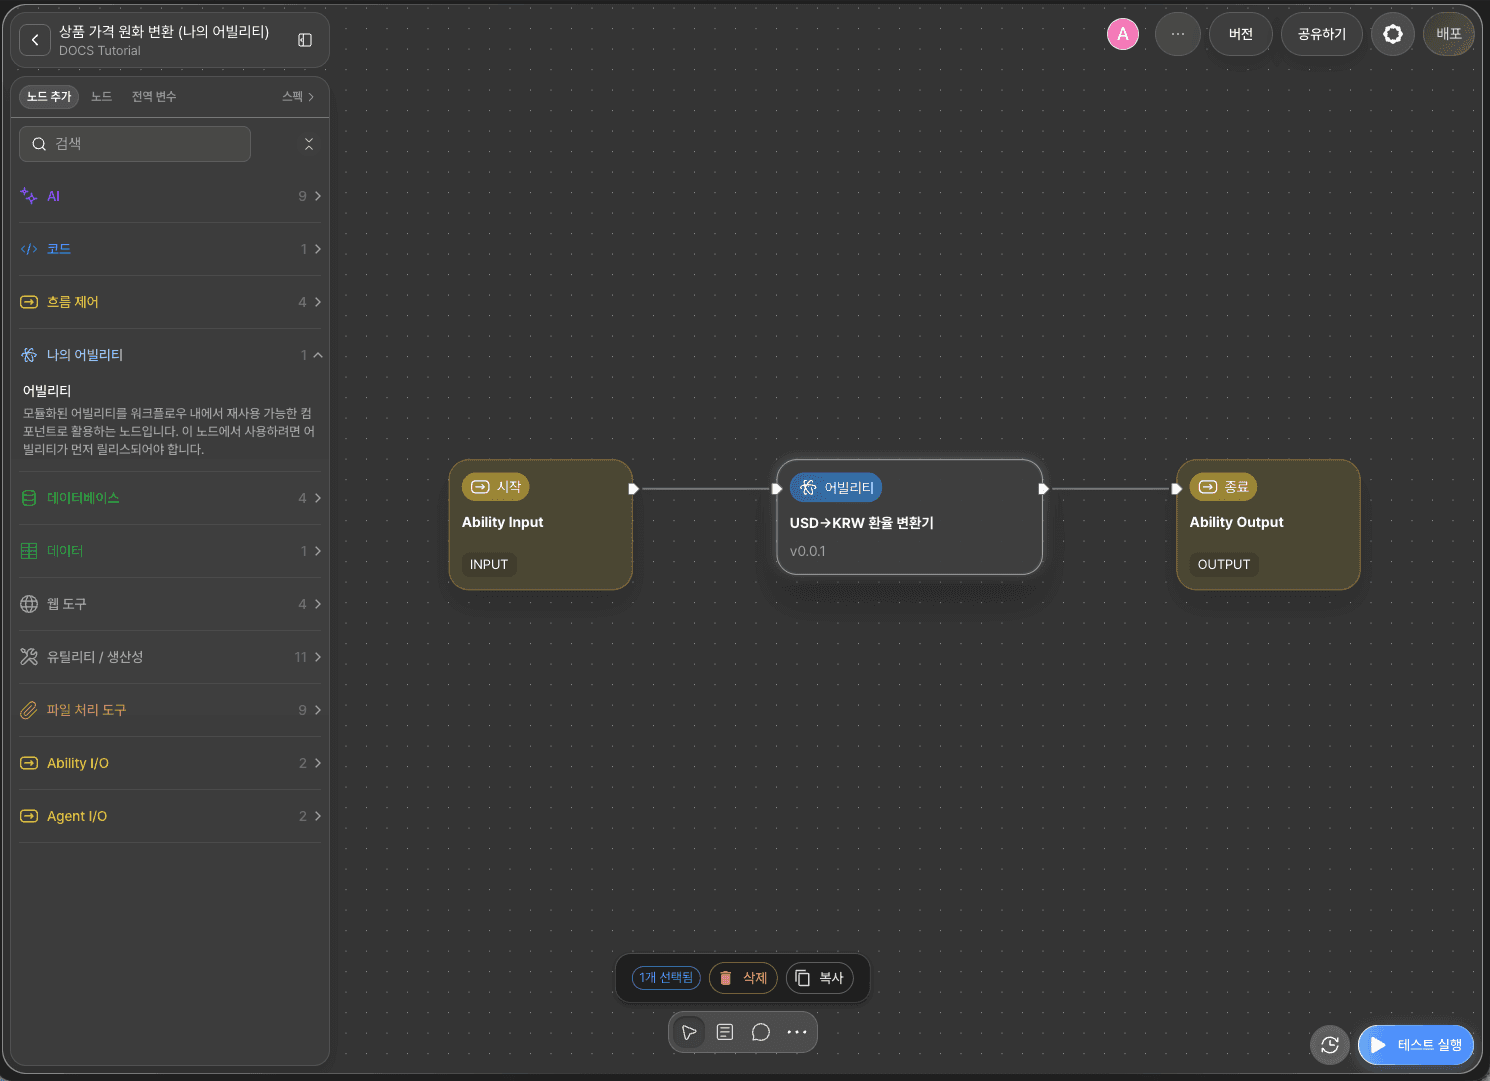
Overall flow: Start Node → Ability Node → End Node
The key focus of this tutorial is the Ability Node.
The Ability node runs the selected Ability internally and passes its output back to the current workflow. In the Node Editor, select the Ability and version to load, then use Binding to connect current workflow variables to the Ability’s input variables.
Step B-1: Declare input variables (Start Node)
Create a new Ability, double-click the Start Node, and add the following input variables.
Variable | Type |
|---|---|
| Float |
| Float |
price_usd is the product price in USD, and rate is the exchange rate for the day.
Step B-2: Add an Ability Node
From the node list on the left, drag and drop Ability Node from the My Ability category onto the canvas.
When the Create Ability Node pop-up appears, select the Ability USD→KRW Exchange Rate Converter and the version you created in advance, 0.0.1.

Step B-3: Connect nodes and verify Ability/version
Connect the Start Node’s Out-Pin to the Ability Node’s In-Pin with an edge.
Double-click the Ability Node to open the Node Editor.
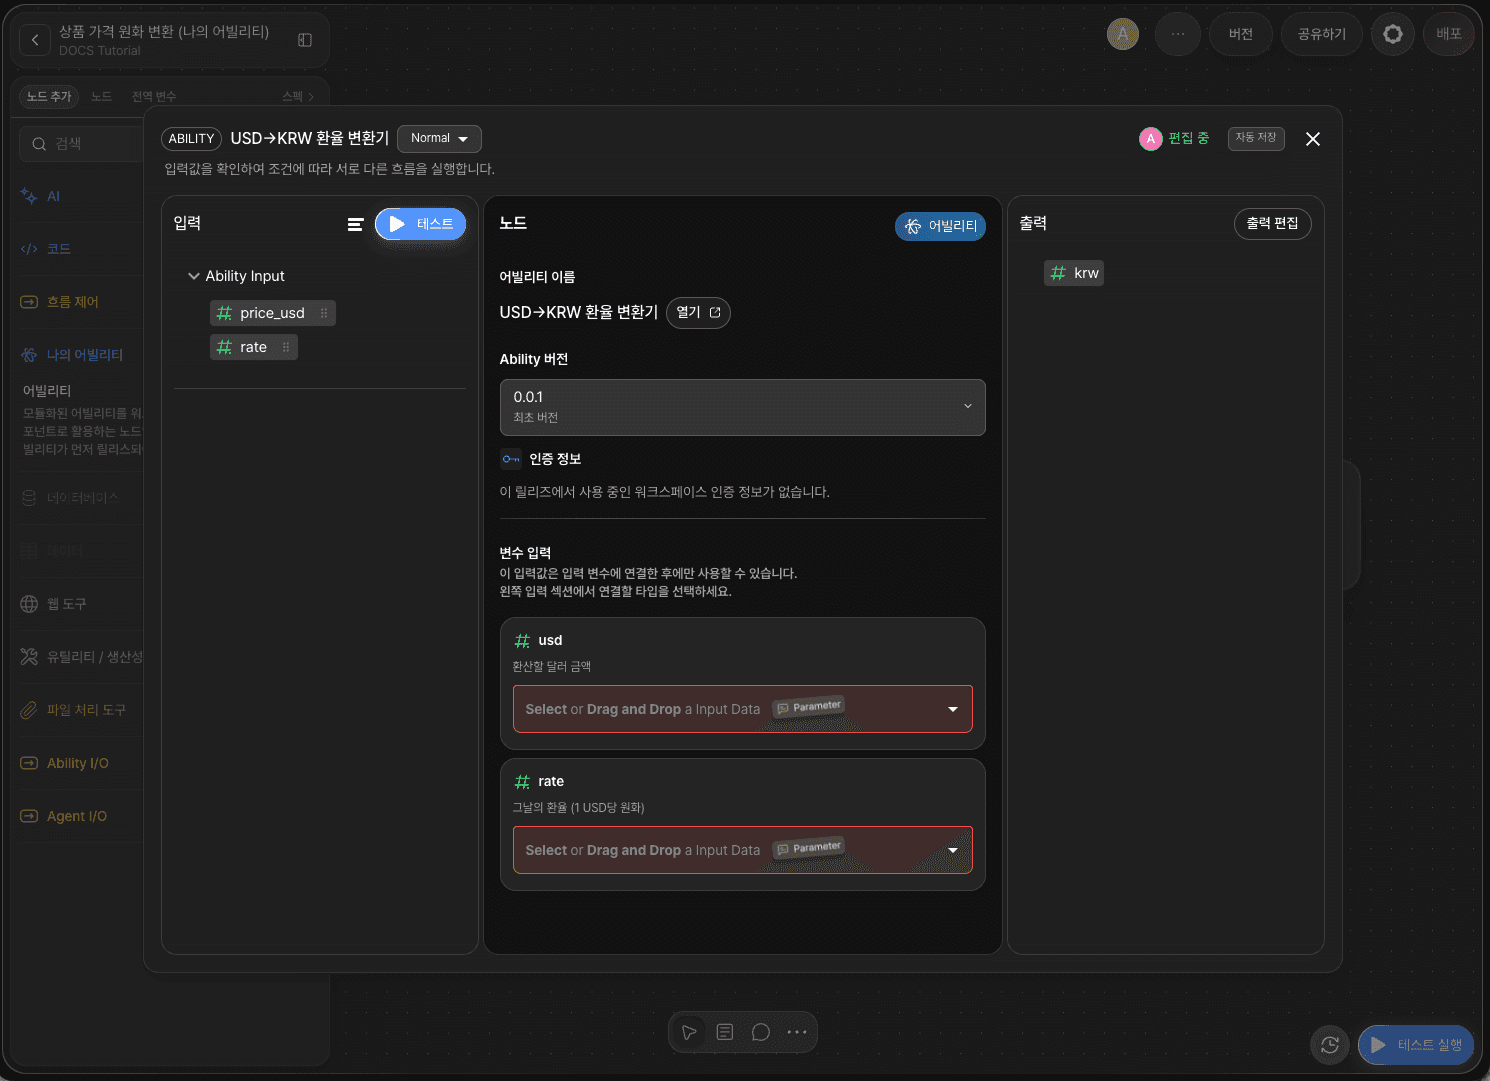
The Node Editor consists of three sections: Input, Node, and Output. In the center Node section, you can review the Ability Node settings.
Item | Description |
|---|---|
Ability name | Shows the loaded Ability name. Click |
Ability version | Select the Ability version to use. You can change it later from the same dropdown. |
Credentials | If the loaded Ability uses credentials, configure them here. This example does not require credentials. |
Variable inputs | Connect the current workflow variables to the Ability’s input variables. (See Step B-4) |
In the
Inputsection, you will see the current workflow variables (price_usd,rate) passed from the Start Node. In theOutputsection, you will see the variables returned by the Ability (krw).
Step B-4: Connect variables via Variable inputs
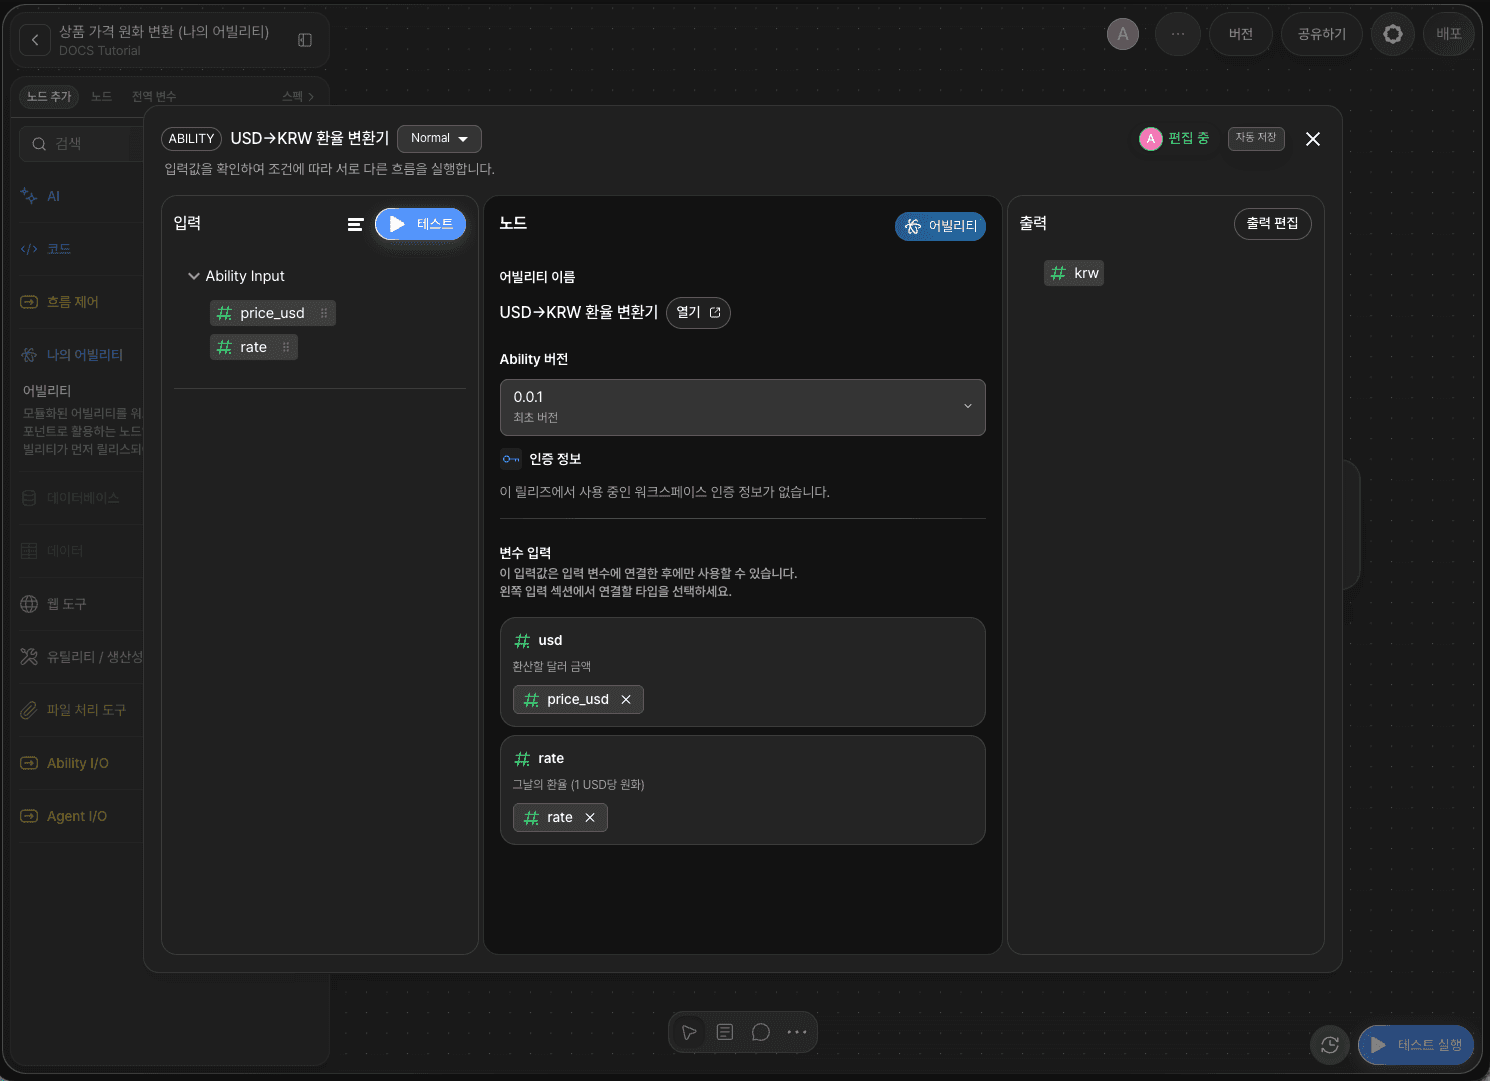
Under Variable inputs in the Node section, the loaded Ability’s input variables (usd, rate) are listed in order.
Click the Select or Drag and Drop a Input Data field under each variable to open the list of current workflow variables (price_usd, rate). Choose the variable to connect, or drag and drop from the Input section.
Ability input | Current workflow variable |
|---|---|
|
|
|
|
Both variables must be connected for the Ability to run correctly.
Once connected, the values of price_usd and rate will be passed into the Ability as usd and rate. After the Ability finishes running, its output variable (krw) appears in the Output section and is delivered as the Ability Node output.
Why variable mapping matters The Ability Node acts as a “bridge” between the current workflow and the loaded Ability. Even if variable names differ between the workflow and the Ability, pairing them in Variable inputs ensures the values are transferred accurately.
Step B-5: Connect the End node
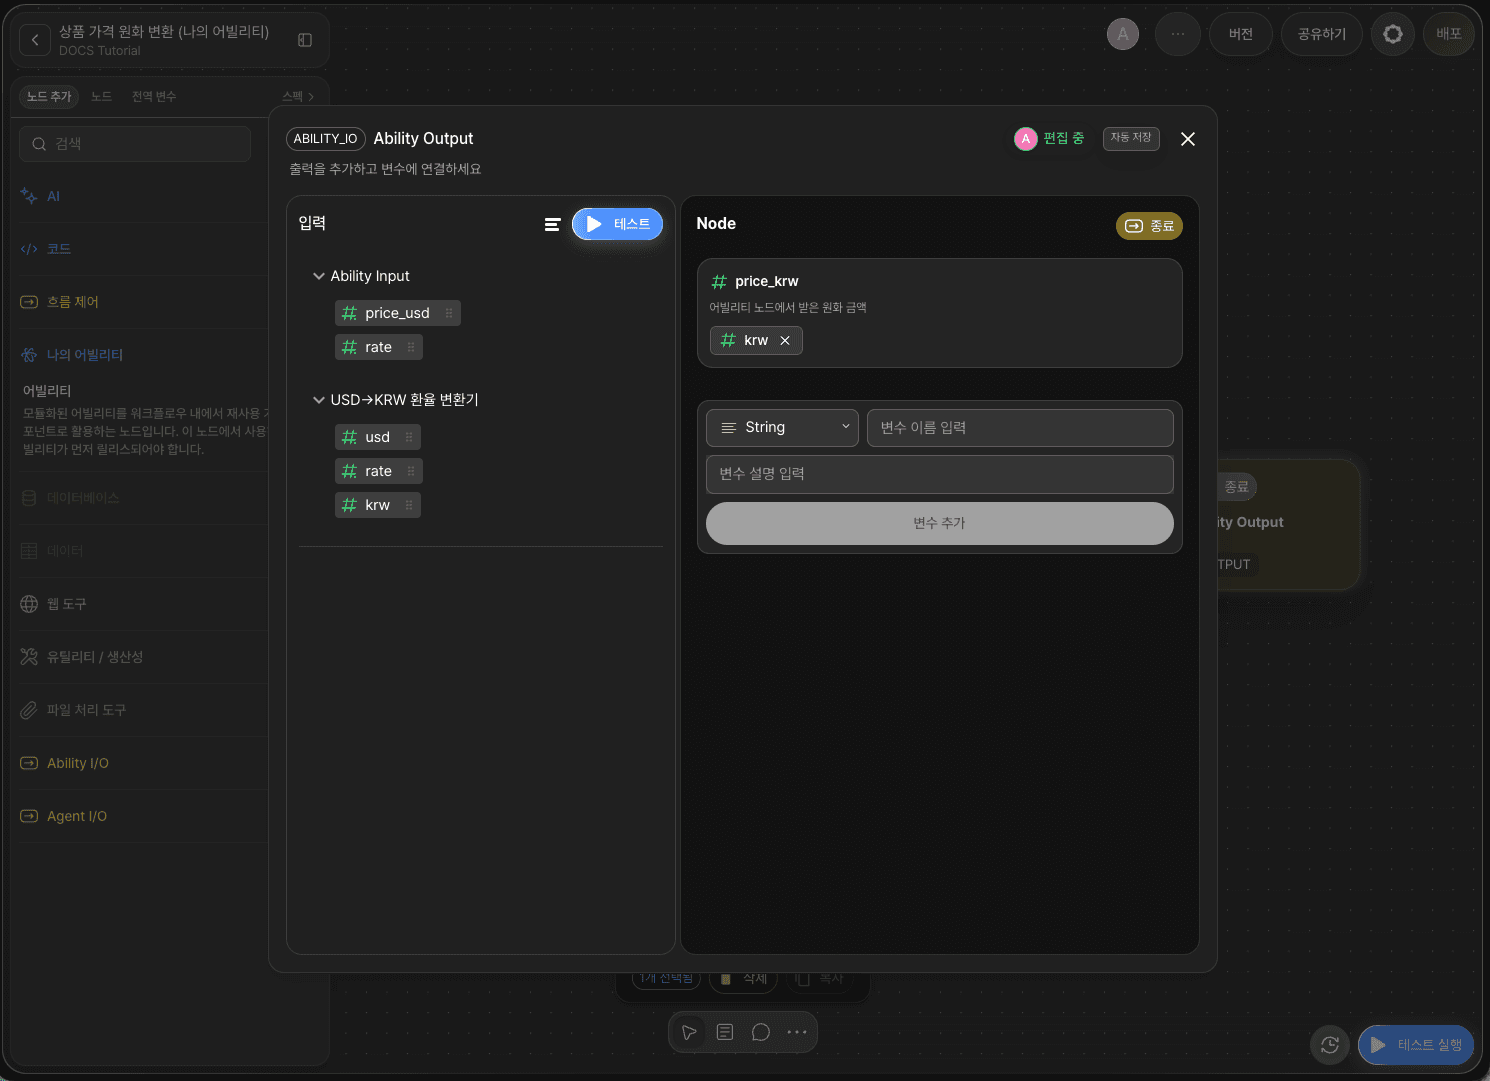
Connect the Ability Node’s Out-Pin to the End Node’s In-Pin with an edge.
Double-click the End Node, add price_krw (Integer) under Outputs, then connect it to the Ability Node’s output variable krw via drag and drop.
Variable | Type |
|---|---|
| Integer |
You have now completed the “Convert product price to KRW” workflow.
Step B-6: Run the entire workflow with Ability Test
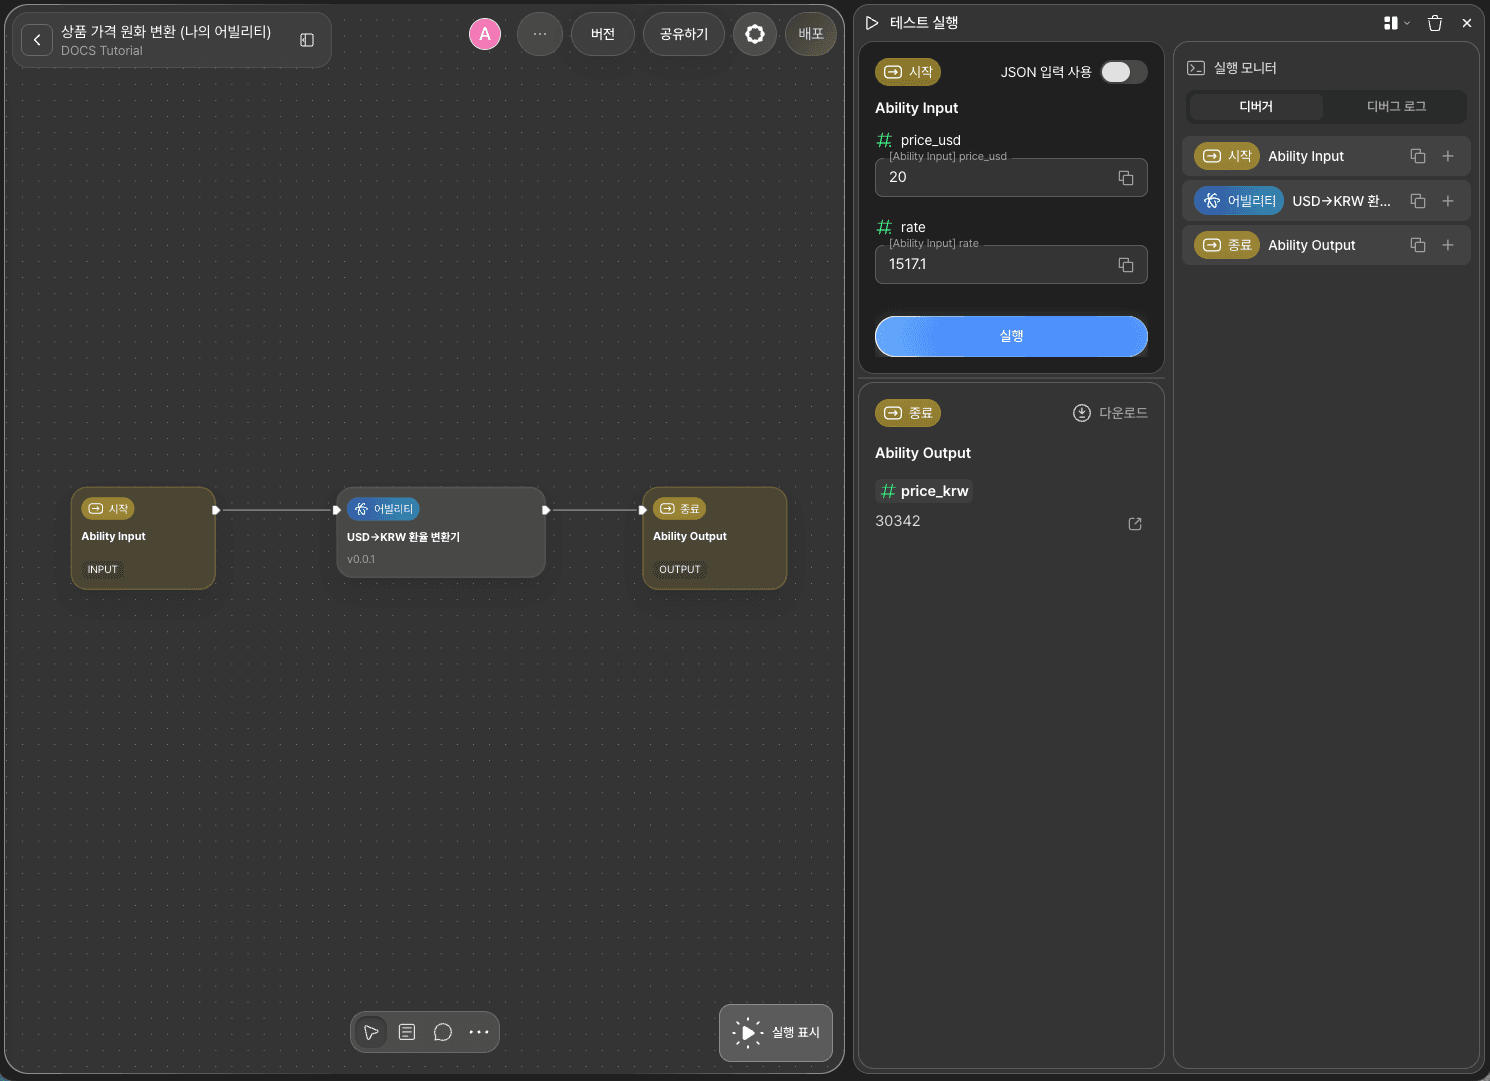
Click RUN TEST in the bottom-right of the canvas to run an Ability Test.
Enter an amount in price_usd (e.g., 20) and an exchange rate in rate (e.g., 1517.1), then run the test. The Ability Node will run the USD→KRW Exchange Rate Converter and return the result.
Input ( | Output ( |
|---|---|
|
|
Confirm that price_krw is returned correctly in the End Node output.
Next steps
🎉 Congratulations! You have completed an “Ability Node” workflow using Agentria.
The Ability Node helps you create reusable functionality as an Ability and reuse it across multiple workflows as a node. When you need to modify the Ability logic, update the Ability, publish a new version, then switch the version in the Ability Node.
Agentria is a space of possibility where ideas become reality.
With your imagination, workflows can expand without limits.
To explore more Ability examples, see 🔗Ability Guide.
For Agent examples, see 🔗Agent Guide.