Slip Link Node
Using Slipbox Nodes (Link Slips)
The Link Slips node creates a structural relationship from one Slip (the source) to one or more other Slips (the targets). The relationship carries a type drawn from a closed vocabulary (e.g., a classification relationship, a composition relationship), and you can optionally layer a business-level predicate on top of it. Once created, the relationship shows up in each Slip's References area.
This node also works well connected to an agent as a tool, but this tutorial covers it in an Ability to walk through the most basic usage first. Connecting it to an agent will be covered in a separate Slipbox agent integration guide. In this tutorial, you'll build an Ability workflow that creates two test Slips in the Agentria Docs slipbox and links them together.
Before You Begin
A slipbox must already be set up in your project before starting this tutorial. For instructions on building a slipbox, see the 🔗Slipbox Guide. This tutorial creates two test Slips inside the Agentria Docs slipbox to use along the way.
After completing this tutorial, you will be able to:
Use the Link Slips node to create a structural relationship between Slips.
Connect each input variable of the Link Slips node to the Start Node's input values.
Tell apart the relationship type from the domain predicate and use each appropriately.
Verify the relationship was created successfully by running the test and checking the debug log.
Workflow Overview
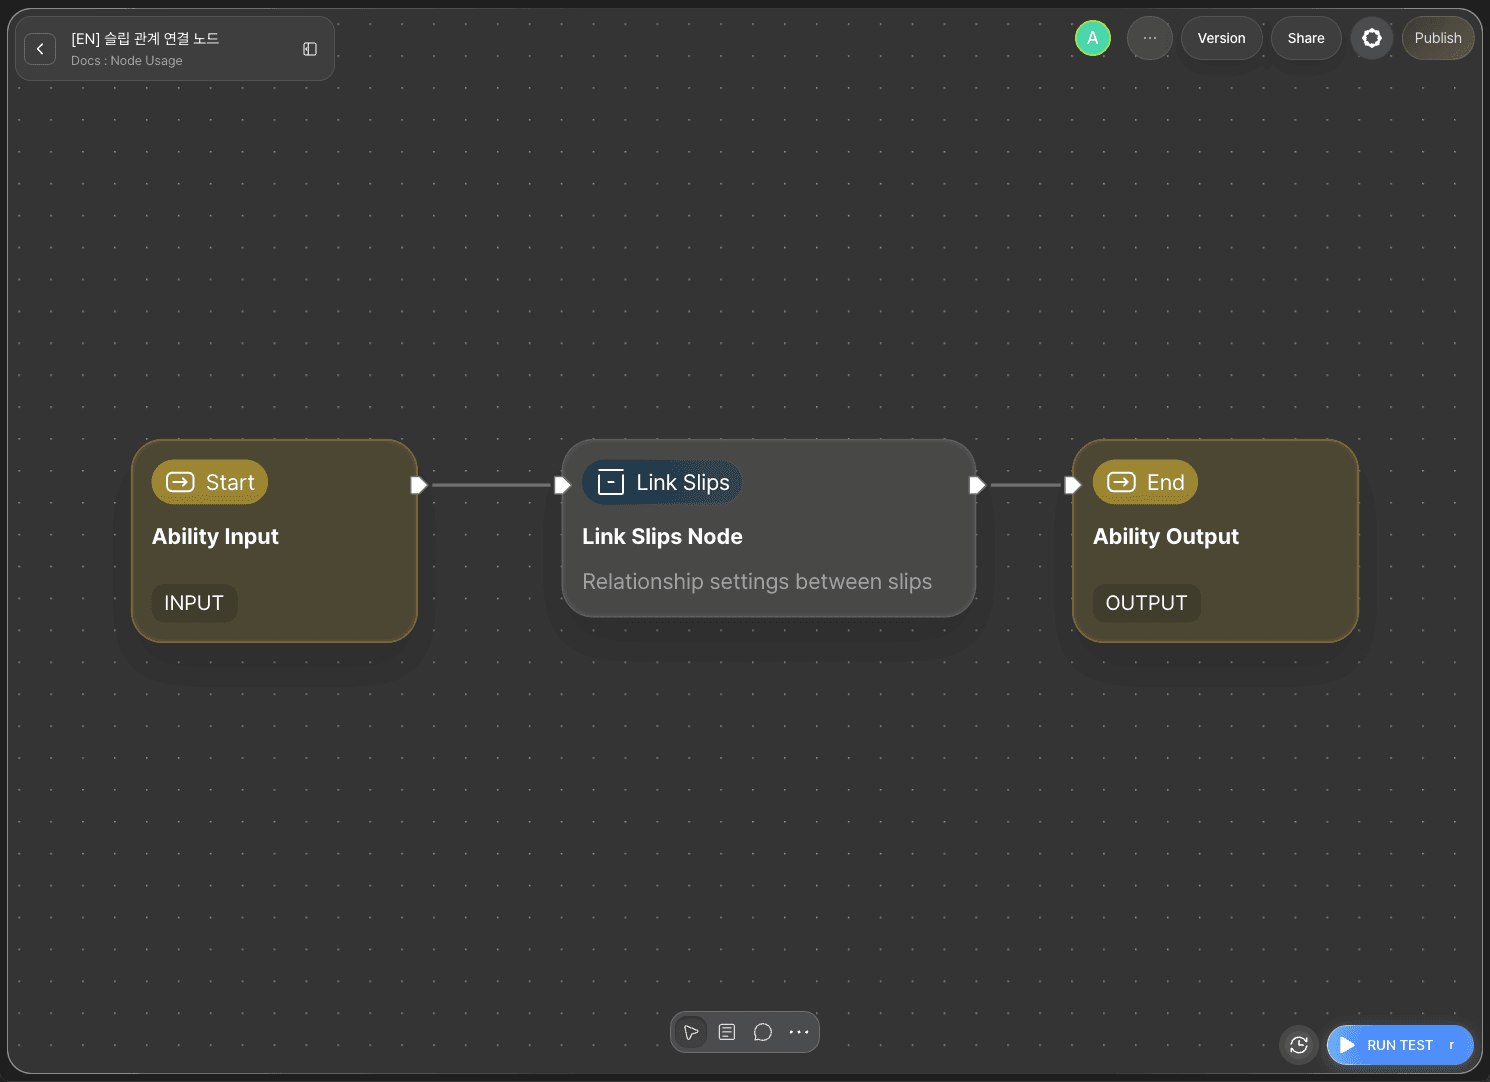
The core of this tutorial is the Link Slips node.
The Link Slips node identifies the source Slip by its UUID and passes in a list of target Slip UUIDs along with a relationship type. Once the node runs successfully, it creates an outgoing relationship from the source Slip to each target, and all targets are connected with the same type and predicate.
Link Slips Node Basic Info
The Link Slips node provides the following options.
Option | Required | Description |
|---|---|---|
| Required | The UUID of the Slip the relationship starts from. This Slip is being modified, so you need edit permission on it. |
| Required | A structural relationship type. One of a closed vocabulary of 13 values — pick the narrowest one that fits ( |
| Required | A list of UUIDs for the Slips to link to. All of them are connected with the same type and predicate. Any UUID that doesn't exist in this Slipbox is skipped, and this is reported in the result. |
| Optional | A business-level relationship name layered on top of the structural type (lowercase snake_case, e.g. |
| Required | The Slipbox this node operates on. Bound at design time in the builder. |
This tutorial uses all five options.
The Full List of 13 Relationship Types
The closed vocabulary you can use for Relationship Type has 13 values, listed below. Even when two Slips are loosely related, prefer the narrowest, most specific type that fits — use Related only when nothing else applies.
Relationship Type | Value ( | Description |
|---|---|---|
Related |
| A loose relationship where the two Slips reference each other. |
Same As |
| Refers to the same entity, even if the wording differs. (Symmetric) |
Is A |
| This Slip is an instance or subclass of the target. |
Part Of |
| This Slip is a part of the target. (column→table, clause→contract) |
Depends On |
| This Slip requires the target to hold. |
Uses |
| This Slip draws on and uses the target. |
Extends |
| This Slip broadens or adds onto the target. |
Derived From |
| This Slip was created from the target. |
Supports |
| This Slip serves as grounds for the target. |
Tested By |
| This Slip is verified by the target. |
Governs |
| This Slip (a policy) governs the target. |
Supersedes |
| This Slip replaces the target. |
Contradicts |
| This Slip and the target conflict with each other. (Symmetric) |
Relationships created by the node are always outgoing, from the source Slip to the target. If you need to change the direction afterward, you can do so manually in the Slipbox UI — on the Slip's References entry, use the direction button to switch between outgoing, incoming, or mutual.
Step 1: Create an Ability
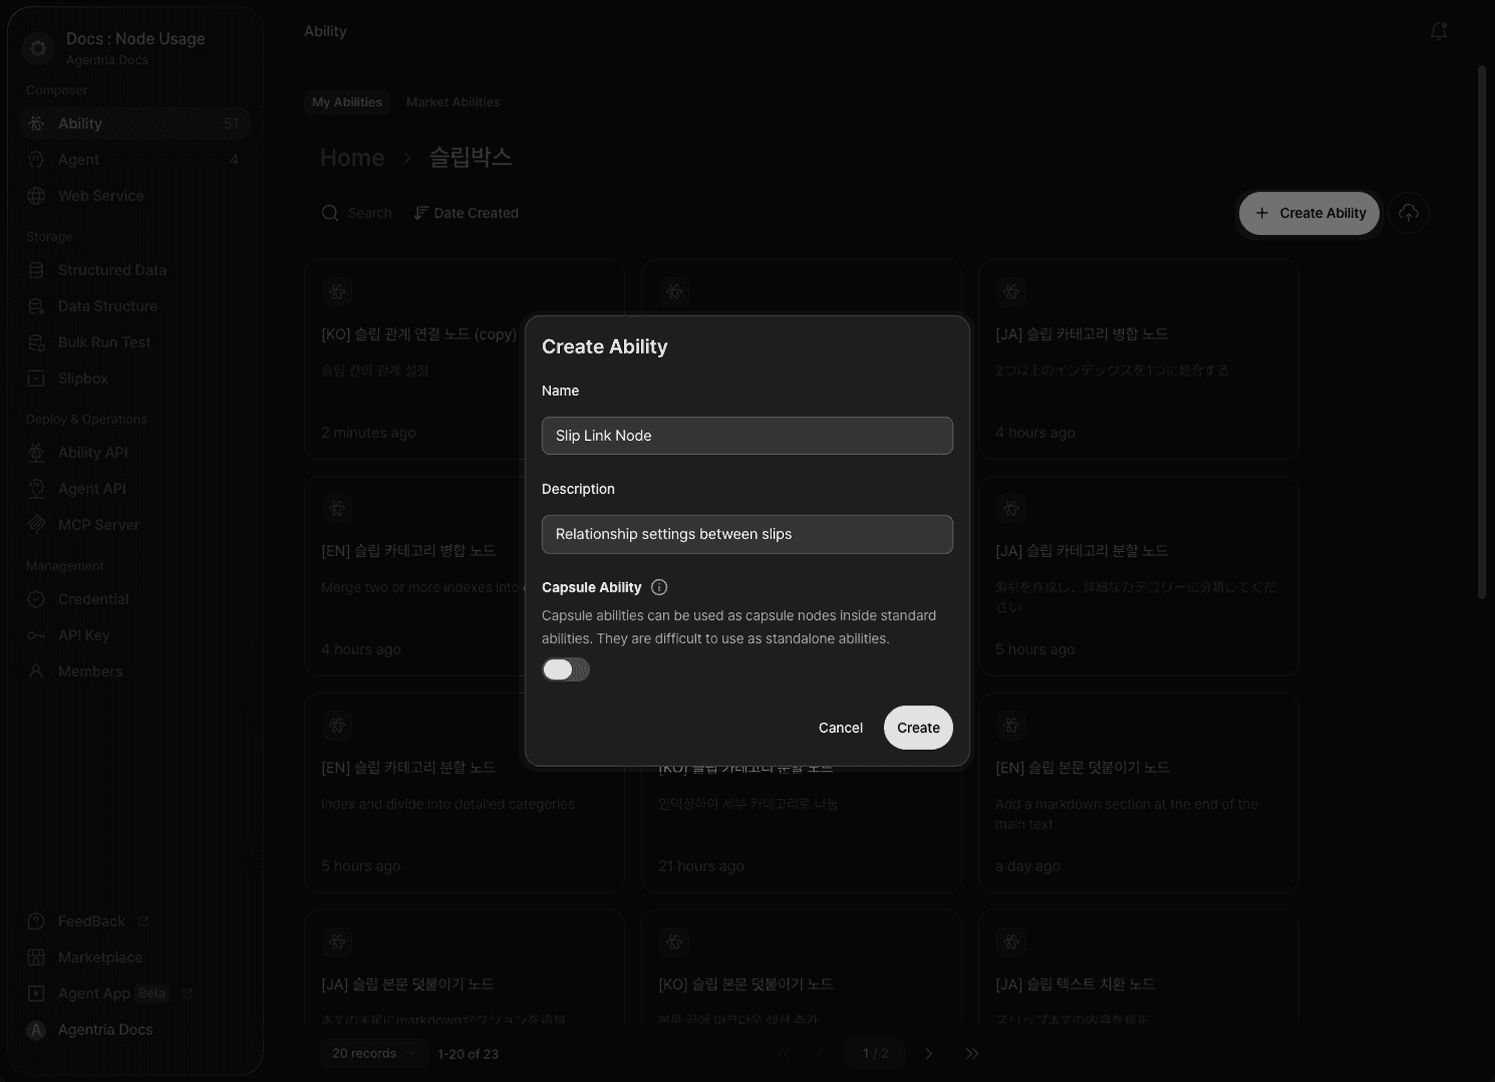
Create a new Ability. Enter Link Slips node for Name and Link Slips together for Description. This Ability connects the Link Slips node directly to the Slips you want to link. Which Slips you target is up to you — this tutorial targets two test Slips in the Agentria Docs slipbox.
Step 2: Configure the Start Node
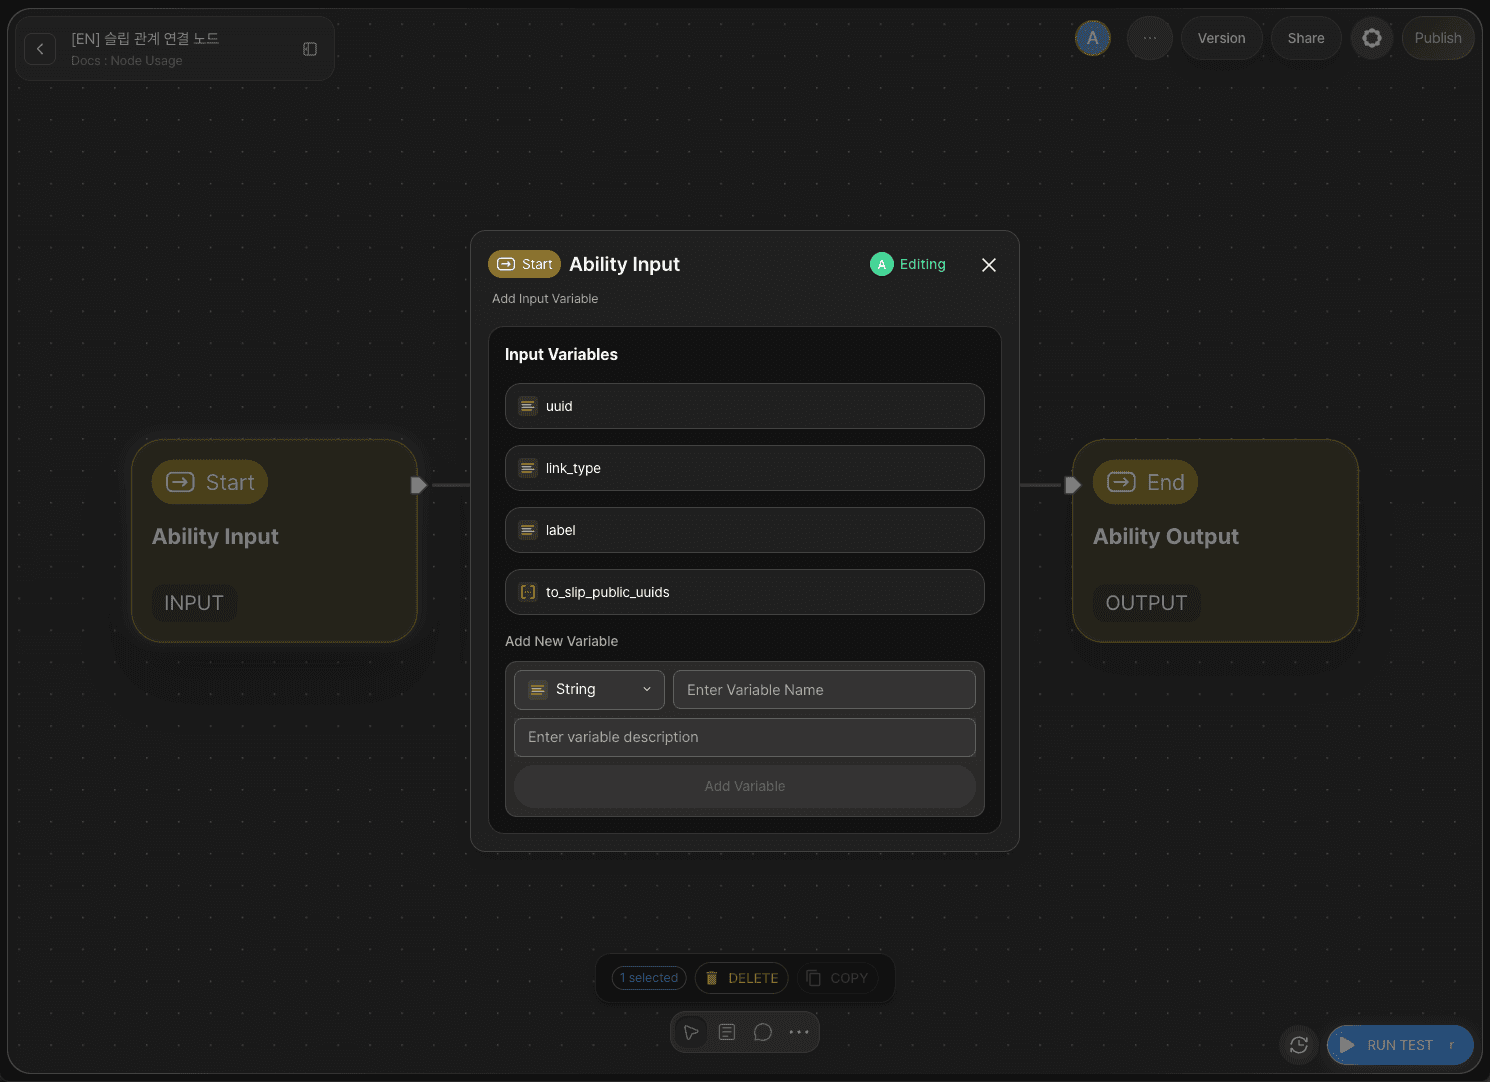
Double-click Start Node to enter the Node Editor. Add the following four variables.
uuid: accepts the UUID of the source Slip. (String)link_type: accepts the relationship type. (String)to_slip_public_uuids: accepts the list of target Slip UUIDs. (Array)label: accepts the domain predicate. (String)
Add to_slip_public_uuids as an Array type, not a String.
Step 3: Add the Link Slips Node
Click +Add Node → add a Link Slips node from the Slipbox category.
Step 4: Configure the Link Slips Node

Double-click the Link Slips node to enter the Node Editor. In Target Slipbox, select whichever slipbox you're working with — this tutorial selects Agentria Docs as an example. If you leave this unset, running the node fails with error_code set to SLIPBOX_NOT_FOUND, so make sure to check it.
Drag and drop the Start Node's input values onto the remaining fields as follows.
Adapter Variable | Bound Value |
|---|---|
|
|
|
|
|
|
|
|
Once the node runs successfully, it outputs linked_count (the number of Slips linked), skipped_slip_ids (an array of UUIDs skipped because they didn't exist), slip_public_uuid (the UUID of the source Slip that was modified), error_code, and error_message.
Step 5: Configure the End Node
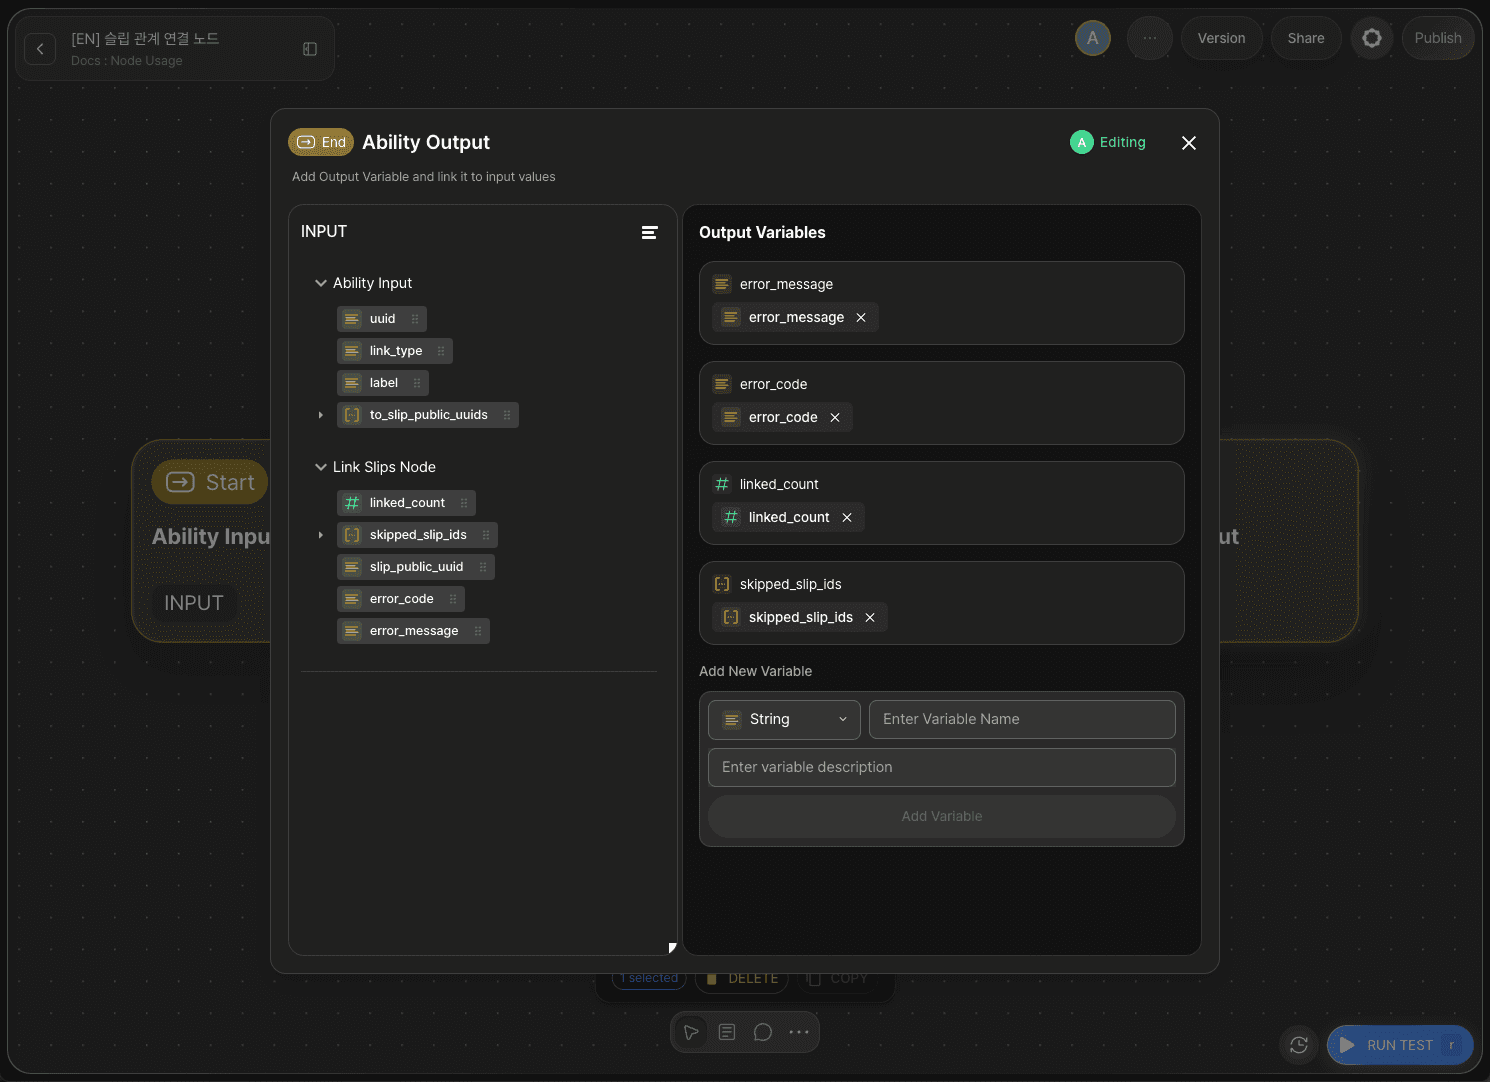
Double-click End Node to enter the Node Editor. Add a String output variable named result and drag and drop error_code from the Link Slips node to bind it. This lets you check whether the relationship was created successfully or failed from the output value.
Step 6: Prepare Two Test Slips
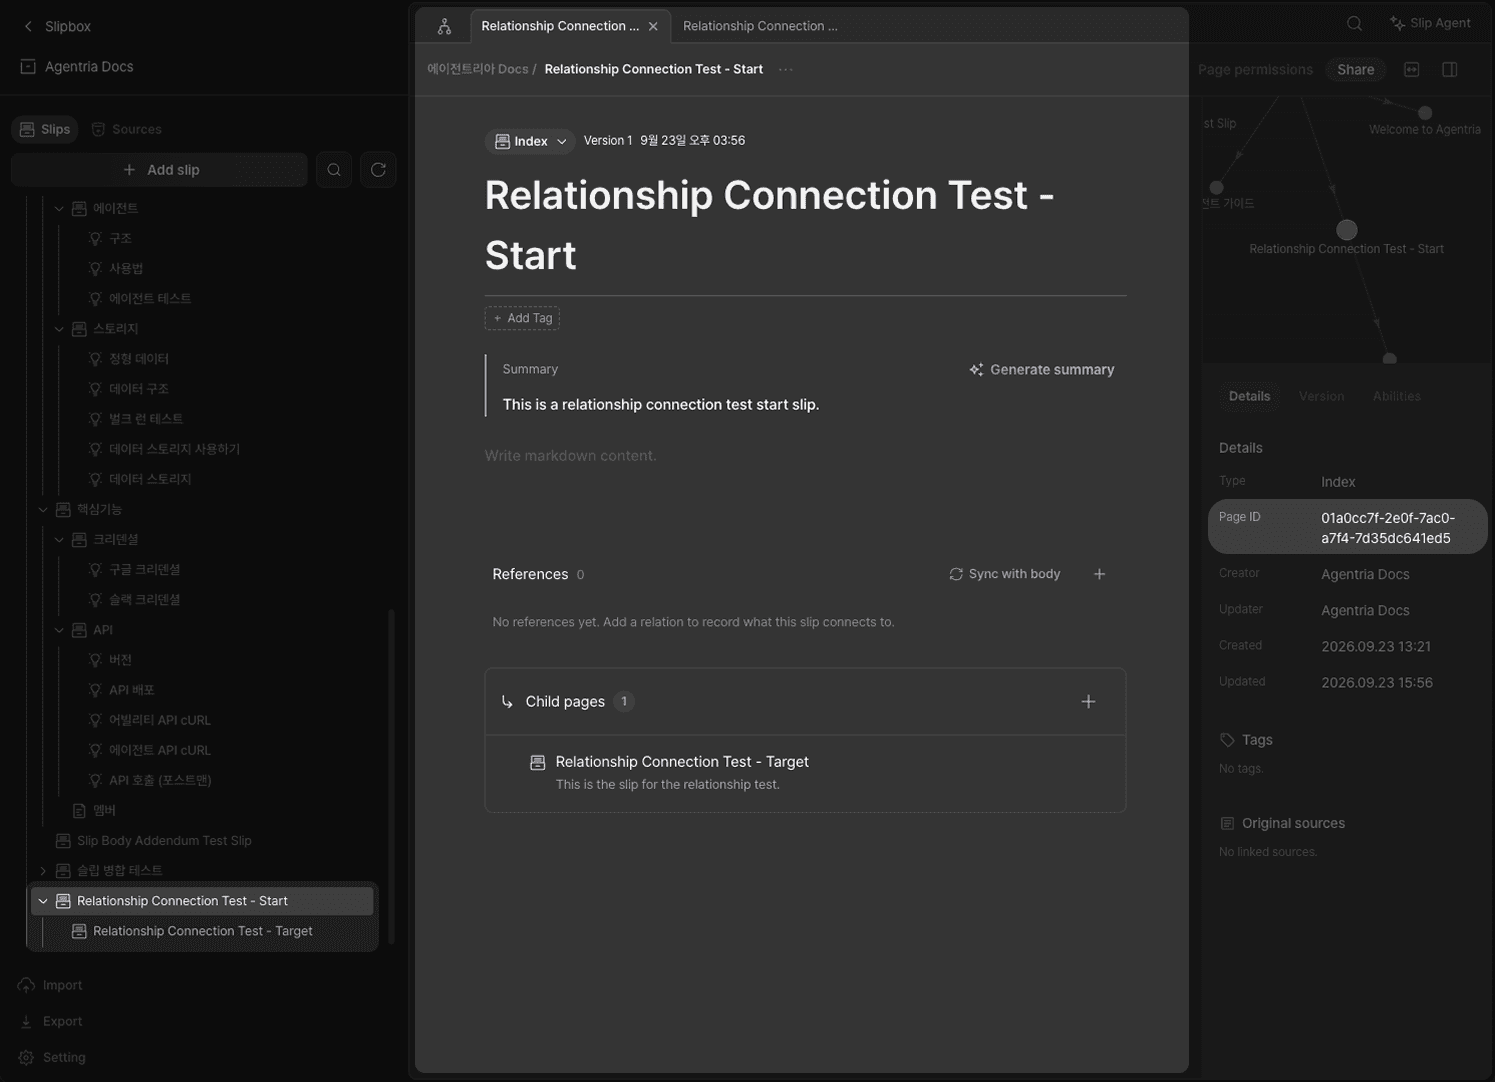
Go to the Agentria Docs slipbox and click Add Slip twice to create two test Slips (e.g., a source Slip and a target Slip). Finally, copy the public UUID of each Slip from the details panel on the right. You'll use these values as the uuid and to_slip_public_uuids inputs when you run the test.
Step 7: Run the Test
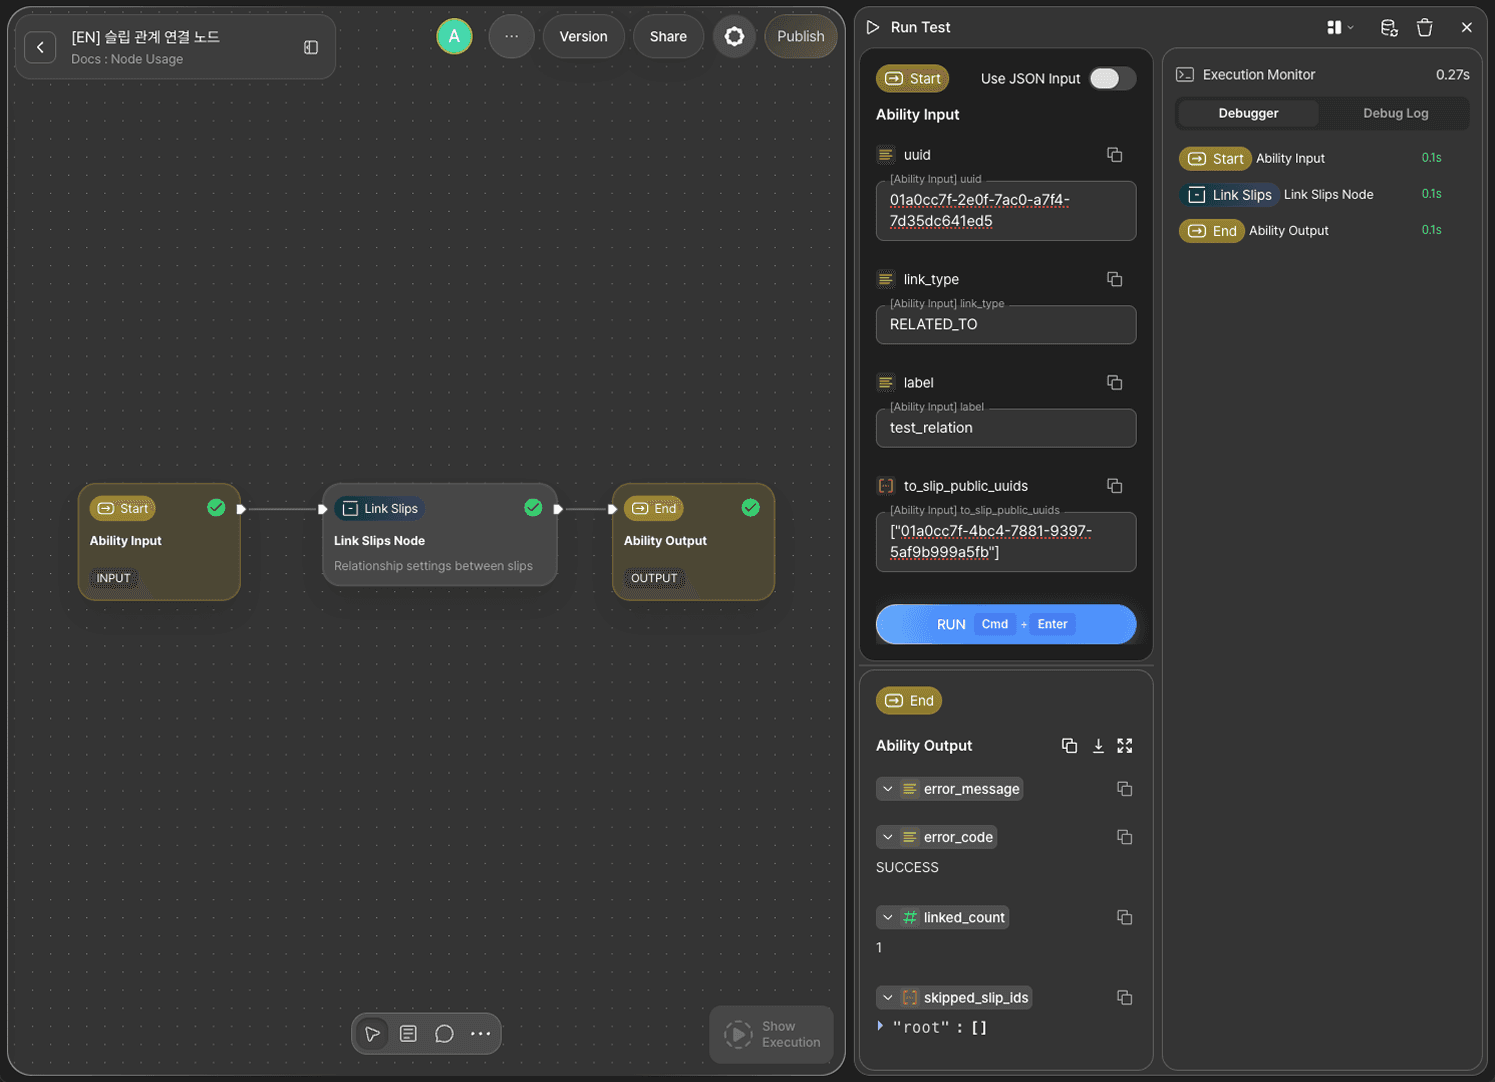
Paste the source Slip's public UUID into uuid. Enter RELATED_TO for link_type. In to_slip_public_uuids, write a JSON array containing the target Slip's public UUID.
Enter test_relation for label, then click RUN TEST. If the result output is SUCCESS, the test succeeded.
Step 8: Check the Debug Log
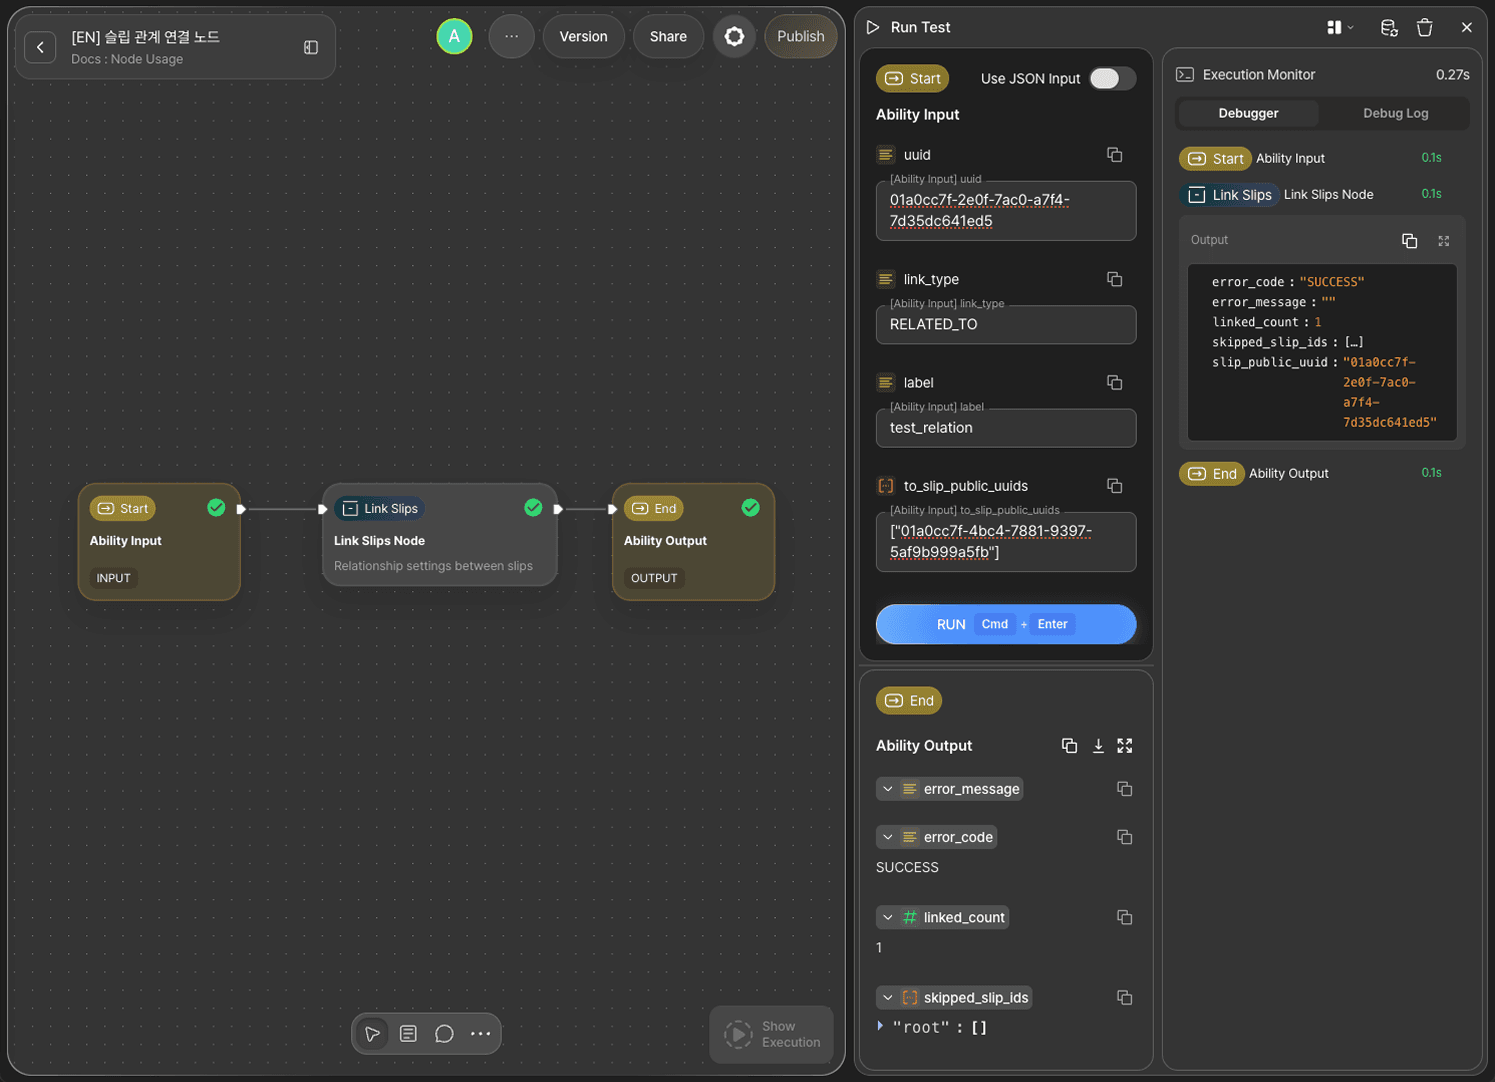
Check the Debug Log of the Link Slips node to see the details showing error_code returned as SUCCESS, along with the linked_count (1), skipped_slip_ids (an empty array), and slip_public_uuid (the source Slip's UUID) values that came back with it.
Step 9: Verify the Result in the Slipbox
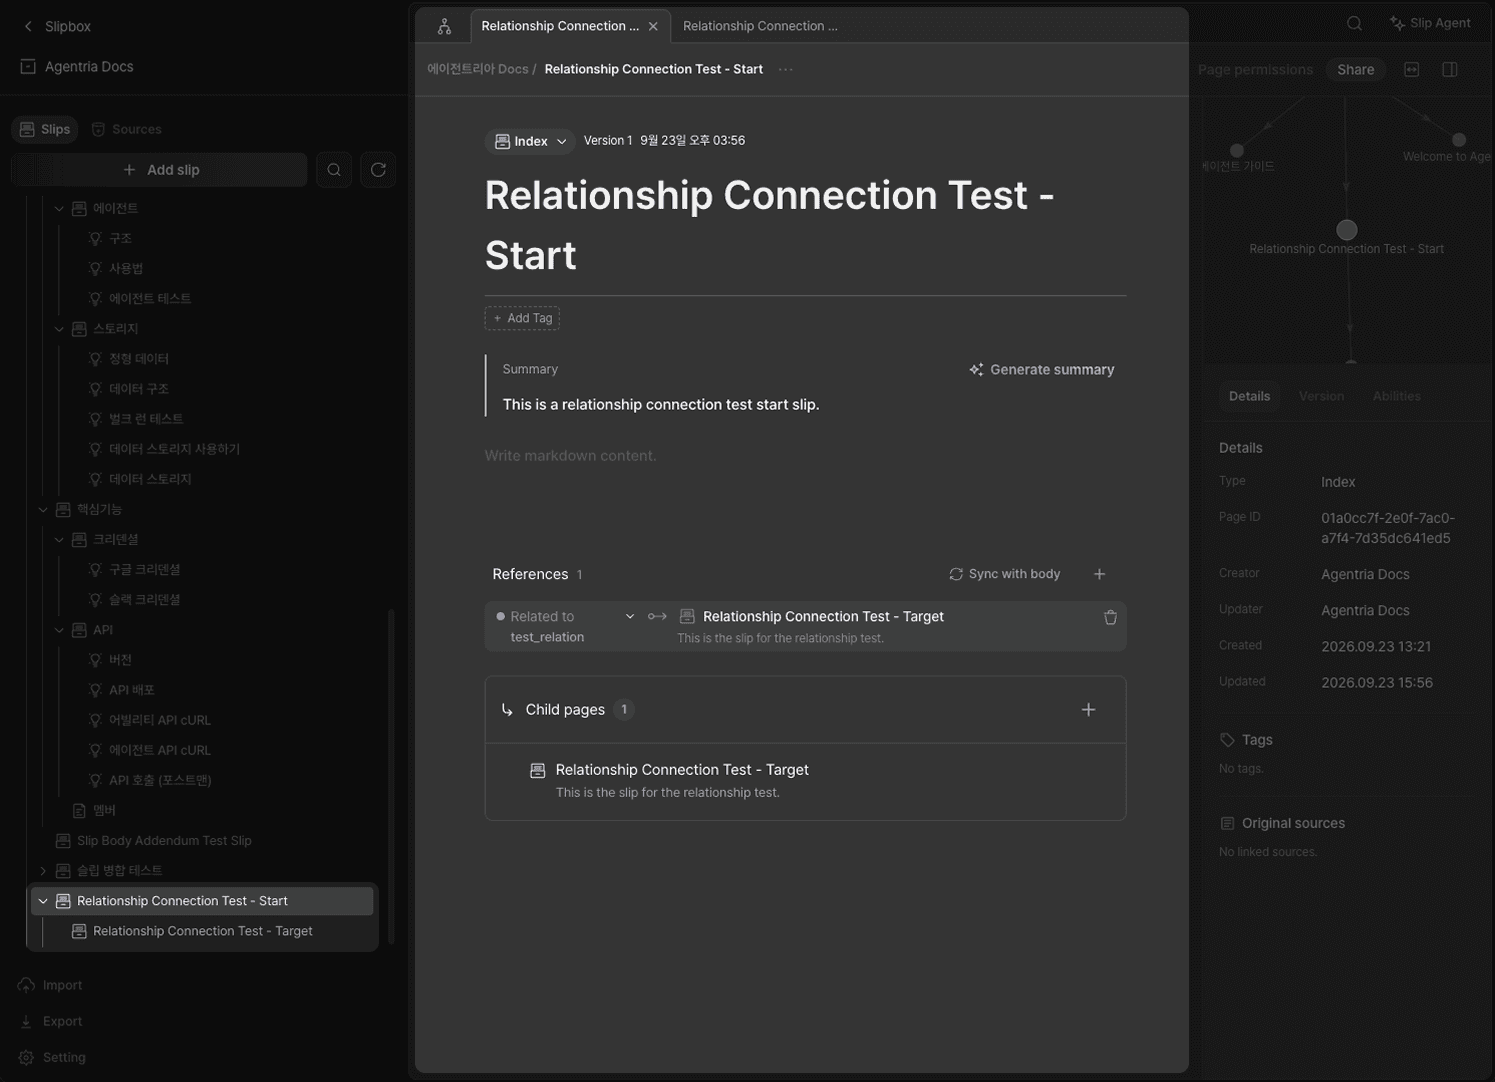
Go to the Agentria Docs slipbox and open the source Slip — you'll see its References count has gone up to 1. The new reference entry shows the relationship type you set (RELATED_TO), the label as test_relation, the direction as outgoing, and the target as the test Slip you just created.
Next Steps
🎉 Congratulations! You've successfully built the "Link Slips Together" workflow using Agentria.
Connect this node to an Agent Loop node as a tool, and you can extend it into a workflow where the agent identifies and links structural relationships between Slips on its own during a conversation.
Agentria is a place where ideas become reality—your workflow can expand infinitely with your creativity.
For more node examples, visit the 🔗Node Usage page.
Frequently Asked Questions
What does the Link Slips node do?
The Link Slips node creates a structural relationship from one source Slip to one or more target Slips. You specify the relationship type from a closed vocabulary, and you can optionally add a domain predicate on top of it. The resulting relationship shows up in the source Slip's References.
What values can I use for Relationship Type?
You use one of a closed vocabulary of 13 values. See the "The Full List of 13 Relationship Types" table above for all of them. Of these, RELATED_TO (Related) should only be used when no other type fits well — prefer a narrower, more specific type whenever one is available.
Can I change the relationship direction later?
Yes. Relationships created by the node are always outgoing — from the source Slip to the target — and the node itself has no input for setting direction. But you can change it manually afterward in the Slipbox UI. Open the Slip that has the relationship, find the entry under References, and use the direction button to choose outgoing (the default), incoming, or mutual.
Do I have to fill in Domain Predicate?
No, it's optional. While Relationship Type carries the structural meaning (classification, composition, and so on), Domain Predicate layers business context on top of it. Write it in lowercase snake_case, like customer_of or approves, and leave it blank if the structural type alone already says enough.
What happens if I include a UUID that doesn't exist in Target Slip UUIDs?
The node doesn't fail entirely — it simply skips any UUID that doesn't exist and reports it in the skipped_slip_ids output. Relationships are still created normally with the remaining valid targets.