Key Features
Google Credential Setup
To use nodes that integrate with Google services — Gmail, Google Sheets, Google Calendar, and more — you must first register a Google Credential in Agentria.
Agentria supports OAuth 2.0 integration. Simply logging in with your Google account completes credential registration without issuing any keys. Advanced users who need a custom app or organization branding can also issue and connect their own Client ID and Client Secret.
Before You Begin
A Google account is required.
If you have an Ability that uses a Google service node (e.g., the Gmail node), you can register the credential directly from the Node Editor. Without an Ability, you can still register one in advance from the project's
Credentialmenu.
Connect with OAuth 2.0 (Default, Recommended)
This is the recommended method for most users. Connecting takes nothing more than logging in with your Google account — there's no key to issue or manage.
Step 1: Prepare a Node That Needs a Credential
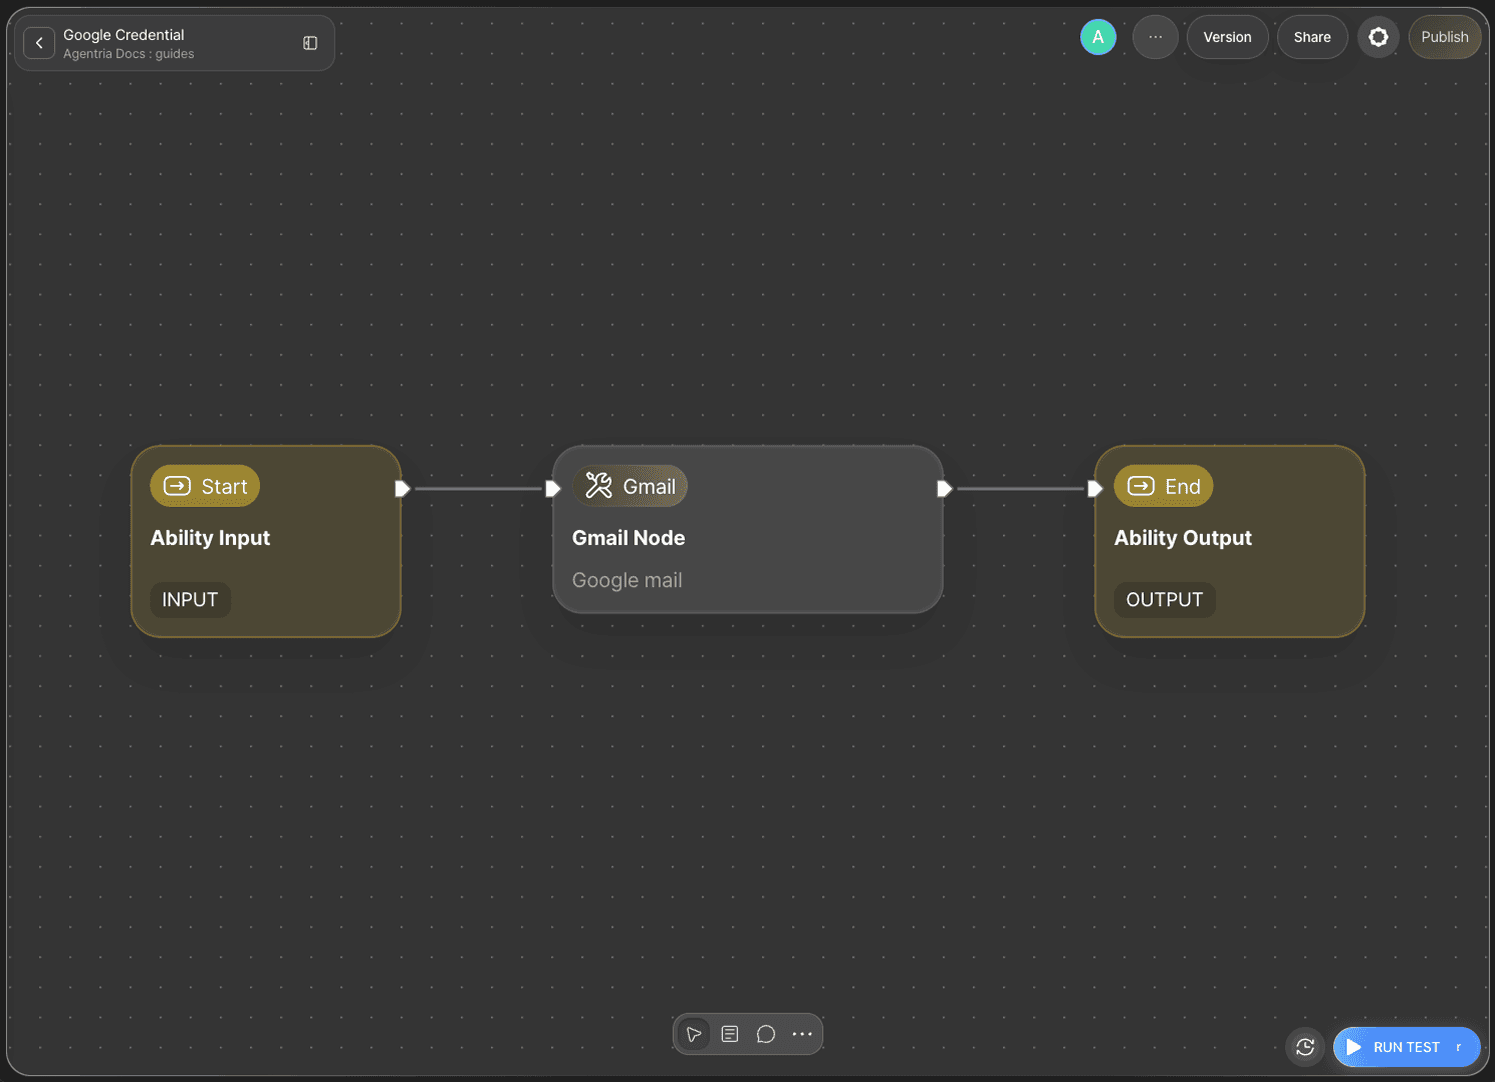
Assume a situation where you're using a node that integrates with a Google service. This guide uses the Gmail node as the example.
Step 2: Select a Credential in the Node
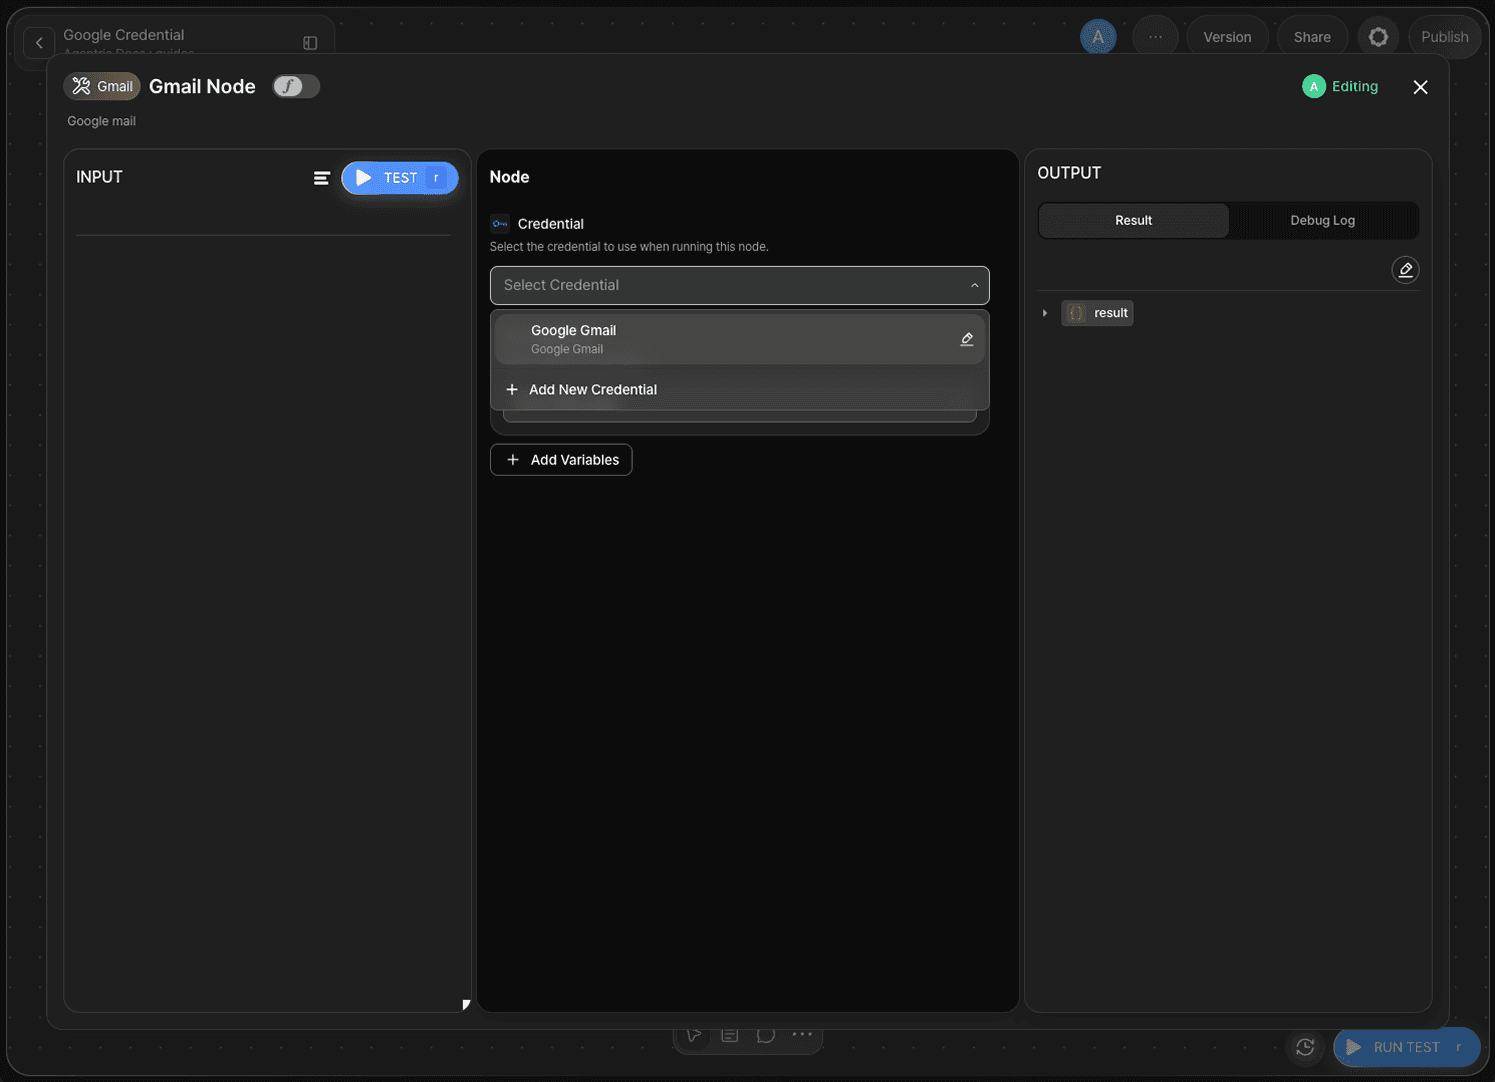
Double-click the Gmail node to enter the Node Editor, then check the Credential dropdown. The screen below shows an example where a credential is already registered — the first time you open it, the list will be empty. If no credential is registered, click + Add New Credential.
Step 3: Check an Existing Credential's Connection Status
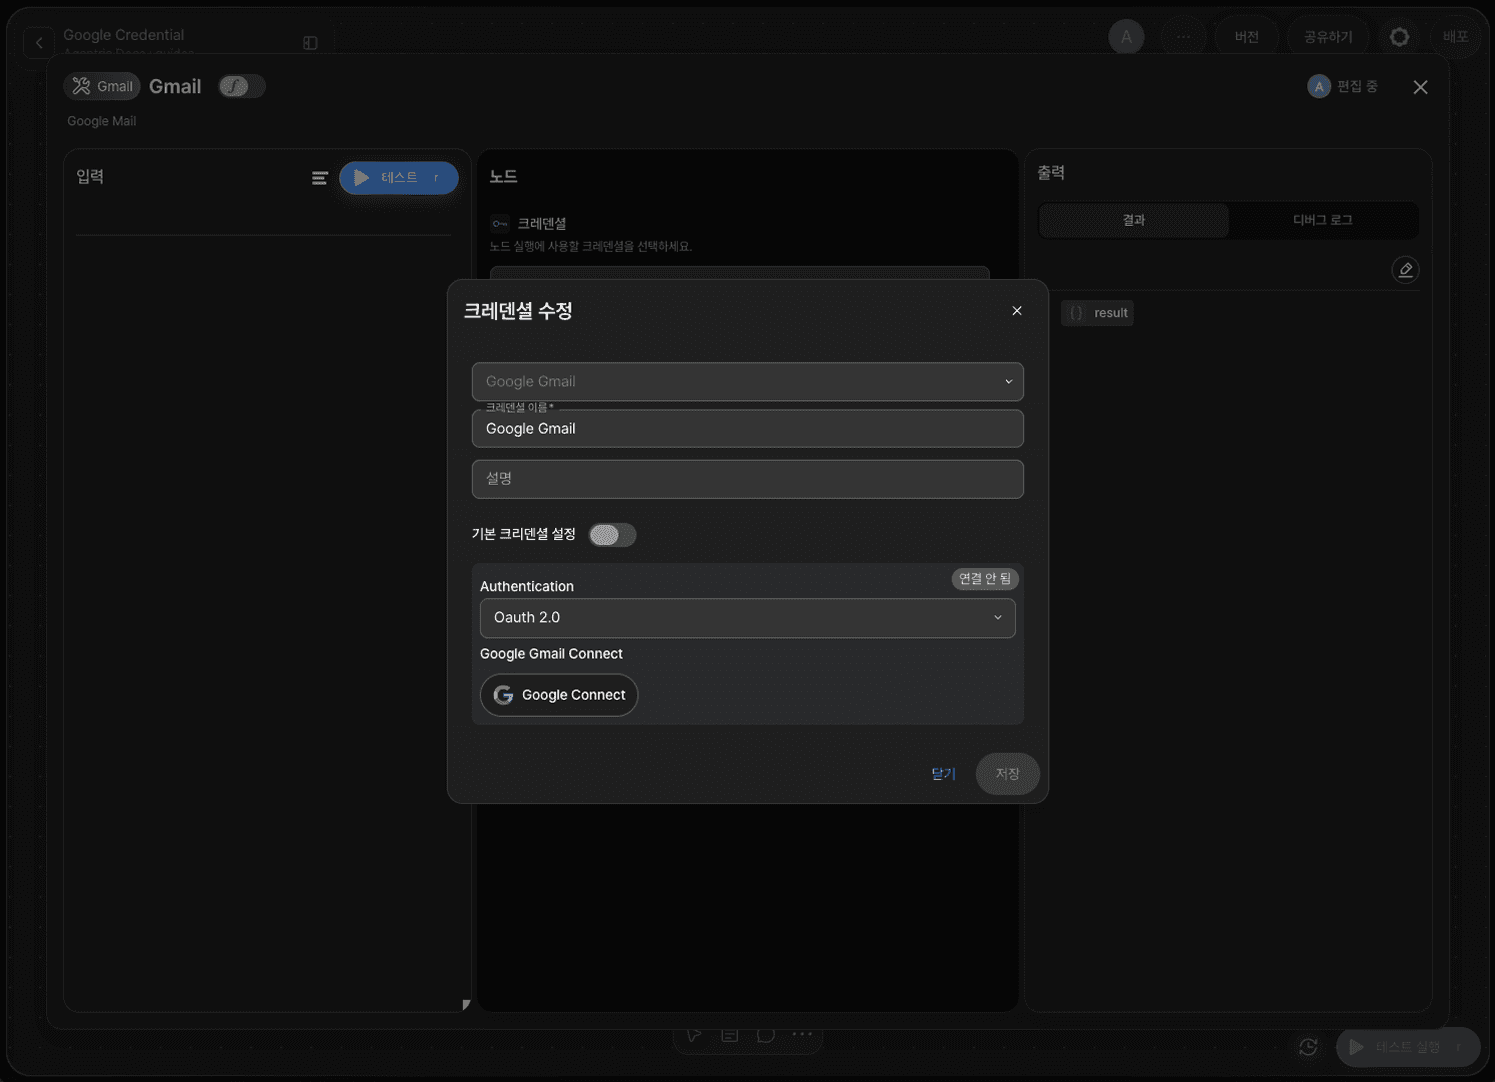
If a credential is already registered, click the pencil icon in the list to open the edit screen. If the Authentication status shows Not Connected, it hasn't been linked to a Google account yet, so you'll need Google Connect.
Step 4: Manage Credentials in the Project
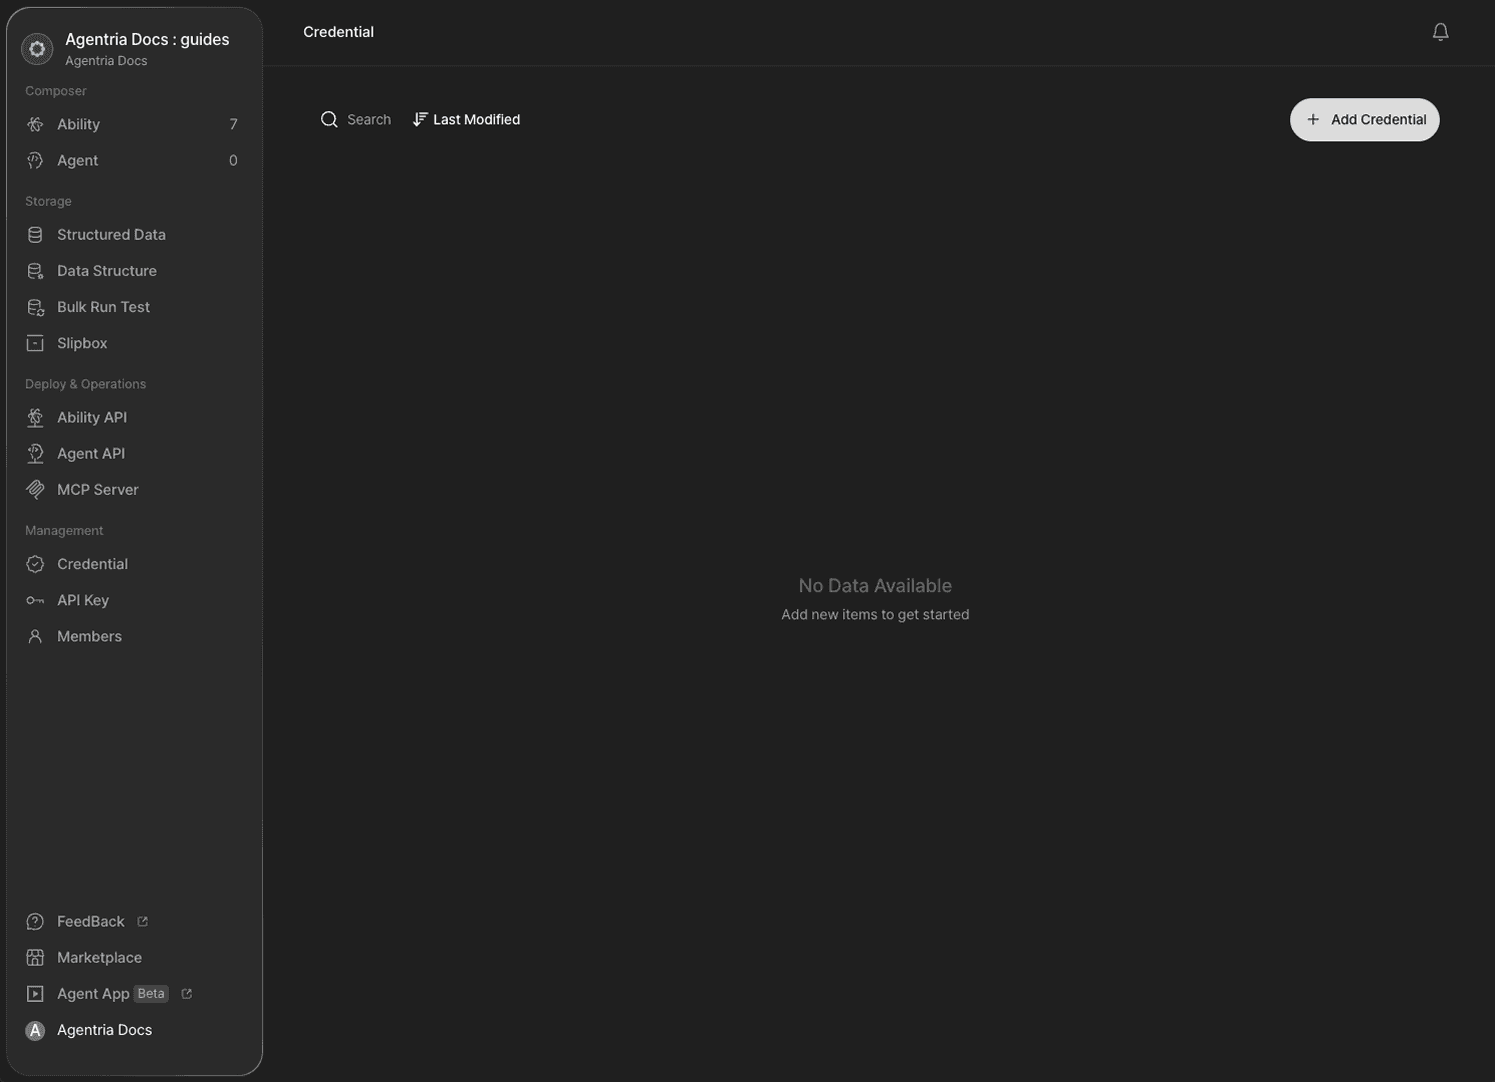
You can also register a new credential from the project, not just the Node Editor. Go to the Credential menu in the left panel to manage every credential in the project as a list. The list starts empty; click Add Credential in the top right.
Step 5: Add a New Credential
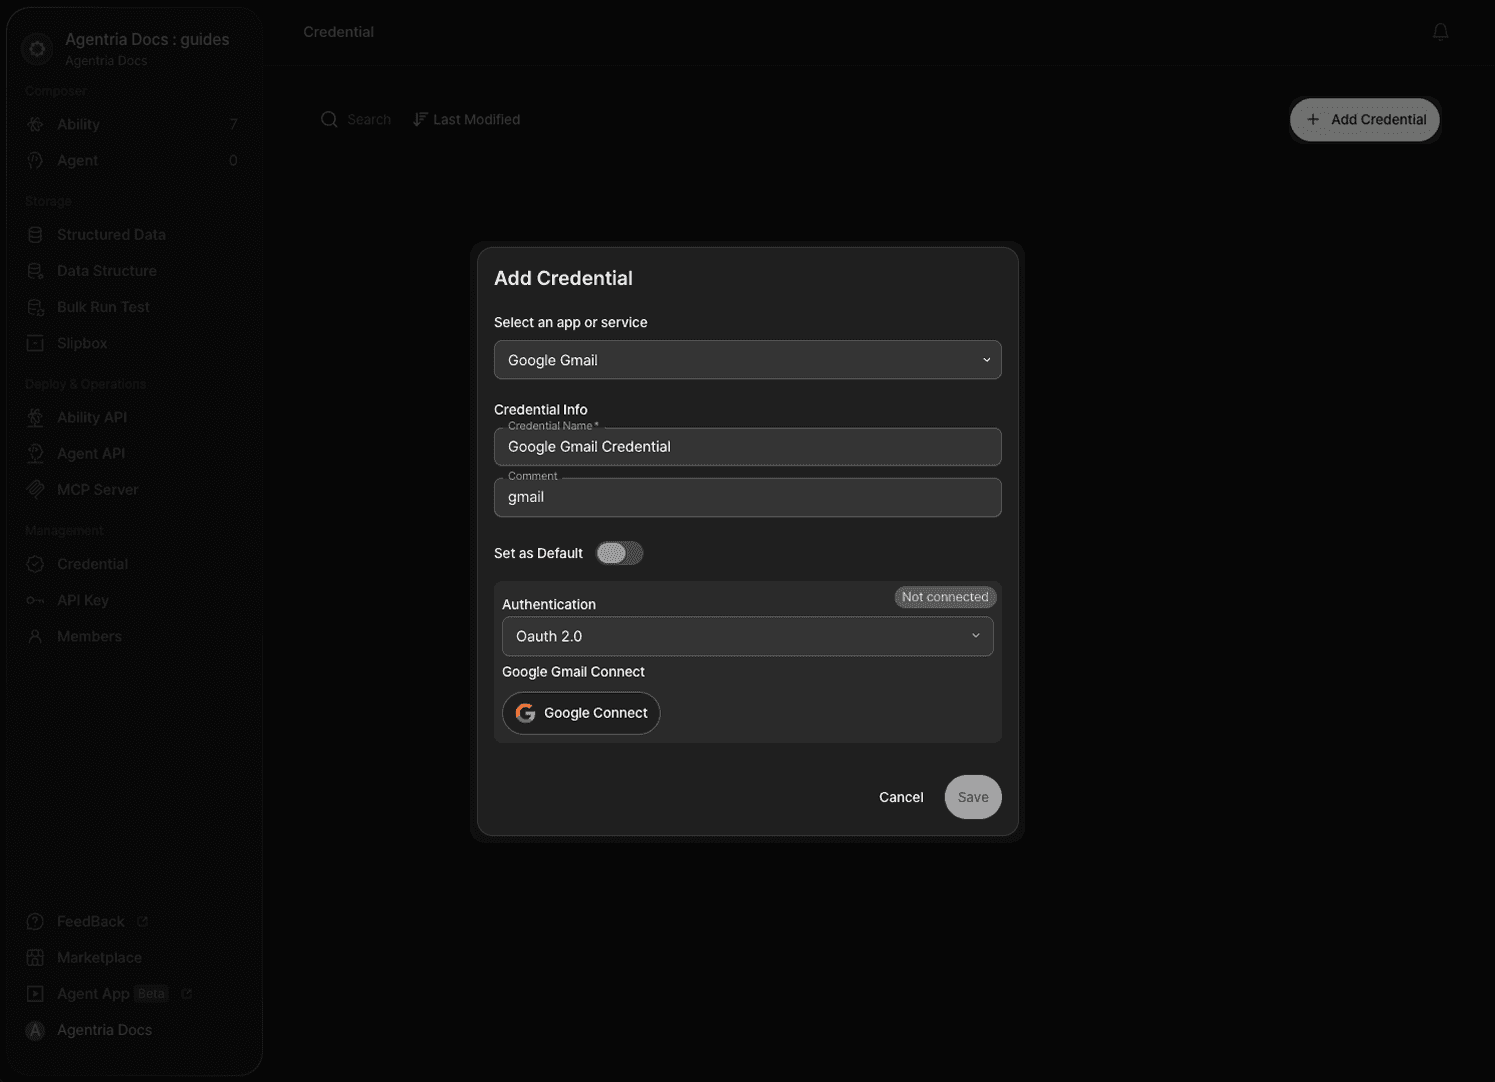
In the Select an app or service to connect dropdown, search for and select the service you want, such as Google Gmail. Enter a Credential Name and Description.
Step 6: Choose an Authentication Method
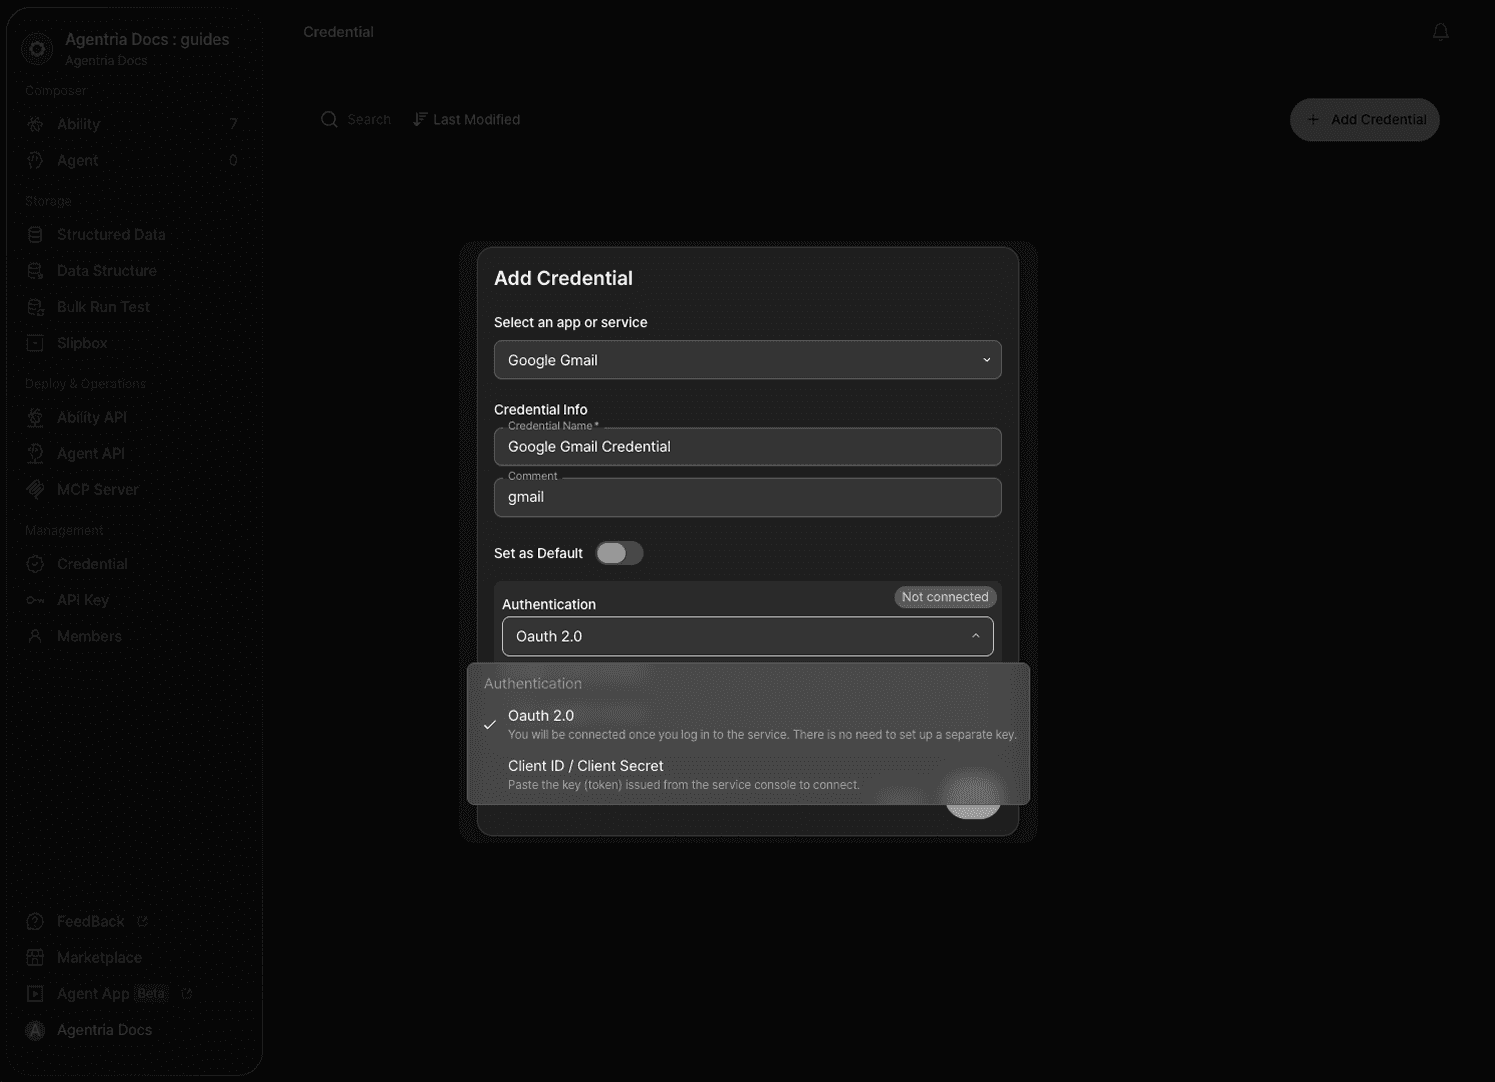
In the Authentication dropdown, choose an authentication method.
Oauth 2.0: Connects as soon as you log in to the service — no key to set up separately.Client ID / Client Secret: Connects using a key (token) issued from the service console.
Oauth 2.0 is recommended for most users.
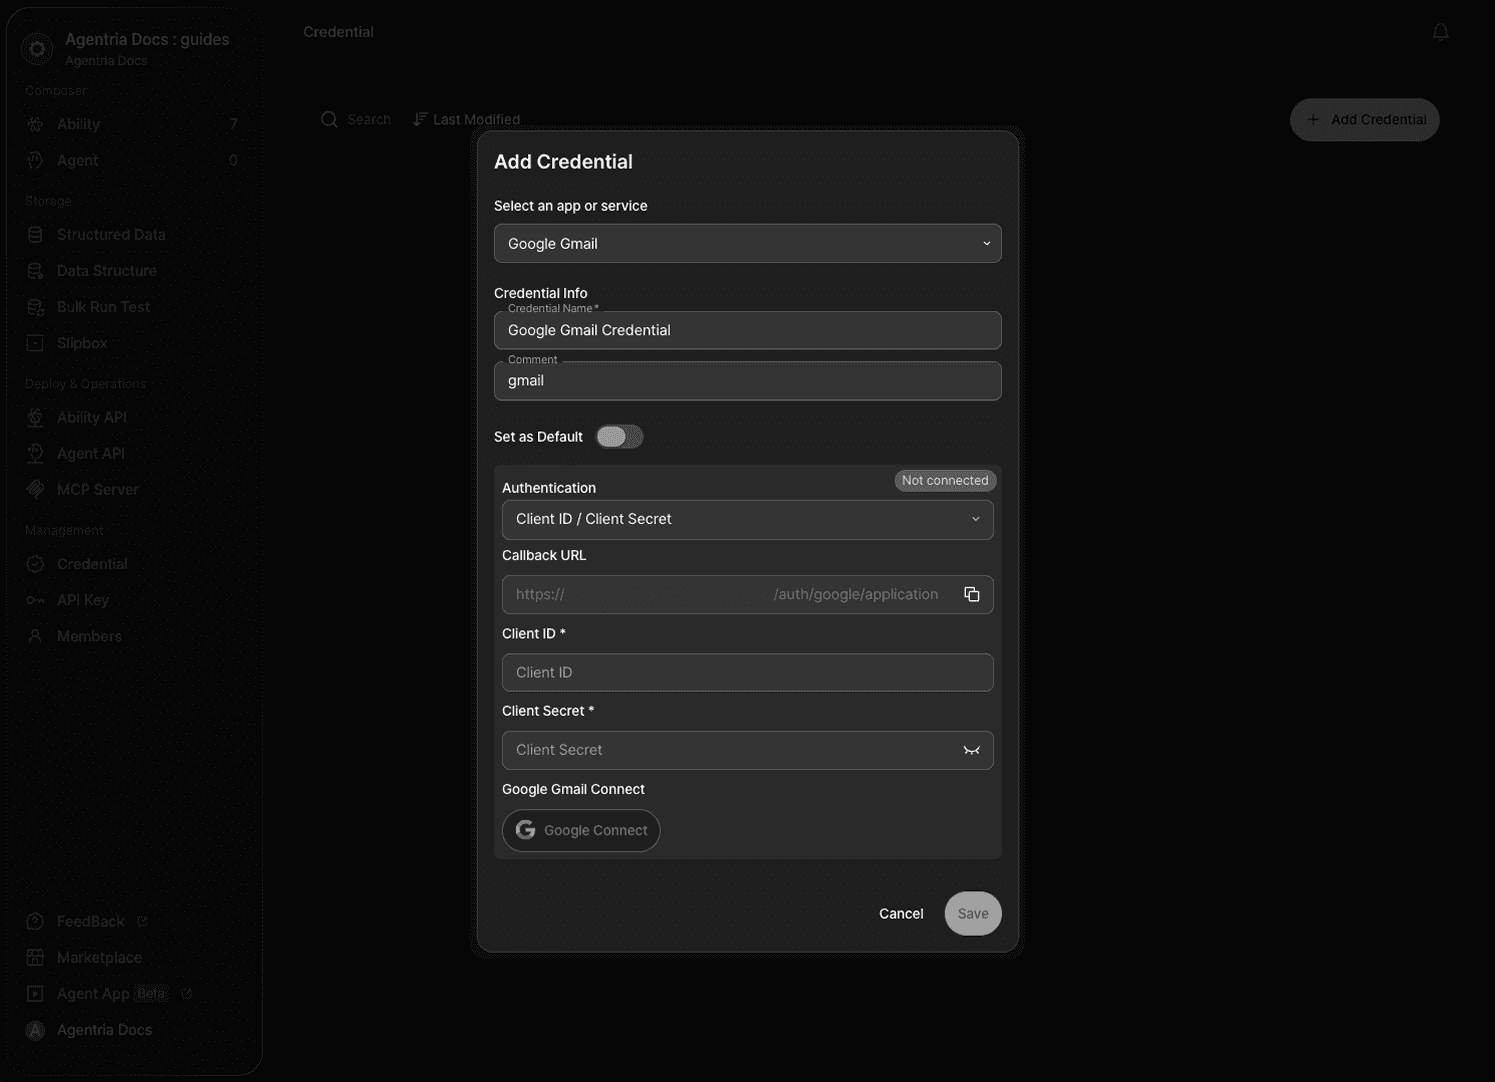
Selecting Client ID / Client Secret reveals the Callback URL, Client ID, and Client Secret fields shown above. This option is for advanced users who need a custom app or organization branding; the steps to obtain these values are covered separately in the "Connect with Client ID / Client Secret" section of this document. The steps that follow assume Oauth 2.0 is selected.
Step 7: Select Your Google Account
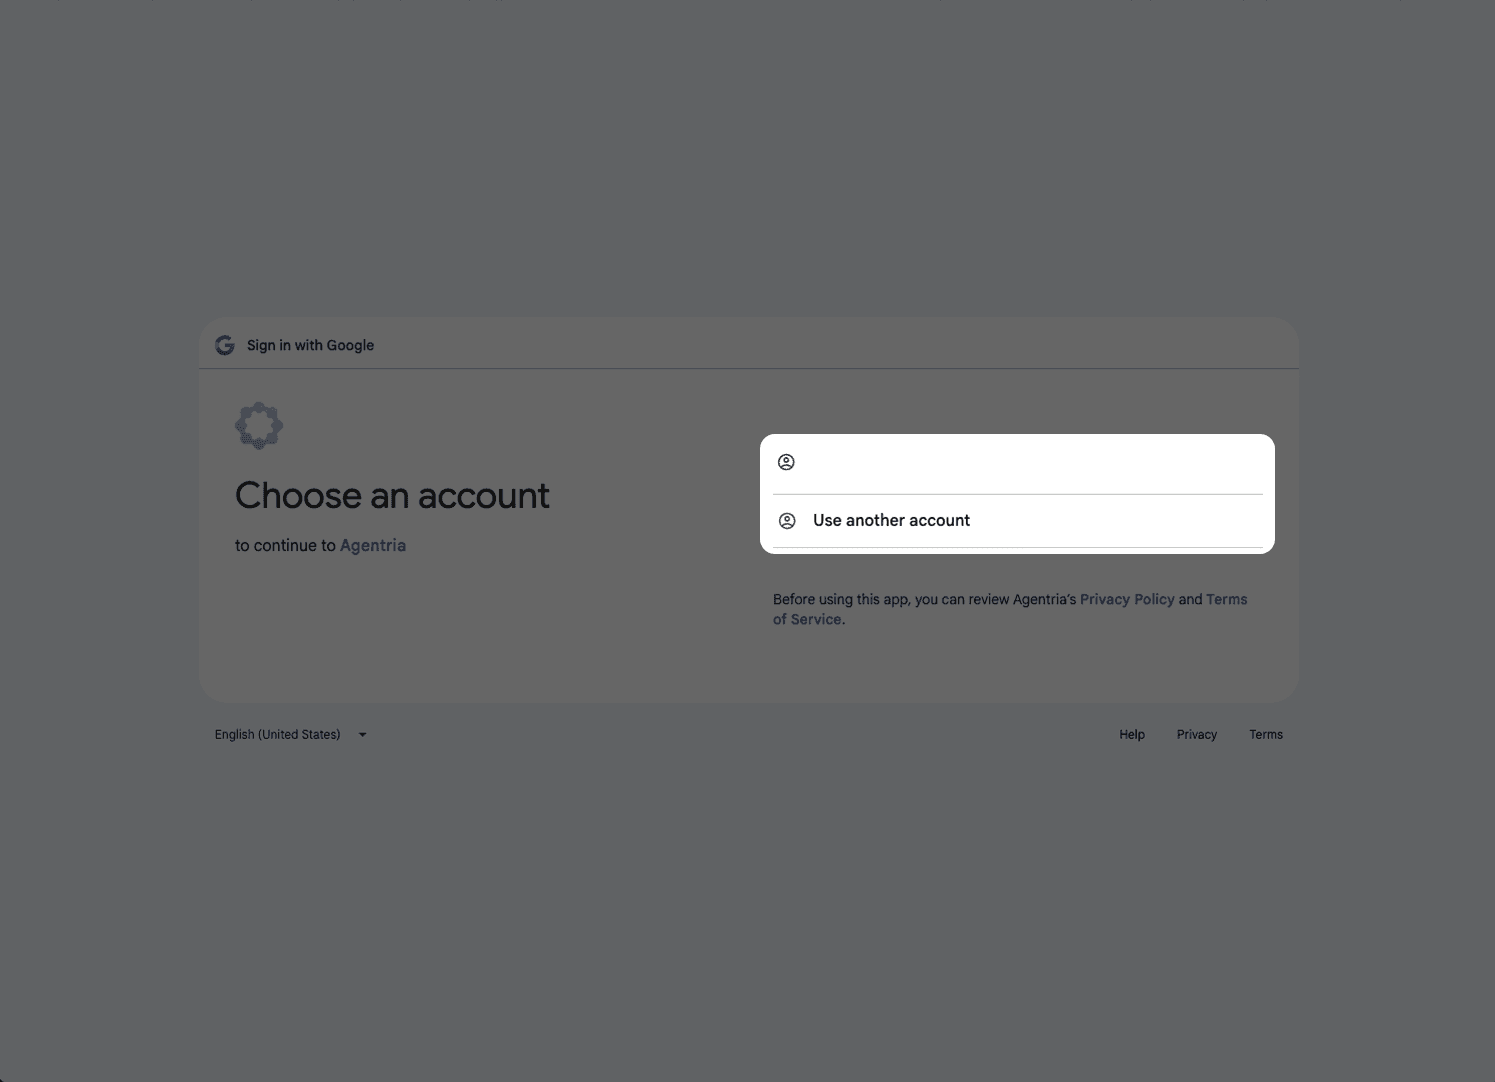
Clicking Google Connect takes you to the Google account selection screen. Select the account you want to connect.
Step 8: Grant Access Permissions
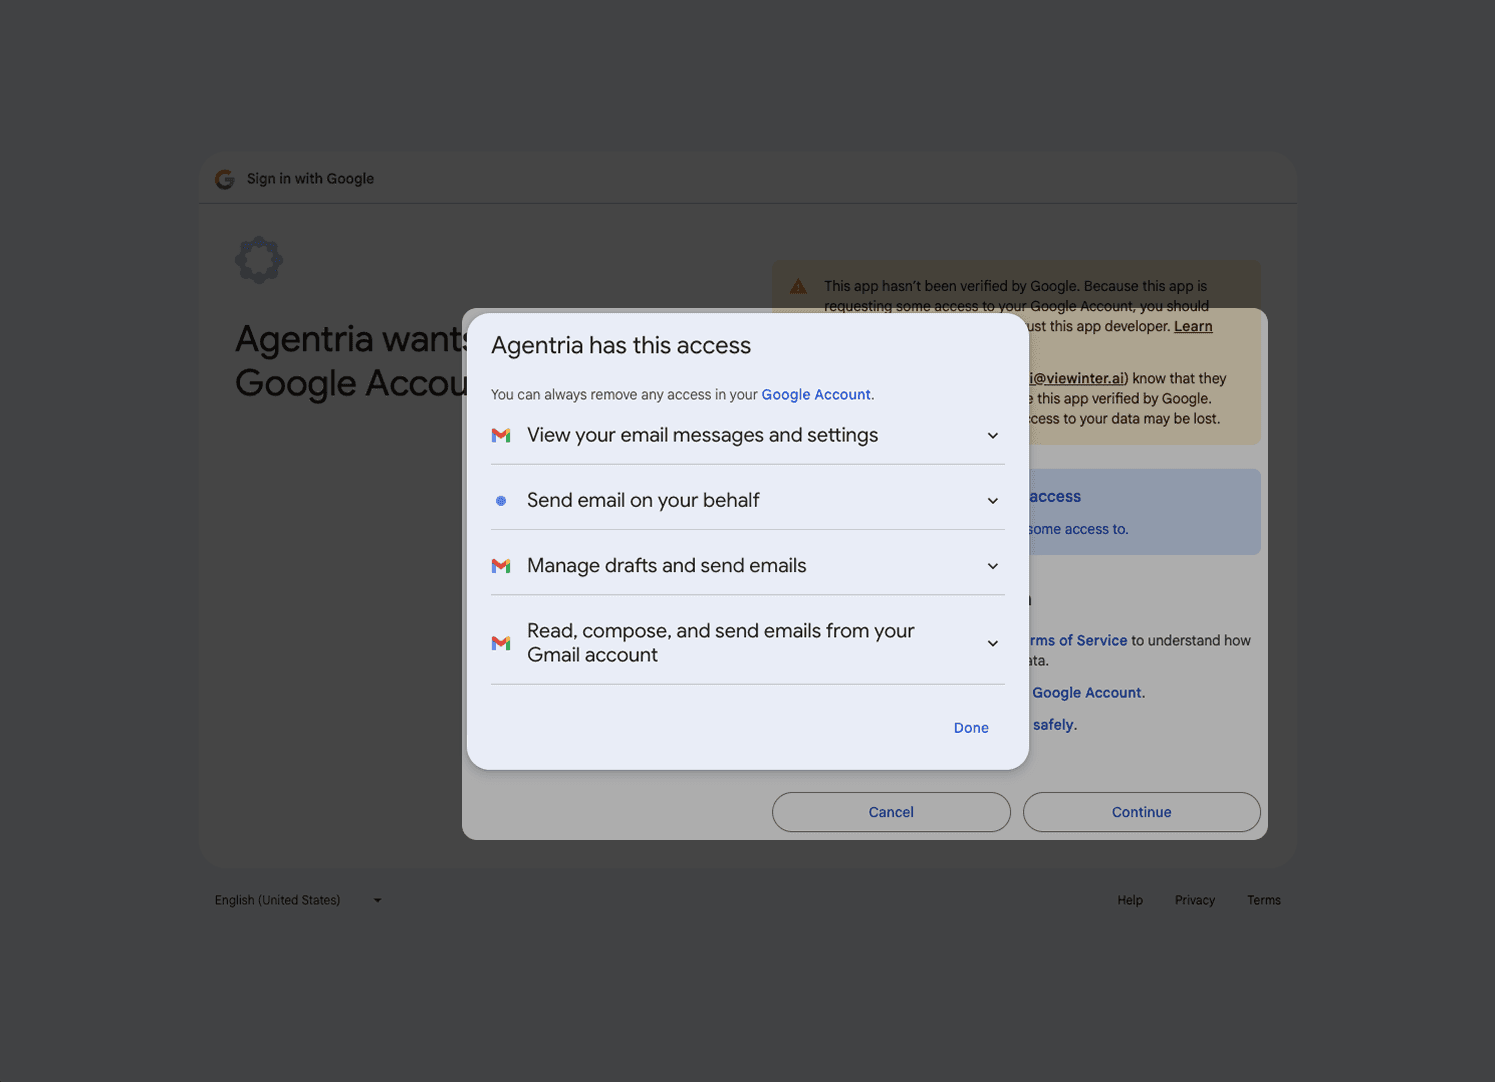
Review the permissions needed to perform actions through Gmail, then click Continue.
Step 9: Confirm the Connection and Save
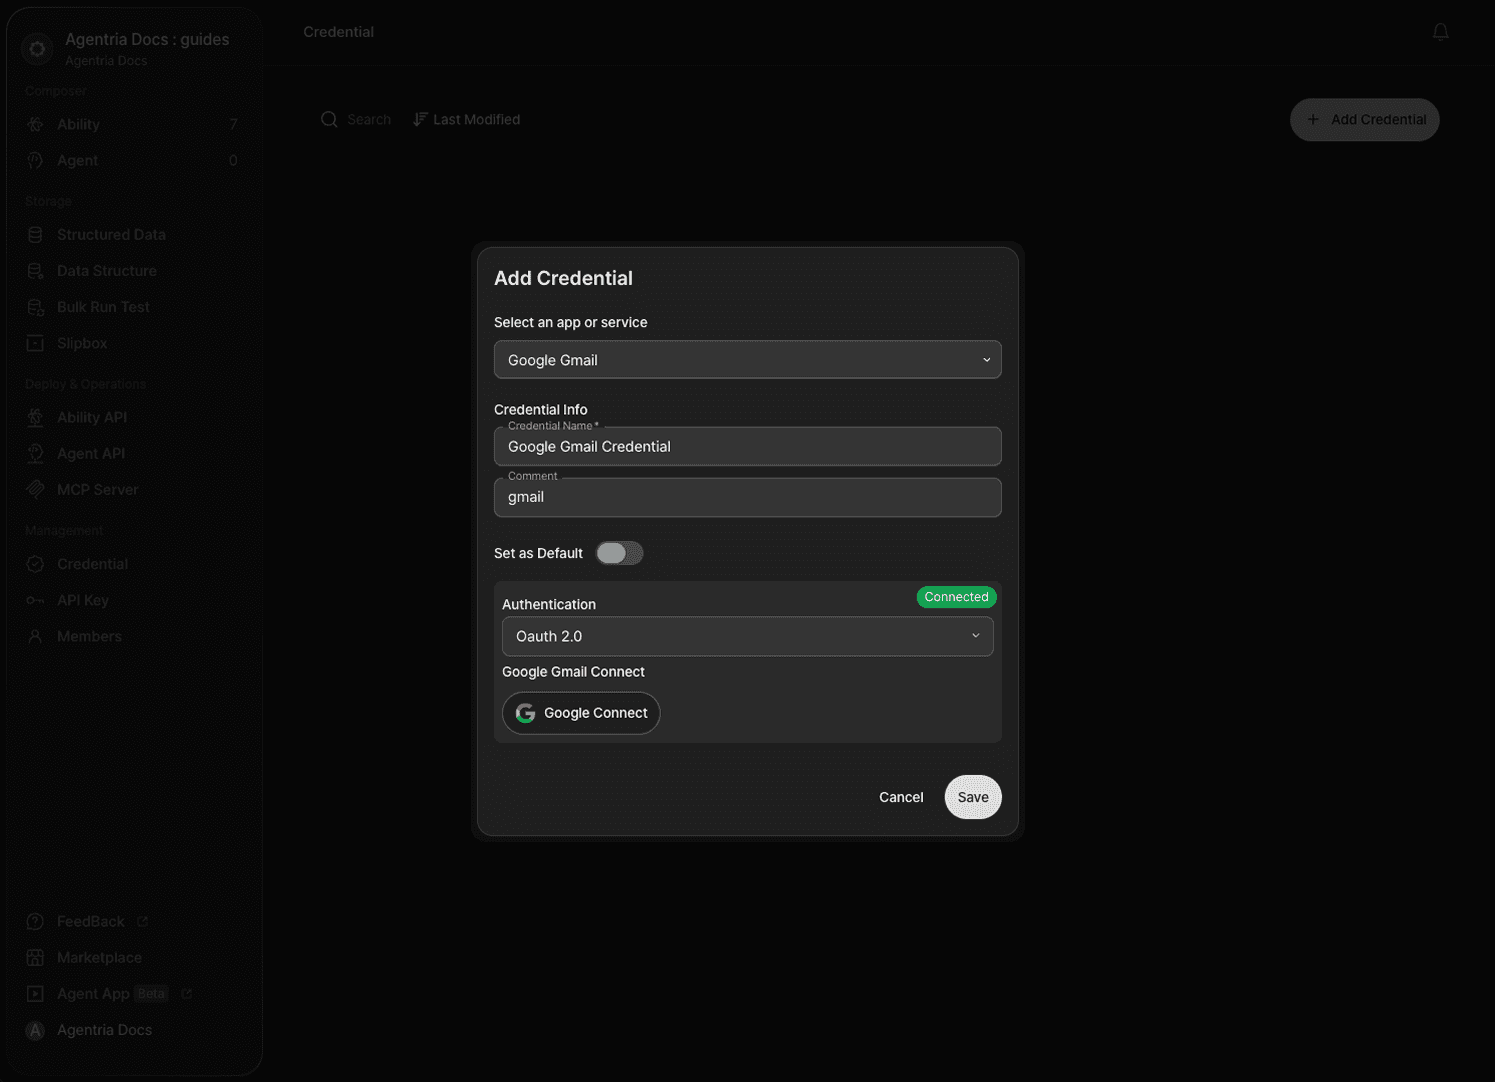
Back in the credential settings window, you'll see the Authentication status change to Connected. Click Save to finish registering the credential — you can now select it in a node and run it right away.
Connect with Client ID / Client Secret (Advanced)
Advanced users who need a custom app or organization branding can create their own OAuth client directly in the Google Cloud Console to issue a Client ID and Client Secret, then connect using those values. This method involves more steps than Oauth 2.0 and requires configuration in the Google Cloud Console. Once issued, a Client ID/Client Secret can be reused across multiple Google-based nodes.
Step 1: Access the Google Cloud Console
To issue a credential, open a new tab or window in your browser and go to the 🔗Google Cloud Console Auth Platform page.
Click Create Project to create a project.
Step 2: Manage OAuth
OAuth is an open standard protocol for user authentication and authorization on the internet.
Issuing a Google credential requires going through the OAuth flow.
Set a project name and select an organization.
For personal use, leave it set to No organization and click Create.
Click Get Started to configure the project.
Step 1: App Information
Set the App name
Set the User support email
Step 2: Audience
Internal: Restricted to Google Workspace users within your organization (suited to building an internal app)
External: Open to any user with a Google account, but only users added to the test user list can use it (suited to building an app for public service)
Step 3: Contact Information
Enter an email address to receive notifications about project changes (can be the same as the user support email)
Step 4: Finish
Agree to Google's policies and create the project
Click Create to finish configuring the OAuth project.
Step 3: Create an OAuth Client ID
You need to create a client ID to generate user authentication credentials.
If a Client ID and Client Secret are displayed during this step, be sure to copy them somewhere safe.
Click Create OAuth client to create an ID.
If you have trouble finding the button, go to the Clients tab in the sidebar and click +Create client — this leads to the same ID creation process.
Since this is for use with Agentria, set the application type to
Web application.Enter a name for the client ID.
You can leave the JavaScript origins blank.
Now it's time to enter the redirect URL.
A redirect URL (callback URL) is required so Google can return a success or failure result after authentication.
Leave the Google Console page open for now, and go to the Agentria credential settings page to add the authorized redirect URL.
Step 4: Add the Credential in Agentria
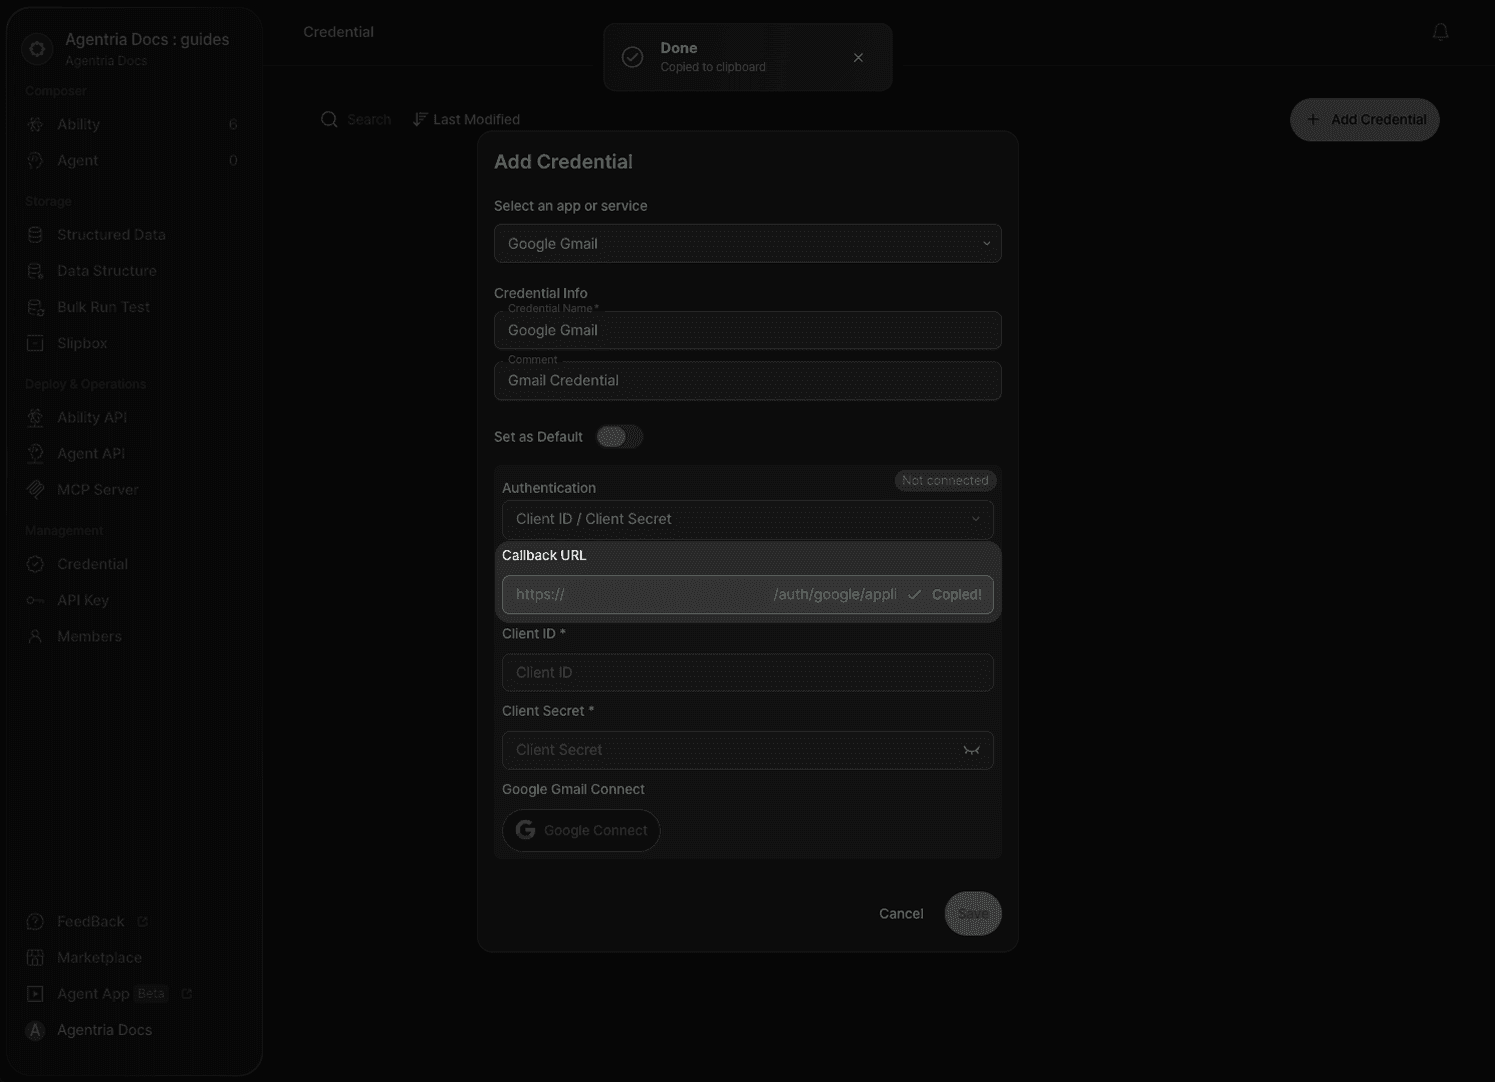
Authentication is set to Client ID / Client Secret.
Copy the Callback URL below and proceed to Step 5.
The credential popup can't be saved yet, so leave the Agentria page as is and go back to the Google Console page.
Step 5: Register the Callback URL
In the Google Cloud Console where you were creating the client ID, click +Add URI under the authorized redirect URIs section to open the redirect URL input field.
Paste the Callback URL you copied in Step 4.
Click Create to save it, and the OAuth client will be created.
You can close the completion popup.
Step 6: Store the Secret (Important)
In the Clients tab, click the Client ID to view the contents of the popup you closed earlier again.
Since you won't be able to copy the secret again later, be sure to copy the Client ID and Client Secret immediately after creating them and store them somewhere safe.
Downloading them as a JSON file to keep somewhere safe is also a good option.
You'll use this information in Step 8.
Step 7: Add Data Access Scopes
Go to the Data Access tab in the sidebar.
Clicking Add or remove scopes opens a side panel.
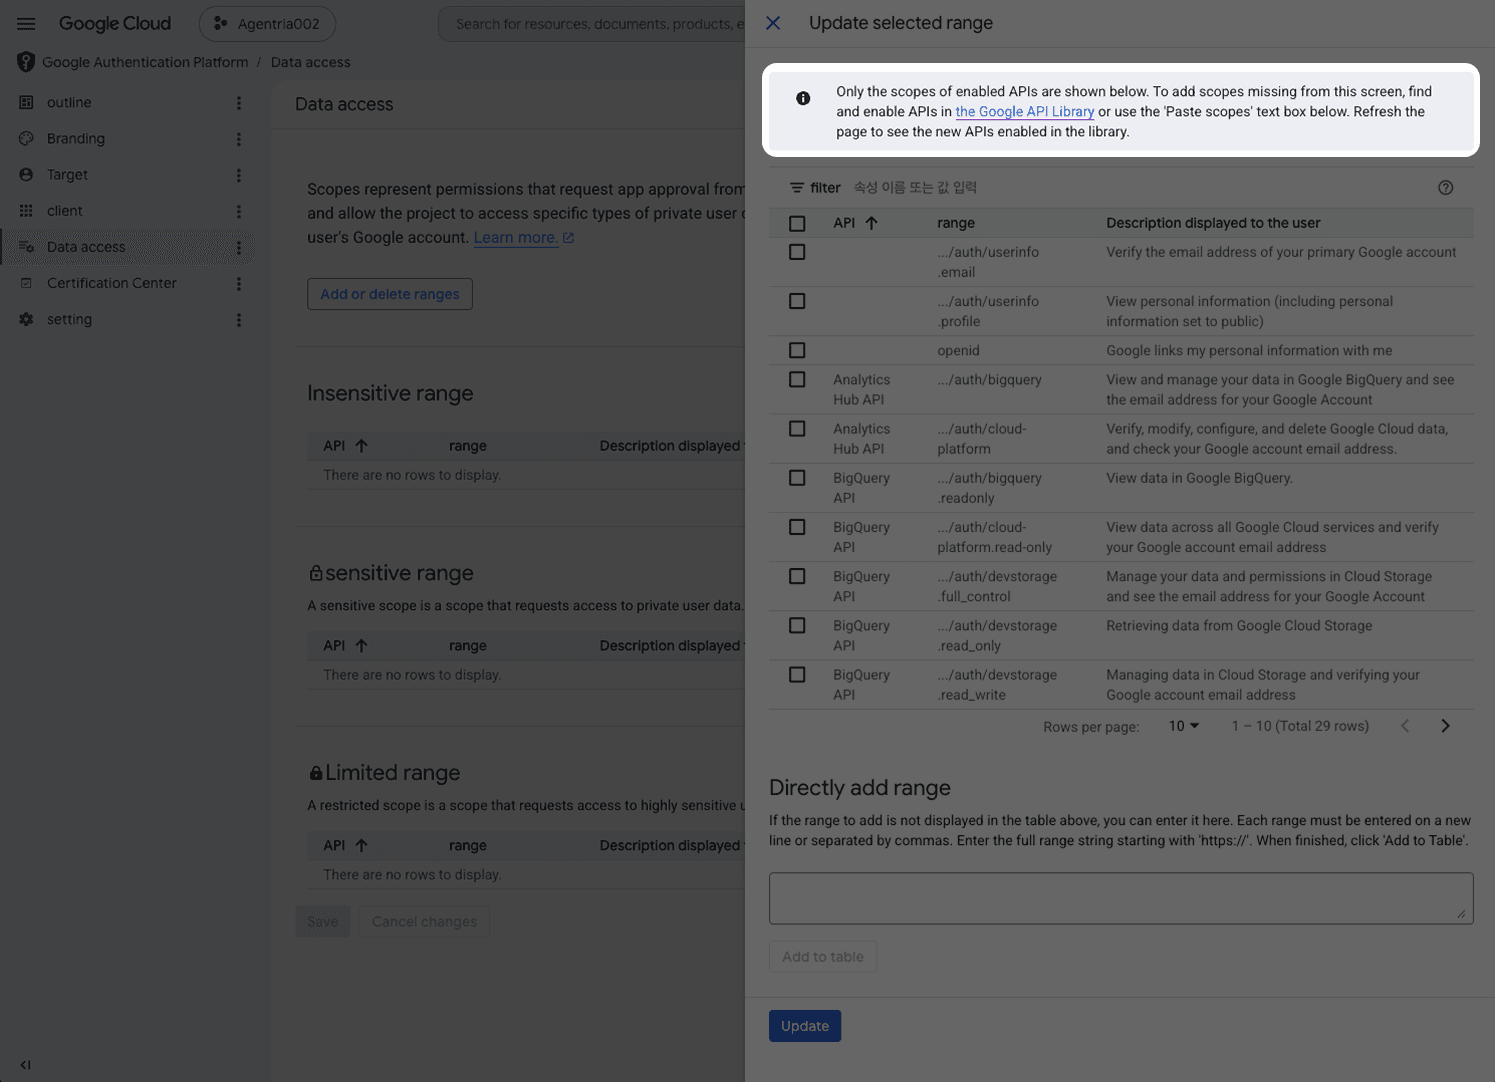
Follow the 🔗link to the Google API Library in the message at the top.
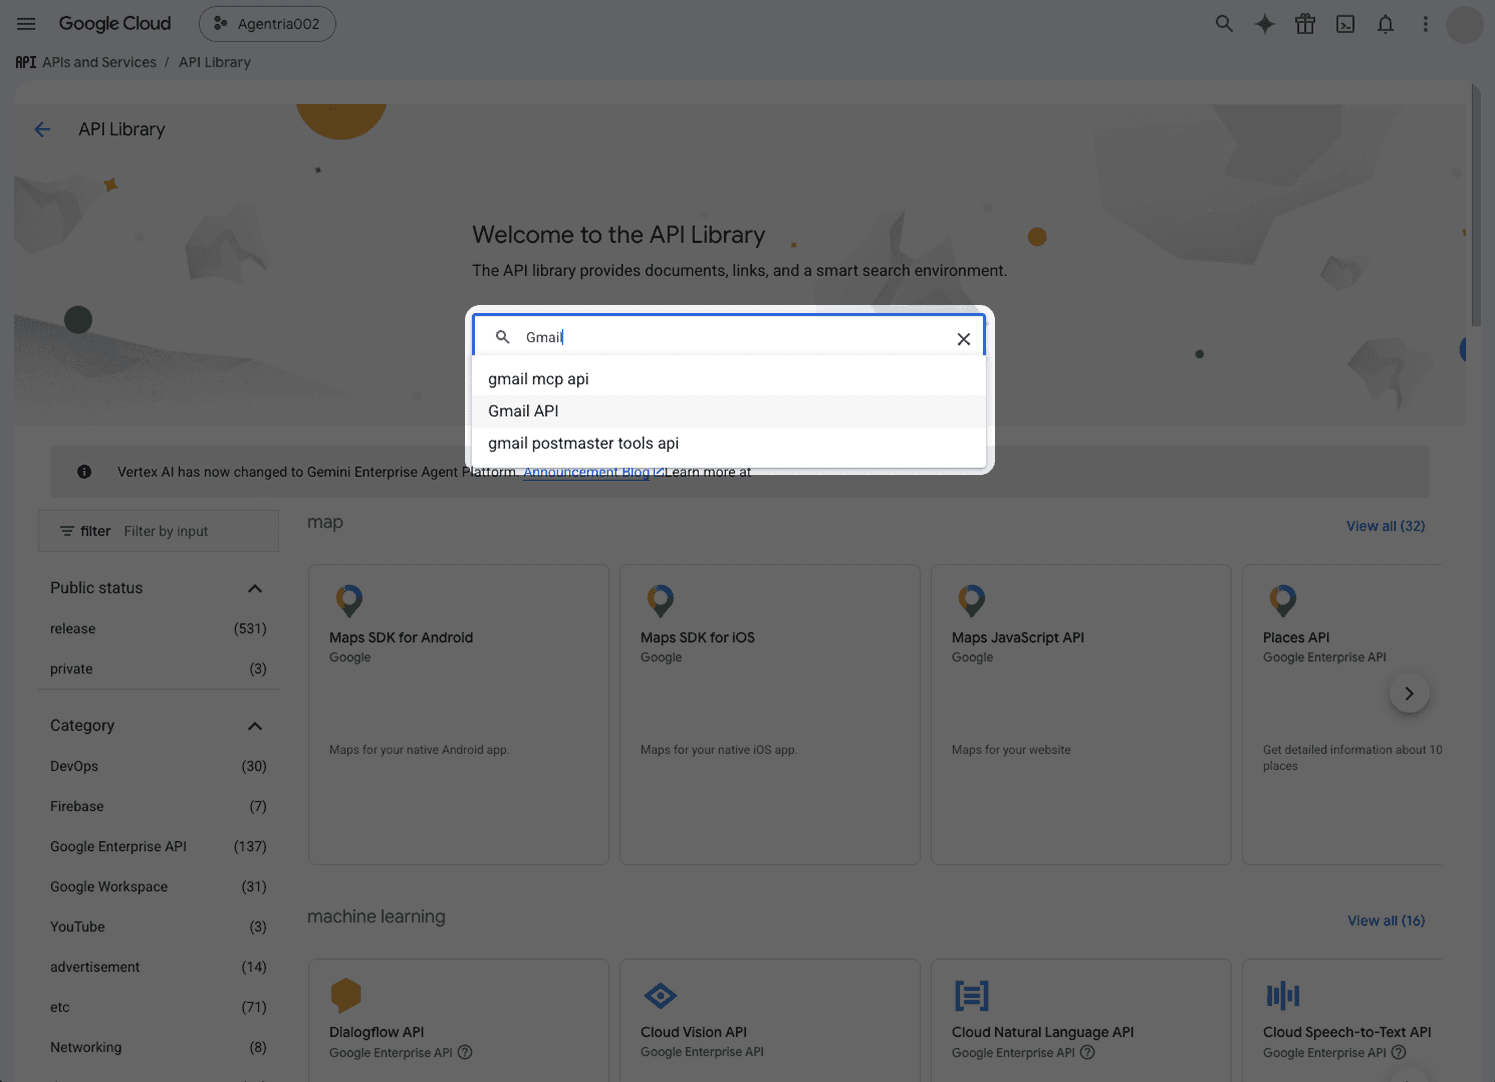
Search for the API you need (e.g., Gmail API, Google Sheets API).
This guide explains the process using the Gmail API.
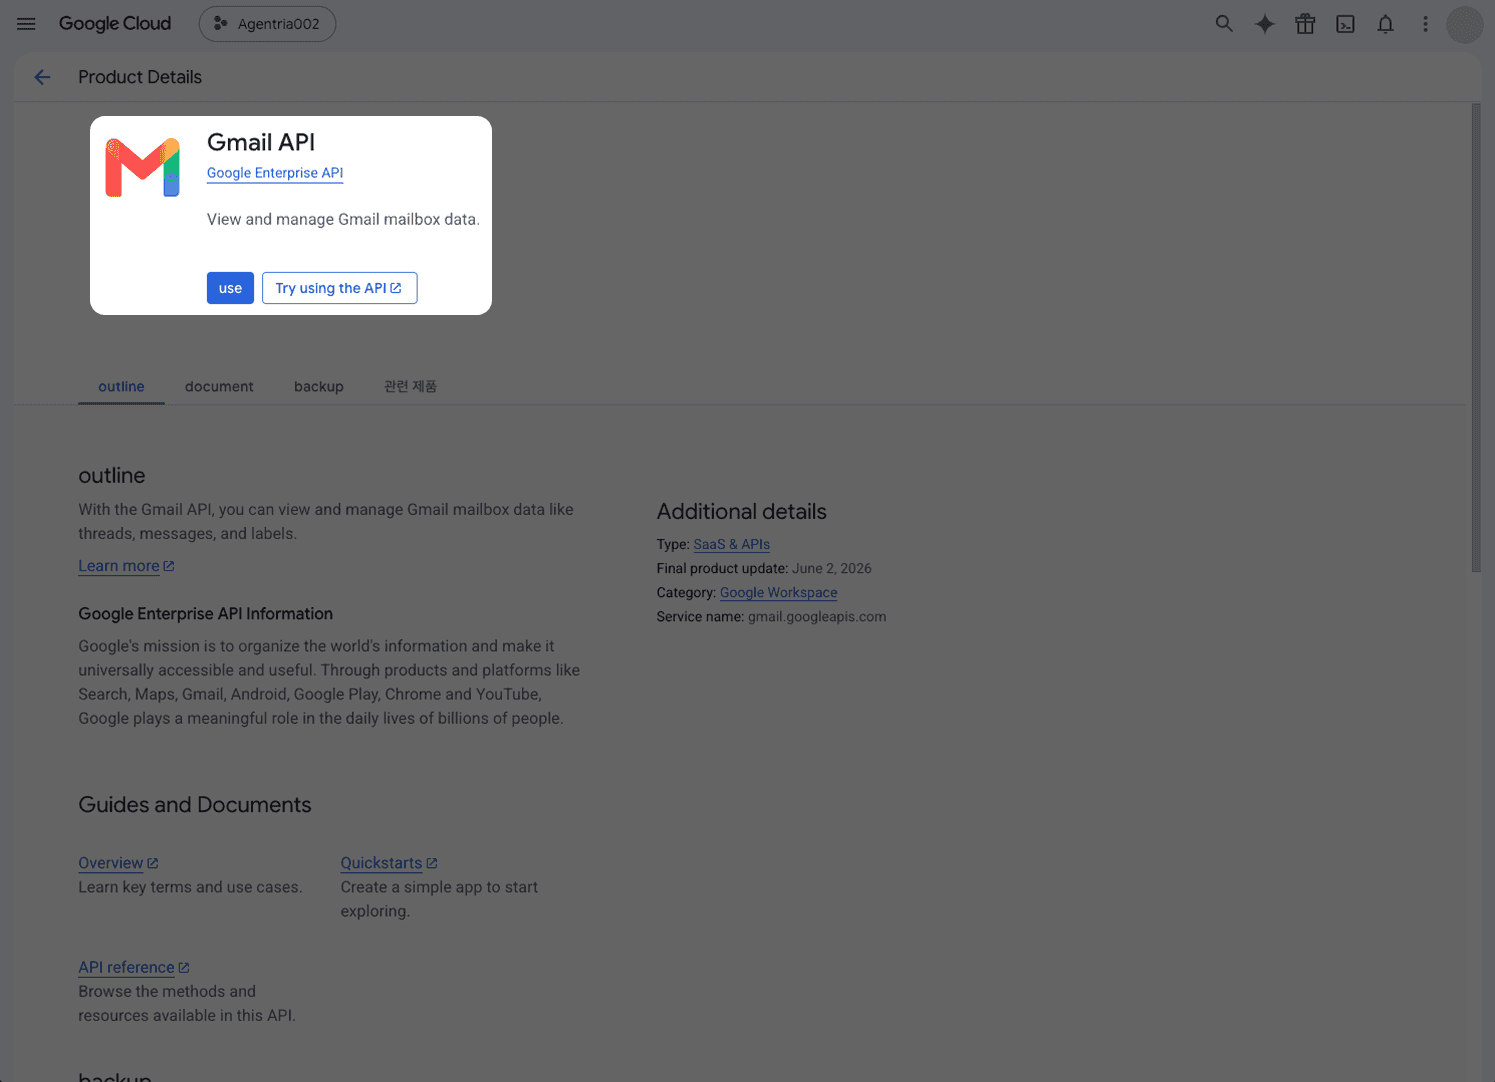
Select the search result and click Enable to activate it.
All the configuration in the Google Cloud Console is now complete. Go back to the Agentria page.
Step 8: Enter the Client ID and Client Secret in the Credential
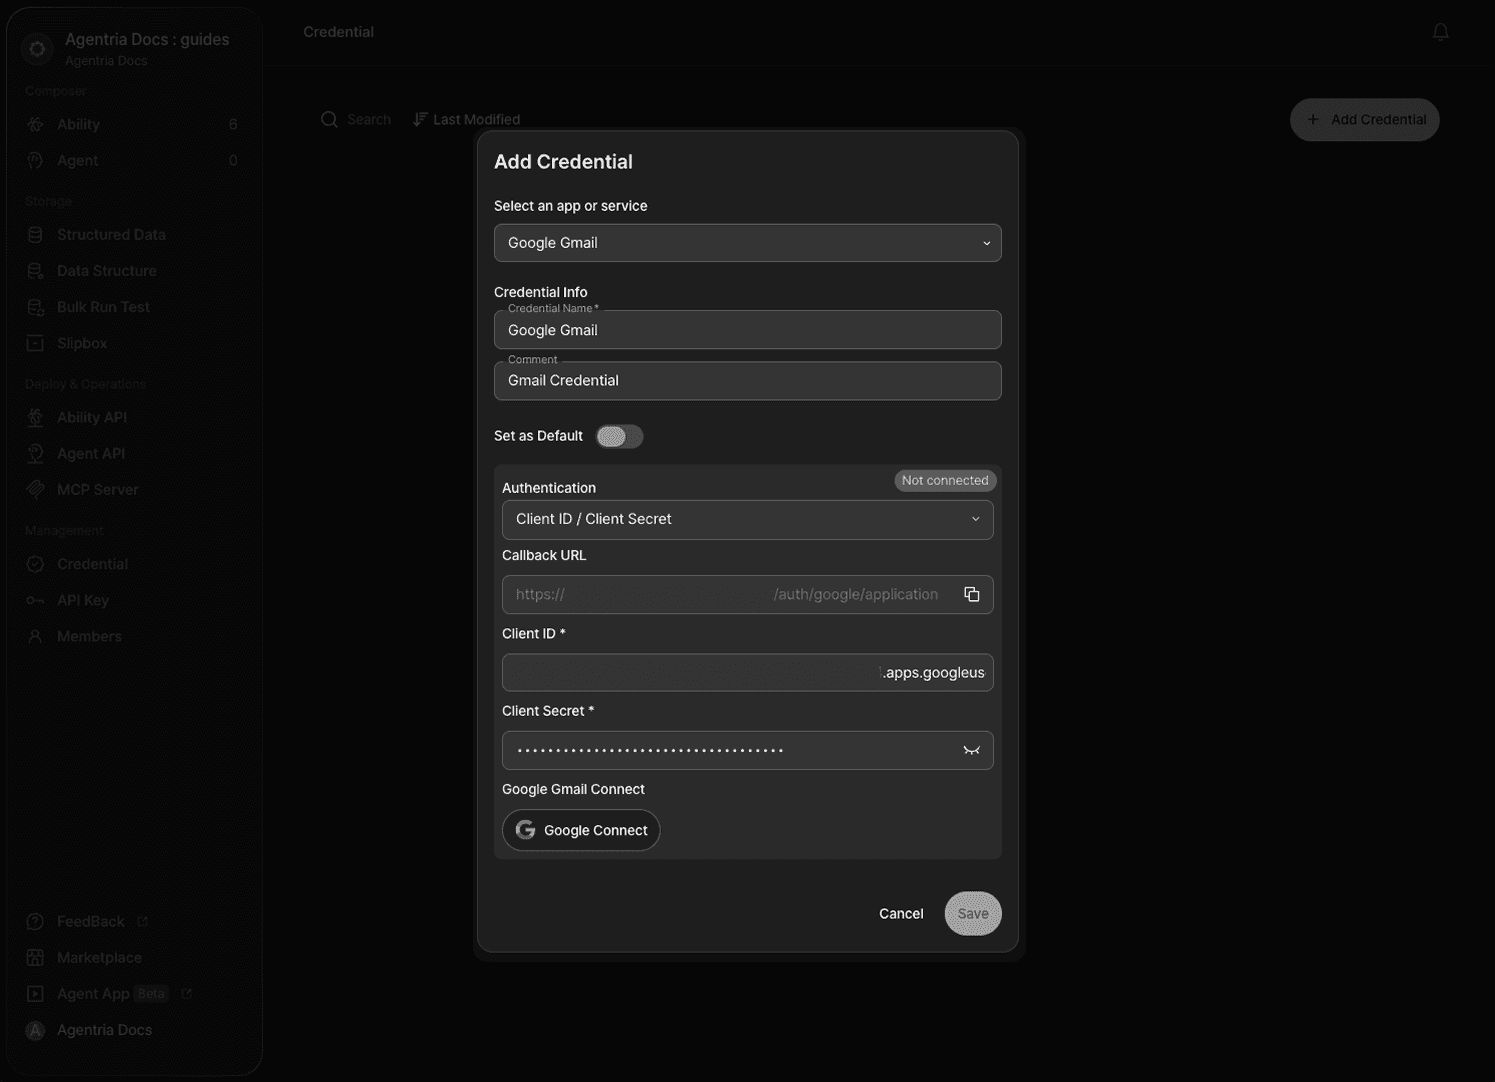
In the credential popup you were setting up in Agentria, enter the values you recorded in Step 6 into the Client ID and Client Secret fields.
If you didn't copy the values, you can check them again by going to the Clients tab and clicking the Client ID.
Click Google Connect to link your Google account.
The connection process is the same as Steps 7–9 of the Oauth 2.0 method.
Click Save to complete the credential setup — the Authentication status will then show Connected.
Note: Client information issued this way can be reused, but it expires after 6 months of inactivity. If it expires, you can re-authorize and go through authentication again.
Next Steps
Setup complete.
You can now select this credential in a node to use Google service integrations right away.
Frequently Asked Questions
What is a Google Credential?
A Google Credential is the authentication information registered in Agentria that lets a node accessing a Google service — Gmail, Google Sheets, Google Calendar, and more — reach a user's Google account. A node can only read and write real Google account data once this is registered.
When do you need a Google Credential?
You need one whenever you add a node that integrates with a Google service, such as the Gmail node, to a workflow and try to run it. If no credential is registered, or if it isn't connected to a Google account, the node can't run.
Which method should you choose, Oauth 2.0 or Client ID/Client Secret?
Most users should use the Oauth 2.0 method, which connects with nothing more than a Google account login and no key to issue. Only advanced users who need a custom app or organization branding should choose the method that uses a Client ID/Client Secret issued directly from the Google Cloud Console.
How does a Google Credential connect to a node?
Open the Credential dropdown in the editor of a node that integrates with a Google service, such as the Gmail node, and select a registered credential. Credentials are registered at the project level, so once registered, they can be reused across multiple Google service nodes in the same project.