Get Started
Learning to Use Nodes — Excel Reader Node
This tutorial walks you through the Excel Reader node in Agentria. The Excel Reader node parses a sheet in an XLSX file and returns the column names, the data rows, and the row count as separate values.
In this tutorial, you will build an "Excel Table Data Reading" workflow that reads the contents of an uploaded Excel file while preserving its structure.
Before You Begin
For instructions on how to enter the Agentria Canvas, refer to the 🔗3-Step Core Guide.
Prepare one XLSX file in advance. It must be a table whose first row contains the column names. The Excel Reader node treats the first row as the column names and reads the rows below it as data.
The format the Excel Reader node reads is .xlsx. Save legacy .xls files as .xlsx in Excel before using them.
The column names shown in the screens that follow come from the example file, and what you see will differ depending on the first row of the file you prepare.
After completing this tutorial, you will be able to:
Connect a file-type variable to the
Excel Filefield of the Excel Reader node.Receive the column names of the sheet as
headersand review them.Receive the data rows as
rowsand reference values by column name.Receive the number of data rows as
countand use it in other nodes.Verify the parsing results with a Node Test and an Ability Test.
Workflow Overview
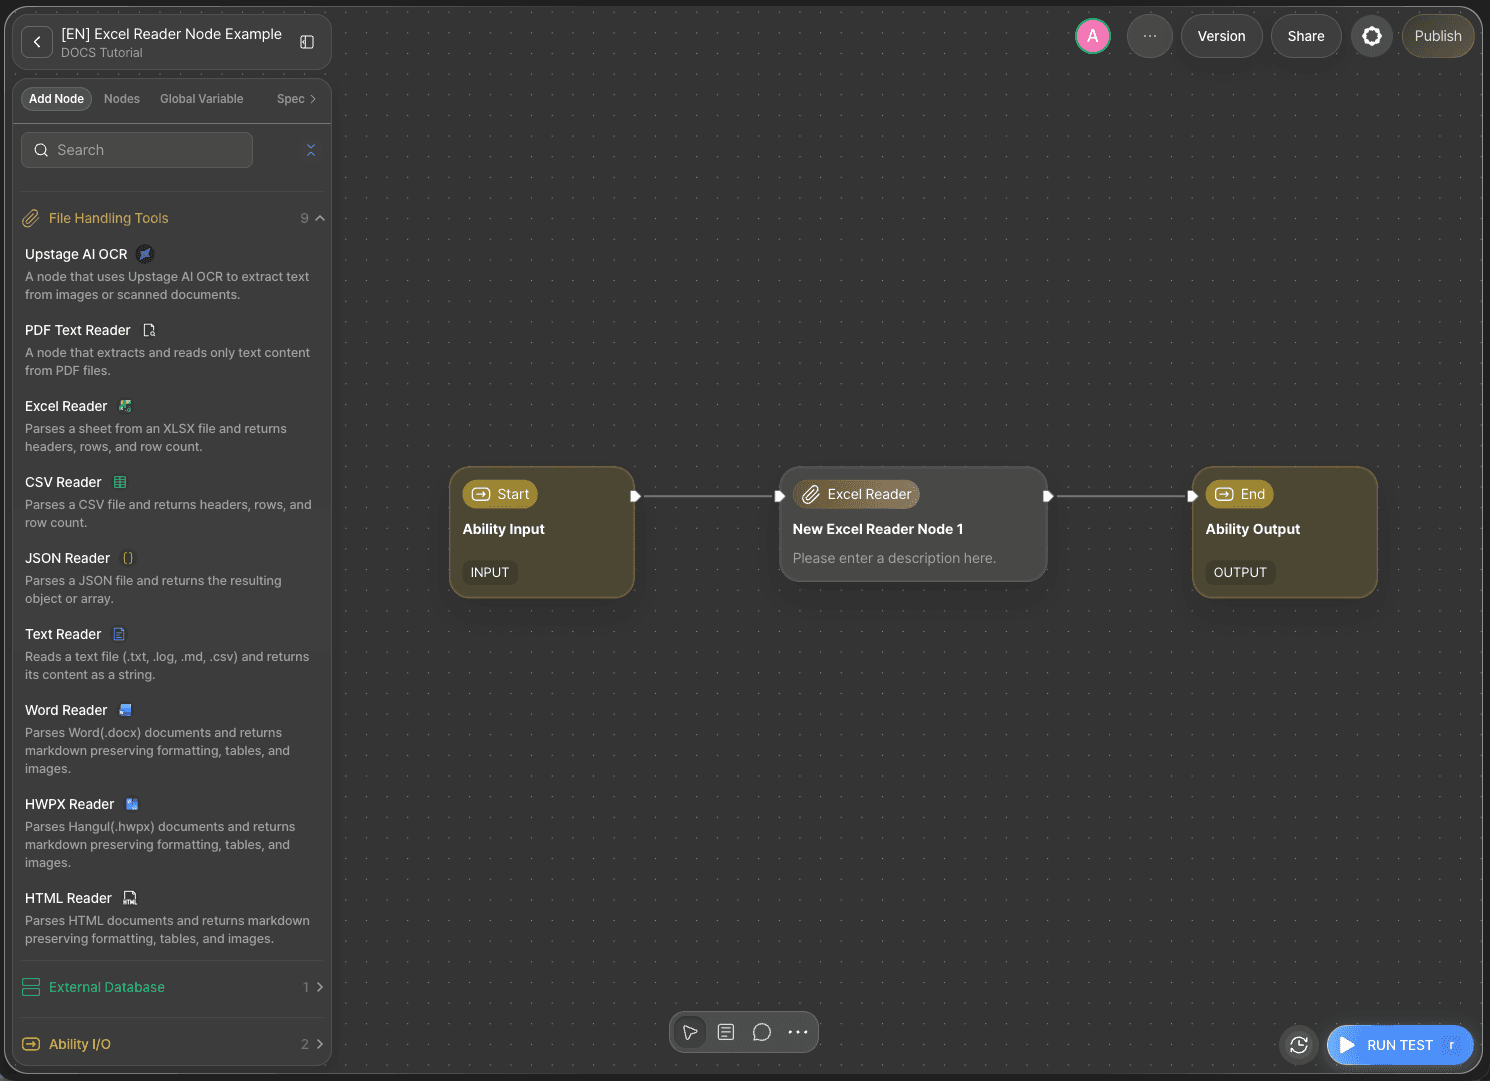
The core of this tutorial is the Excel Reader node.
The Excel Reader node parses the sheet of the connected XLSX file and returns three values. The column names in the first row become headers, the data rows below become rows, and the number of data rows becomes count. Because the table is returned with its structure preserved rather than flattened into a string, it is well suited to picking out the values of a specific column or processing the data row by row.
The Excel Reader node belongs to the File Handling Tools category. Depending on the file format you need to process, you can also use the nodes below.
Node | Supported Format | Return Format |
|---|---|---|
CSV Reader node | .csv | Headers, rows, row count |
PDF Text Reader node | String | |
Upstage AI OCR node | Images and scanned documents | String |
JSON Reader node | .json | Object/array |
Text Reader node | .txt, .log, .md, .csv | String |
Word Reader node | .docx | Markdown |
HWPX Reader node | .hwpx | Markdown |
HTML Reader node | .html | Markdown |
The CSV Reader node returns its results in the same format as the Excel Reader node. If the file you handle is a .csv, follow this tutorial as it is.
The remaining reader nodes differ only in the file formats they support and the format they return; the flow of connecting a file and passing the result to the next node is the same.
For details on the PDF Text Reader node, refer to the 🔗PDF Text Reader Node Guide.
Step 1: Declare Input Variables (Start Node)
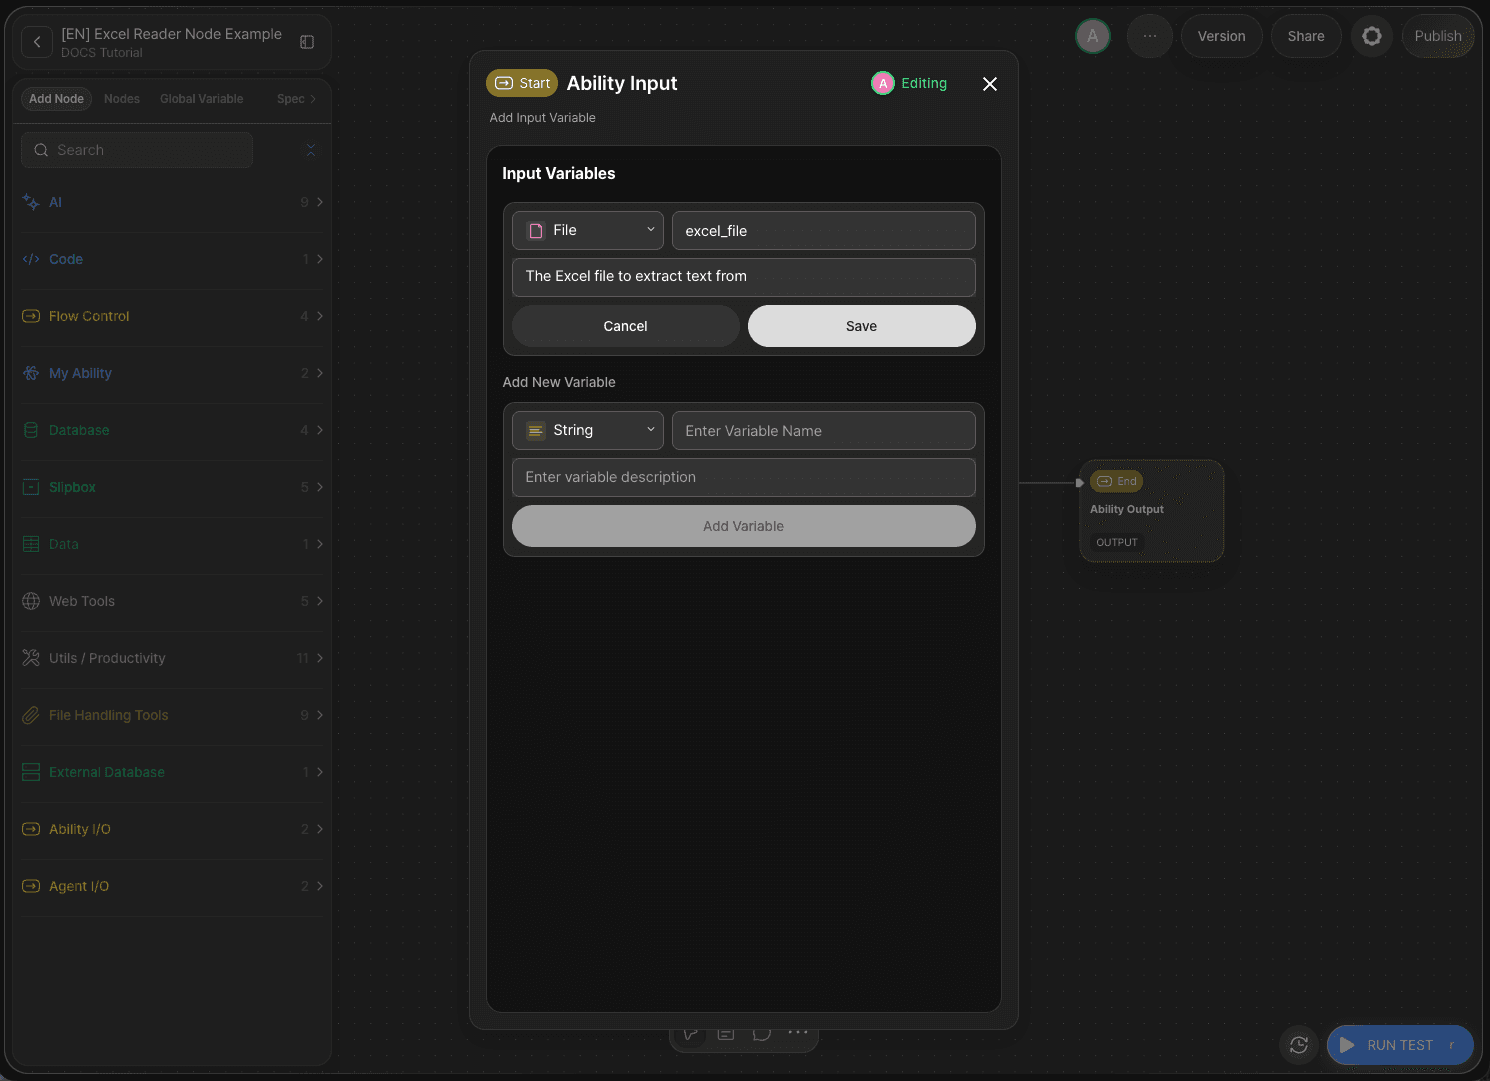
Double-click the Start Node to open the Node Editor. On the Ability Canvas, the Start Node is displayed as Ability Input.
In the Input Variables section, add the variable below and click Save.
Type | Variable Name | Description |
|---|---|---|
|
| The XLSX file to parse |
Select File, which receives a single file, as the type. The Excel Reader node processes one file at a time, so Filearray, which holds multiple files, is not used.
excel_file is the variable you will connect as the input of the Excel Reader node in the next step.
Step 2: Add the Excel Reader Node
Click Add Node on the Canvas, then drag and drop the Excel Reader node from the File Handling Tools category onto the Canvas.
The node you place is named New Excel Reader Node 1.
Step 3: Configure the Excel Reader Node
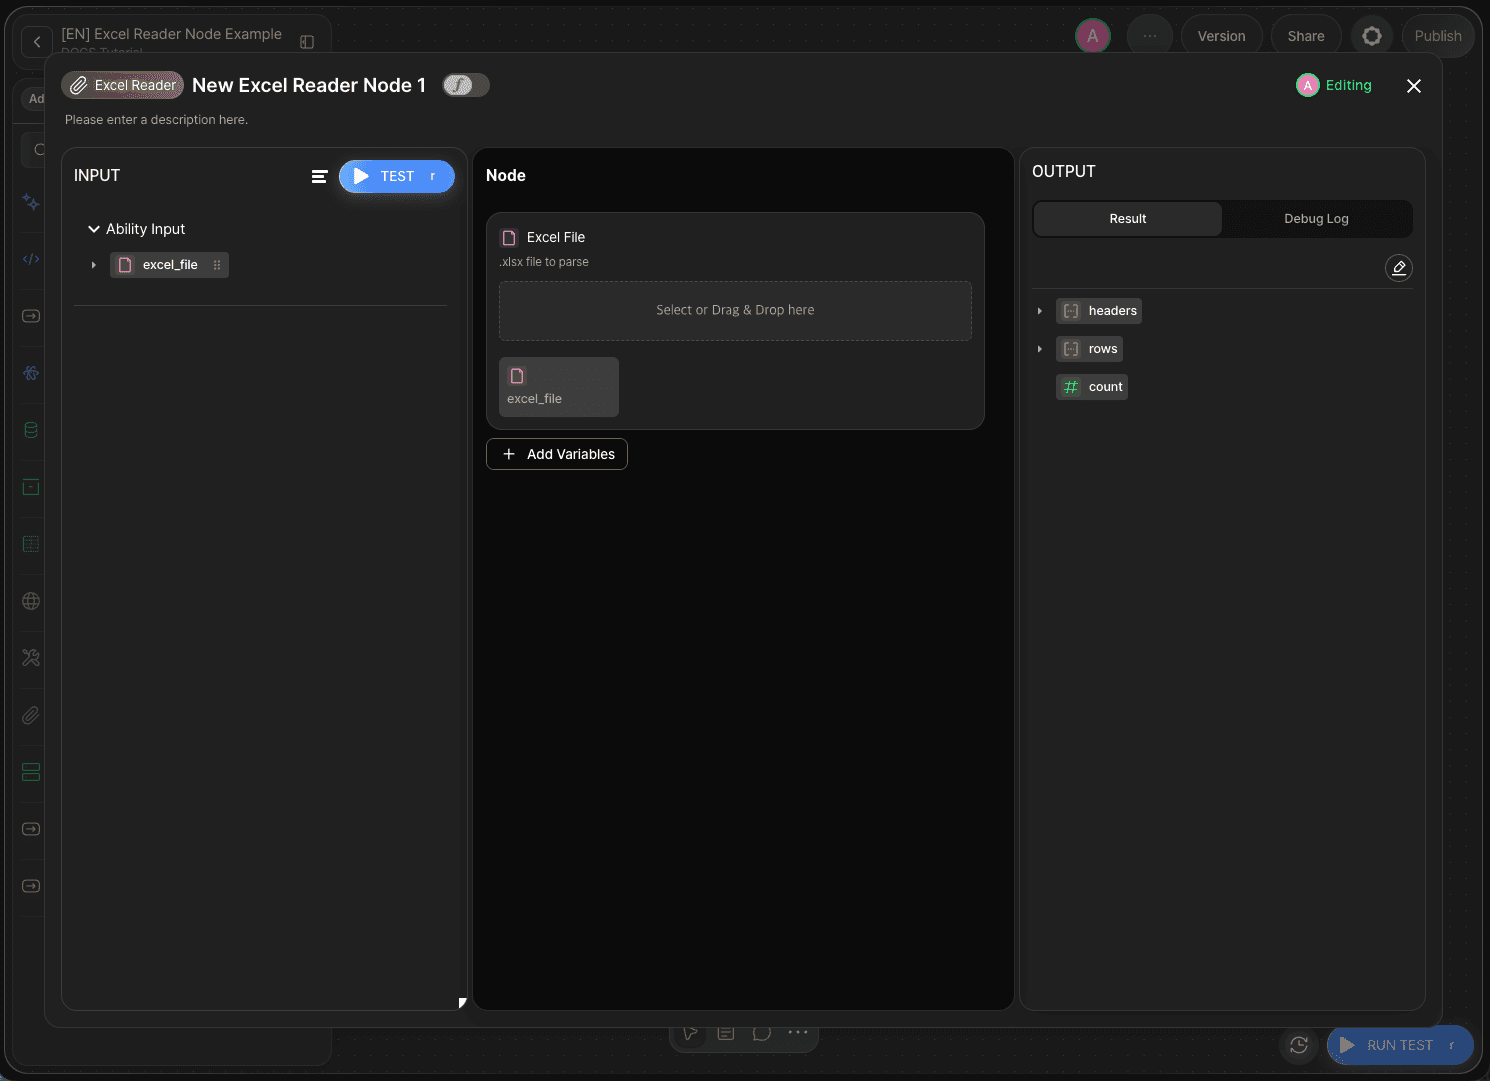
Double-click the New Excel Reader Node 1 node to open the Node Editor.
The Excel Reader node provides the fields below.
Field | Required | Description |
|---|---|---|
| Required | The .xlsx file to parse. Only a single file can be provided |
| Optional | The name of the sheet to read. The first sheet is read if not specified |
| Optional |
|
This tutorial uses only Excel File. If the optional fields sheet_name and evaluate_formula are left in their default state, the first sheet is read.
Two Ways to Connect a File
The Excel File field can be filled in two ways.
Method | Behavior | When to use |
|---|---|---|
Upload a file directly to the node | The uploaded file is fixed to the node, so the same file is read on every run | When the file has fixed contents, such as a reference table |
Connect an input variable | The file passed in when the workflow runs is read | When a different file is processed on each run |
To upload directly to the node, drop a file onto the Select or drag and drop area of the Excel File field. Because the file is stored in the node, you do not need to receive a file from the Start Node.
The CSV Reader node, JSON Reader node, Text Reader node, Word Reader node, HWPX Reader node, and HTML Reader node connect files the same way.
Both methods accept only one file. When connecting an input variable, declare the variable as the File type and upload only one file for testing as well. To process several Excel files, place as many Excel Reader nodes as there are files and connect one file to each node.
This tutorial uses the input variable method. Connect the excel_file variable from the Start Node to the Excel File field using drag and drop. This builds a workflow that processes whichever file the user uploads.
Adding Optional Fields
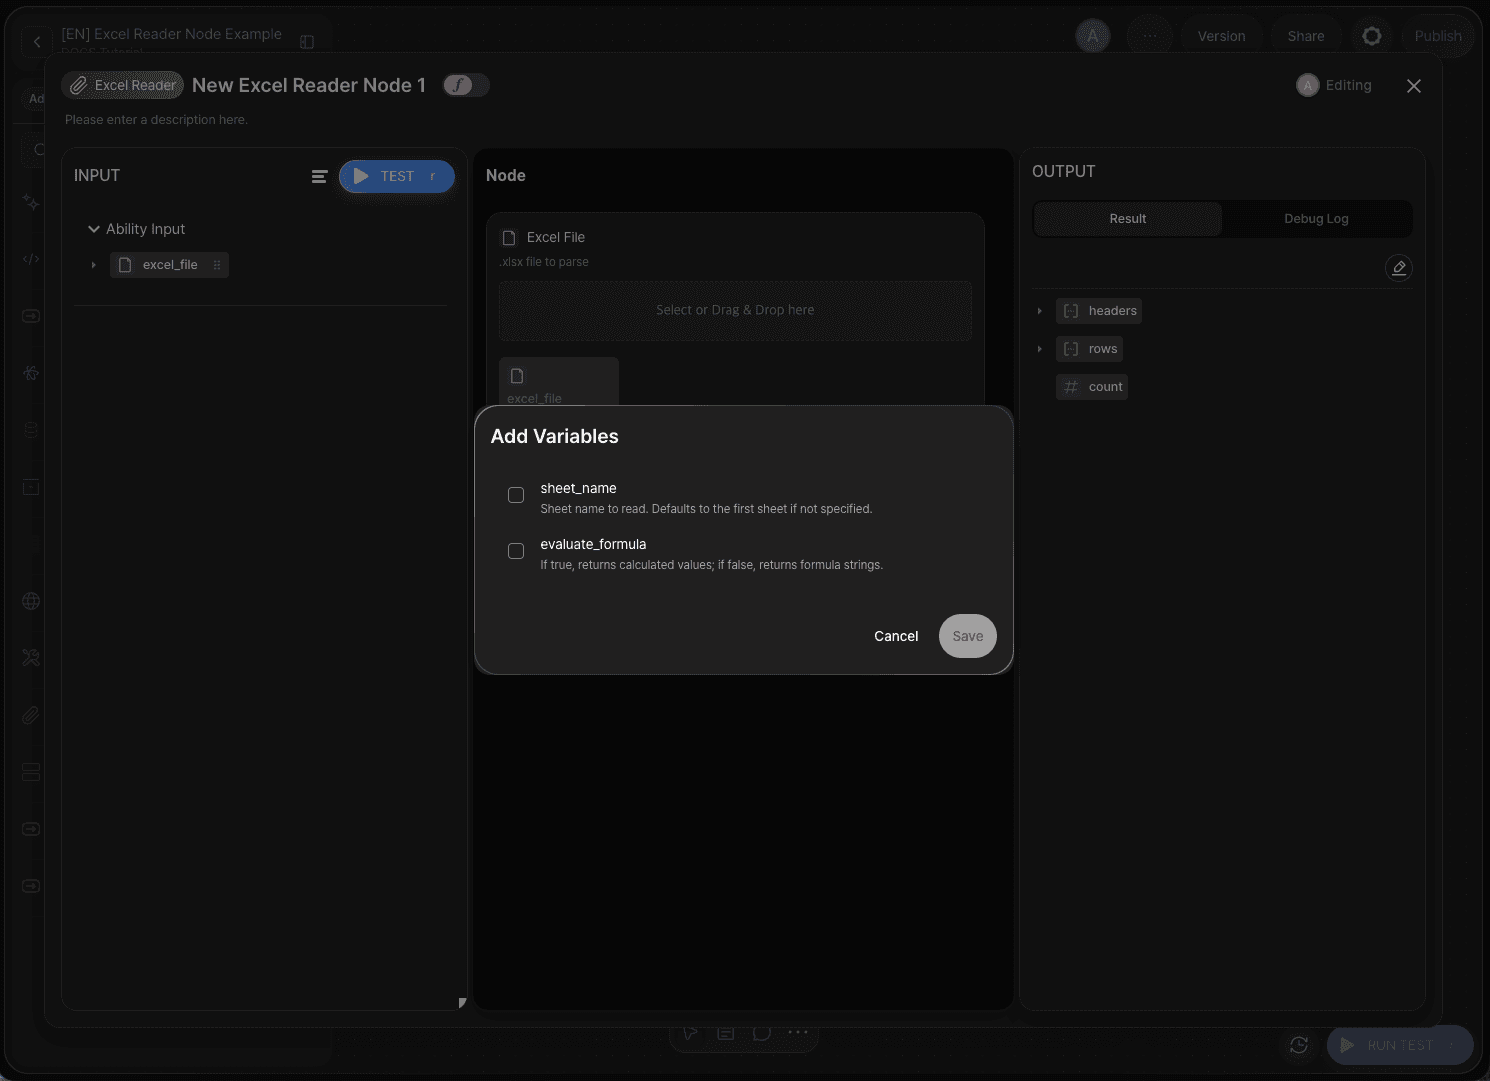
Optional fields are not shown on screen from the start. To use them, click the Add Variable button in the Node Editor. Check the fields you need in the Add Variable modal and click Save; the fields then appear in the Optional Variables section of the node. Adding sheet_name displays it as the Sheet Name field.
sheet_name: Specifies the name of the sheet to read. Use it when a specific sheet must be read from a file that contains several sheets. If it is not specified, the first sheet is read.evaluate_formula: Determines how cells containing formulas are returned.Truereturns the calculated result of the formula, andFalsereturns the formula string itself, such as=SUM(A1:A10). When the field is added, it starts turned on asTrue.
Values the Node Outputs
When the node runs successfully, it outputs the three values below.
Output | Type | Description |
|---|---|---|
| Array | The list of column names read from the first row |
| Array | The list of data rows. Each element is an object keyed by column name |
| Integer | The number of data rows |
The three values relate to one another as follows.
headers: Reads the first row of the sheet as column names and returns them as an array.rows: Returns the remaining rows, excluding the first row, as data.count: The number of elements inrows. The column name row is not counted.
The first row is used as the column names, so it is not included in
rows. As a result,countis one less than the total number of rows visible in Excel.
Step 4: Configure the End Node
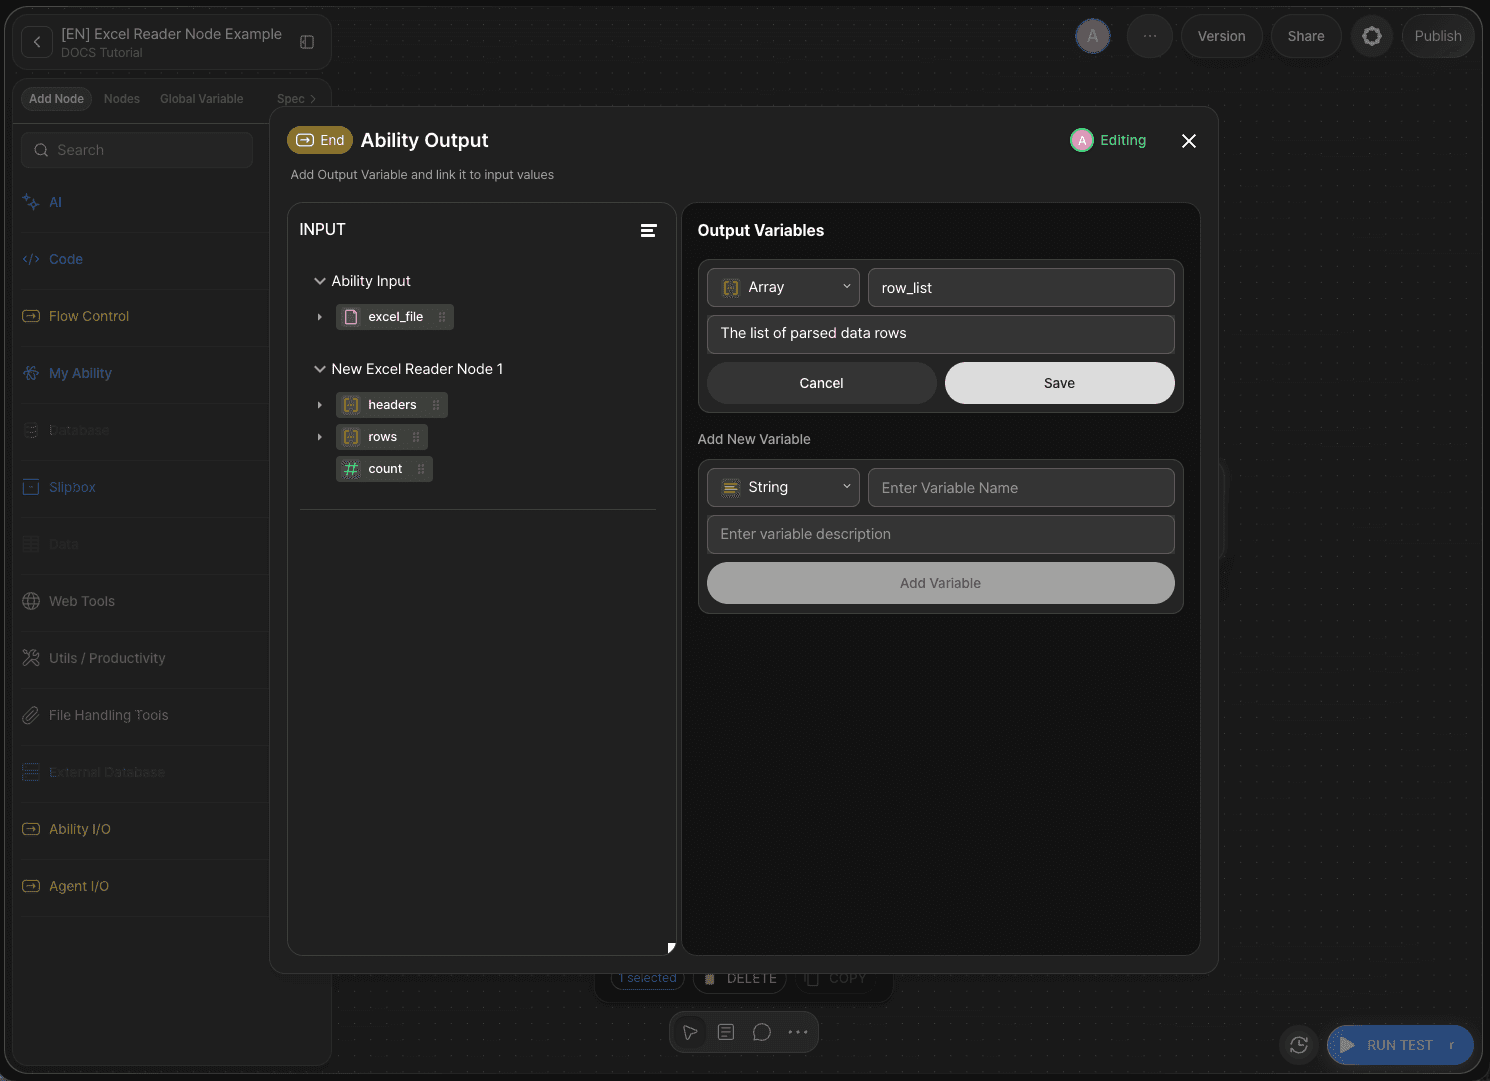
Double-click the End Node to open the Node Editor. On the Ability Canvas, the End Node is displayed as Ability Output.
In the Output Variables section, add the variable below and click Save.
Type | Variable Name | Description |
|---|---|---|
|
| The list of parsed data rows |
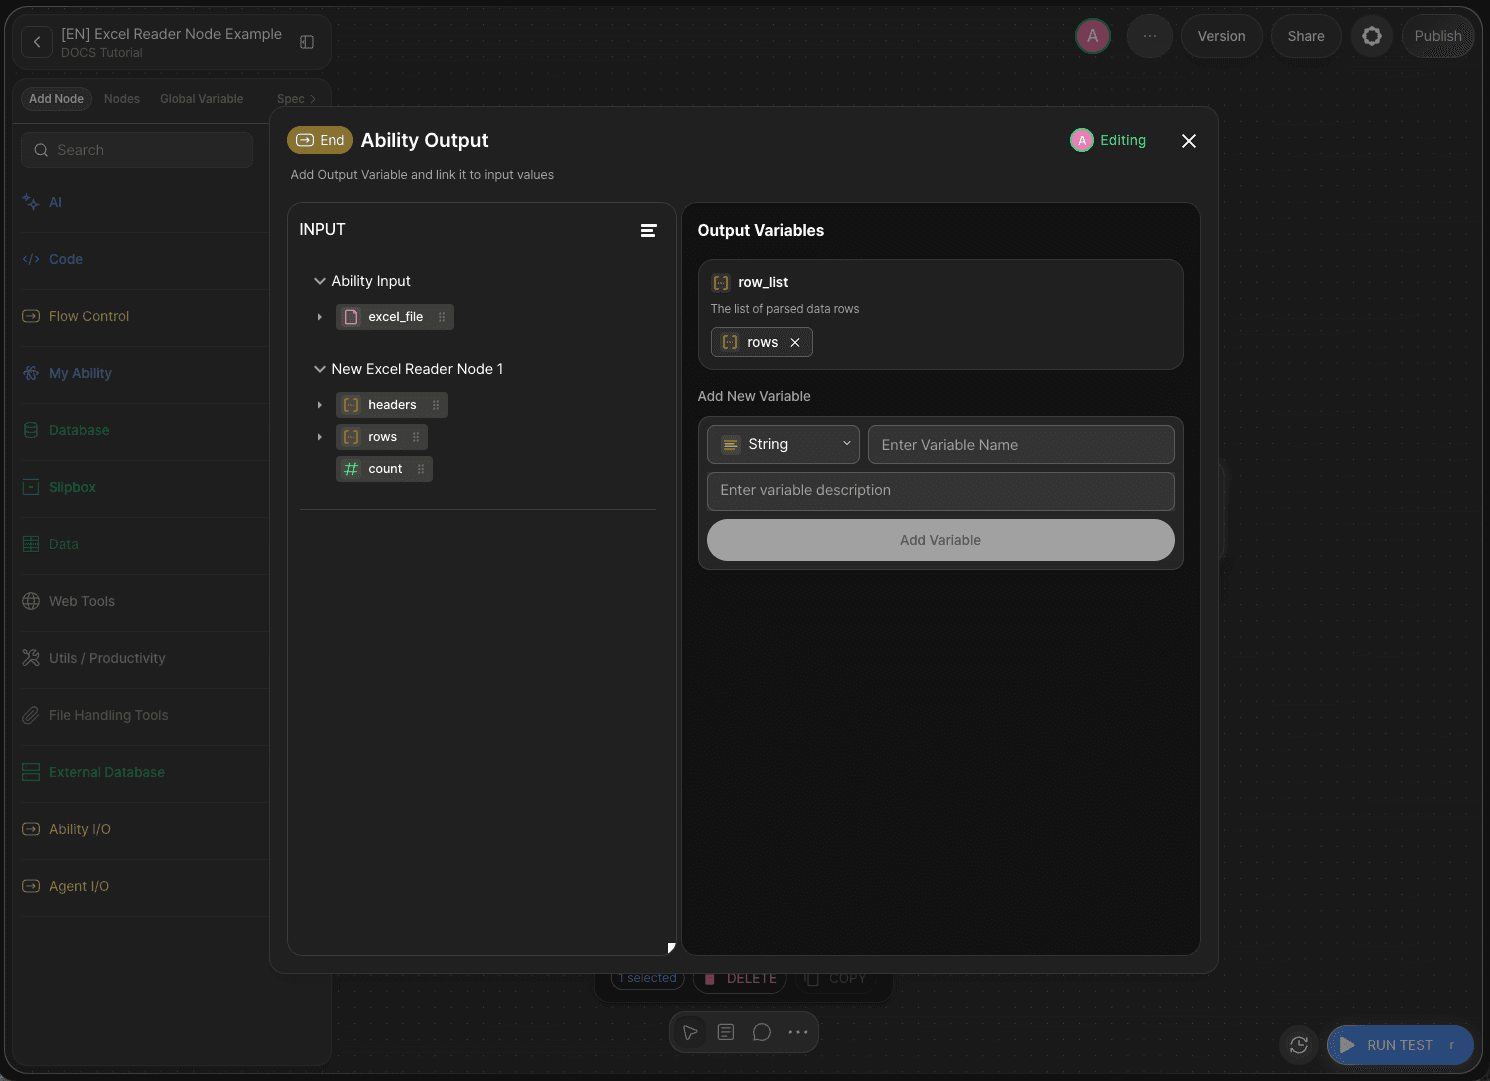
Connect rows from the Excel Reader node to the row_list field you added, using drag and drop.
For an output variable, you set the name and the type yourself, then connect a value of a matching type from a previous node's outputs using drag and drop. Since rows is an array, Array was selected as the type.
headers and count can be added as output variables the same way if you need them. Select Array for headers because it is an array, and Integer for count because it is a whole number. This tutorial exports only the data rows.
Step 5: Check the Output with a Node Test
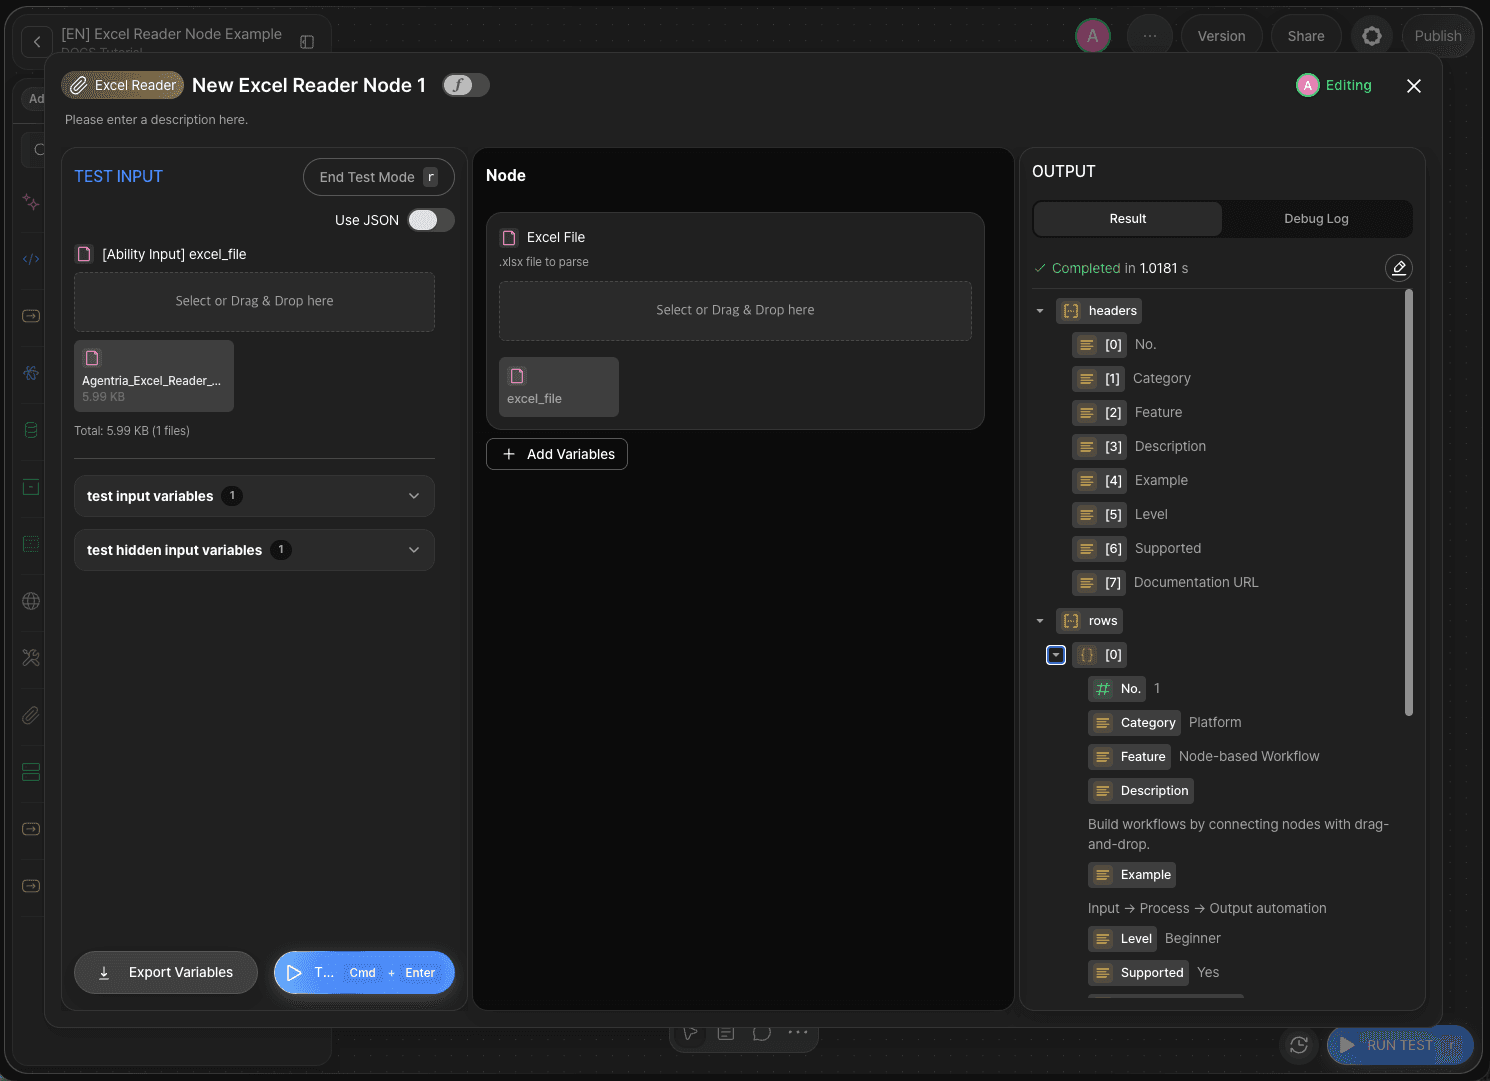
Click the TEST button at the top of the Node Editor to open the Test Input panel on the left. Drag and drop the prepared XLSX file onto the [Ability Input] excel_file field, then click Test.
Expanding headers in the Output Section lists the values of the first row of the sheet in order. Below is the result of using the example file.
Expanding rows lists the data rows starting from [0]. Expanding an individual row shows column names rather than indexes such as [0] and [1].
The No., Category, and Feature shown here are not names defined by the node; they are the values written in the first row of the example file. If you use a different file, the contents of that file's first row become the column names.
This is the core of the Excel Reader node. Instead of counting positions, such as the third item of rows[0], you can specify a value directly by column name. Even if the column order changes in Excel later, the workflow does not need to be modified.
![Image of checking the count value at the bottom of the Node Test result]
Check count at the bottom of the Output Section. If the last index of rows is [11], count is 12, because indexes start from 0.
A Node Test runs only that node on its own. Because parsing results can be checked before the surrounding nodes are connected, it is useful for verifying that a file is read correctly before completing the workflow.
Step 6: Run the Entire Workflow with an Ability Test
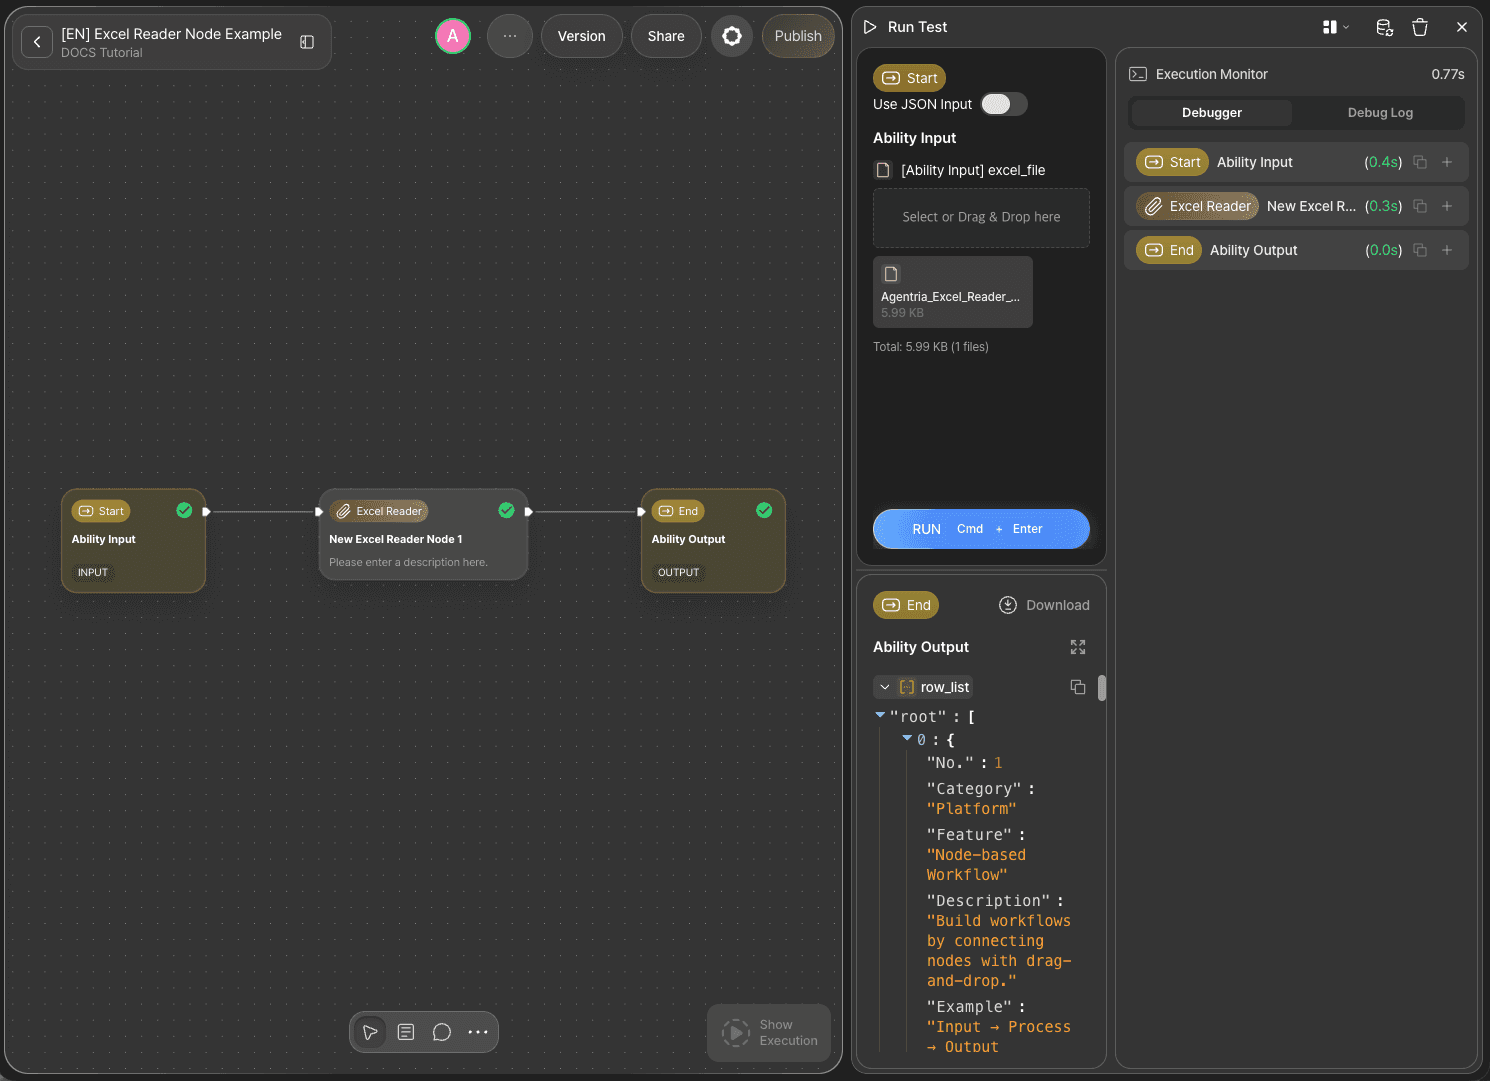
Click the RUN TEST button at the bottom right of the Canvas to run an Ability Test.
Upload an XLSX file to the excel_file field and run the test. The parsed data rows are returned in row_list of the End Node.
Reference: Characteristics of the Parsing Results
Cell value types are preserved. A column containing numbers is returned as numbers, and a column containing text is returned as strings. A column that holds only numbers, such as the No. column of the example file, is passed as the number 1 rather than the string "1", so it can be used directly in calculations in a following node.
The first row is always treated as the column names. The Excel Reader node always regards the first row of a sheet as the column names when reading the file. Therefore, a file whose first row holds a report title or a notice, or whose data begins immediately, will not produce the intended result, because that content takes the place of the column names.
Prepare the format of the file in advance. Delete any title rows or blank rows above the table, and arrange the file so that the column names come in the first row before passing it to the workflow.
The values in the first row of the sheet become the keys as they are. The column names are not generated by the node; the values written in the file are used as they are. Names are kept without any conversion, and names containing spaces, such as Documentation URL, are used exactly as written.
Specify the sheet to read with sheet_name. If it is not specified, the first sheet of the file is read. To read a different sheet, use Add Variable to bring out the sheet_name field and enter the sheet name. To read several sheets from one file, place as many Excel Reader nodes as there are sheets and specify a different sheet name in each node's sheet_name.
At this point, the sheet name must exactly match the name on the sheet tab of the Excel file. If it does not match, the node run fails and an error is returned.
This error appears not only when no value has been entered but also when the sheet with the entered name cannot be found. The name that could not be found is shown in parentheses after the message. If you see this message even though you clearly entered a value in the
Sheet Namefield, compare that name with the sheet tab in Excel. Differences in spacing or letter case are a common cause.
You can choose how formula cells are returned. evaluate_formula is turned on as True when it is added, so leaving it as it is returns the calculated results of formulas. Change it to False only when the original string, such as =SUM(A1:A10), is needed — for example when formulas themselves must be reviewed or documented.
A merged cell holds its value only in the first cell. When several cells are merged in Excel, the screen shows one wide cell, but inside the file only the top-left cell holds a value and the remaining cells are empty. The Excel Reader node reads this as it is, so the first cell holds the value and the remaining cells return null.
Vertical and horizontal merges are handled the same way. If two rows of the Category column are merged, only the first row holds a value and Category in the second row becomes null. If the Description and Example columns are merged horizontally, only Description holds a value and Example becomes null.
For a workflow that requires every row to hold a value, unmerge the cells and enter a value in each one before using the file. Reading a merged table as it is mixes
nullvalues into the results, which can produce unexpected outcomes in later nodes.
A sheet with no data returns an empty result. When a sheet with no contents is read, the node does not raise an error. It is processed as completed successfully and returns empty arrays in headers and rows, and 0 in count. Since the workflow proceeds to the next node as if it had succeeded, add a branch that checks whether count is 0 when later steps should run only if data exists.
It suits row-by-row processing. Because rows is an array, connecting it to a Loop node lets you perform the same task on each row. count can be used to check in advance how many rows will be processed, or to decide whether to skip later steps when there are no rows at all.
Use reader nodes for table data. Even for the same table, if it sits inside a PDF, the PDF Text Reader node joins the cell contents into a string and the distinction between rows and columns disappears. To handle a table with its structure intact, prepare the original as XLSX or CSV and read it with the Excel Reader node or the CSV Reader node.
Next Steps
🎉 Congratulations! You've successfully built the "Excel Table Data Reading" workflow using Agentria.
Connect rows to a Loop node to process each row, or extract the values of a specific column and pass them to an AI model node to classify or summarize them. You can also use count to build a configuration that runs later steps only when there is data to process.
Agentria is a place where ideas become reality—your workflow can expand infinitely with your creativity.
For more Ability examples, visit the 🔗Ability Guide.
For Agent-based examples, visit the 🔗Agent Guide.
Frequently Asked Questions
What is the Excel Reader node?
The Excel Reader node is a node in Agentria that parses a sheet in an XLSX file and returns the contents of the table with its structure preserved. It belongs to the File Handling Tools category, and when a file is connected to the Excel File field, it outputs the column names of the first row as the headers array, the data rows below as the rows array, and the number of data rows as the count integer. It also provides the optional fields sheet_name, which specifies the sheet to read, and evaluate_formula, which determines how formula cells are returned.
When should I use the Excel Reader node?
Use it when table data managed in Excel needs to be handled within a workflow. It suits data that requires the same processing for every row, such as product lists, customer lists, and inventory status. Because the table is received as a structure of rows and columns rather than as a string, you can pick out the values of a specific column or process the data row by row.
What are headers, rows, and count?
headers is the list of column names read from the first row of the sheet, rows is the list of data rows excluding the first row, and count is the number of those data rows. The first row is used as the column names and is not included in rows, so count is one less than the total number of rows visible in Excel.
How do I reference the value of a specific column in rows?
Each element of rows is not an array listed in order but an object keyed by column name. You therefore specify a value by column name instead of counting which column it is. The column names used here are not defined by the node; they are the values written in the first row of the sheet, and spaces are preserved as well. With this approach, changing the column order in Excel later does not require modifying the workflow.
How is the Excel Reader node different from the PDF Text Reader node?
The two nodes differ in what they return. The PDF Text Reader node joins the text of a document into a single string, so even when a PDF contains a table, the cell contents are simply listed in order and no distinction between rows and columns remains. The Excel Reader node parses the sheet and returns the column names and data rows separately, so the structure of the table is preserved. To handle table data row by row, prepare the original as XLSX and use the Excel Reader node.