Get Started
Learning to Use Nodes - LLM Node
This tutorial walks you through how to use the LLM node in Agentria. The LLM node passes a prompt to a large language model (LLM) and lets you use the generated response inside your workflow.
Credit Availability
The LLM node is actually made up of several sub-nodes by model provider, and they differ in whether they support Credit.
Credit-enabled nodes let you use them right away, drawing on your own Agentria plan's Credit, without setting up a separate credential. Credit-disabled nodes, on the other hand, require you to issue and configure a credential for that service yourself before you can use them.
Credit-disabled (requires setting up your own credential): Anthropic LLM, OpenAI LLM
Credit-enabled (ready to use without a credential): Azure OpenAI LLM, Google Gemini LLM, Bedrock Anthropic LLM
In the +Add Node panel on the canvas, LLM nodes labeled Credit next to their name are the Credit-enabled ones. If you're new to setting up credentials, we recommend starting with a Credit-enabled node.
In this tutorial, you'll create and run an ability that takes a name and birthday as input and generates a "Today's Fortune Message" using the LLM node.
Before You Begin
To get started, create a project in Agentria and open the Ability Canvas.
For details on accessing the canvas, see Step 1 (Create a Project and Select a Composer) in the 🔗Get started in 3-Steps guide.
By completing this tutorial, you will be able to:
Add nodes
Declare variables in the Start Node
Connect nodes
Write prompts for the LLM node
Pass the LLM node's generated answer to the End Node
Check workflow execution results with an Ability Test
Workflow Overview
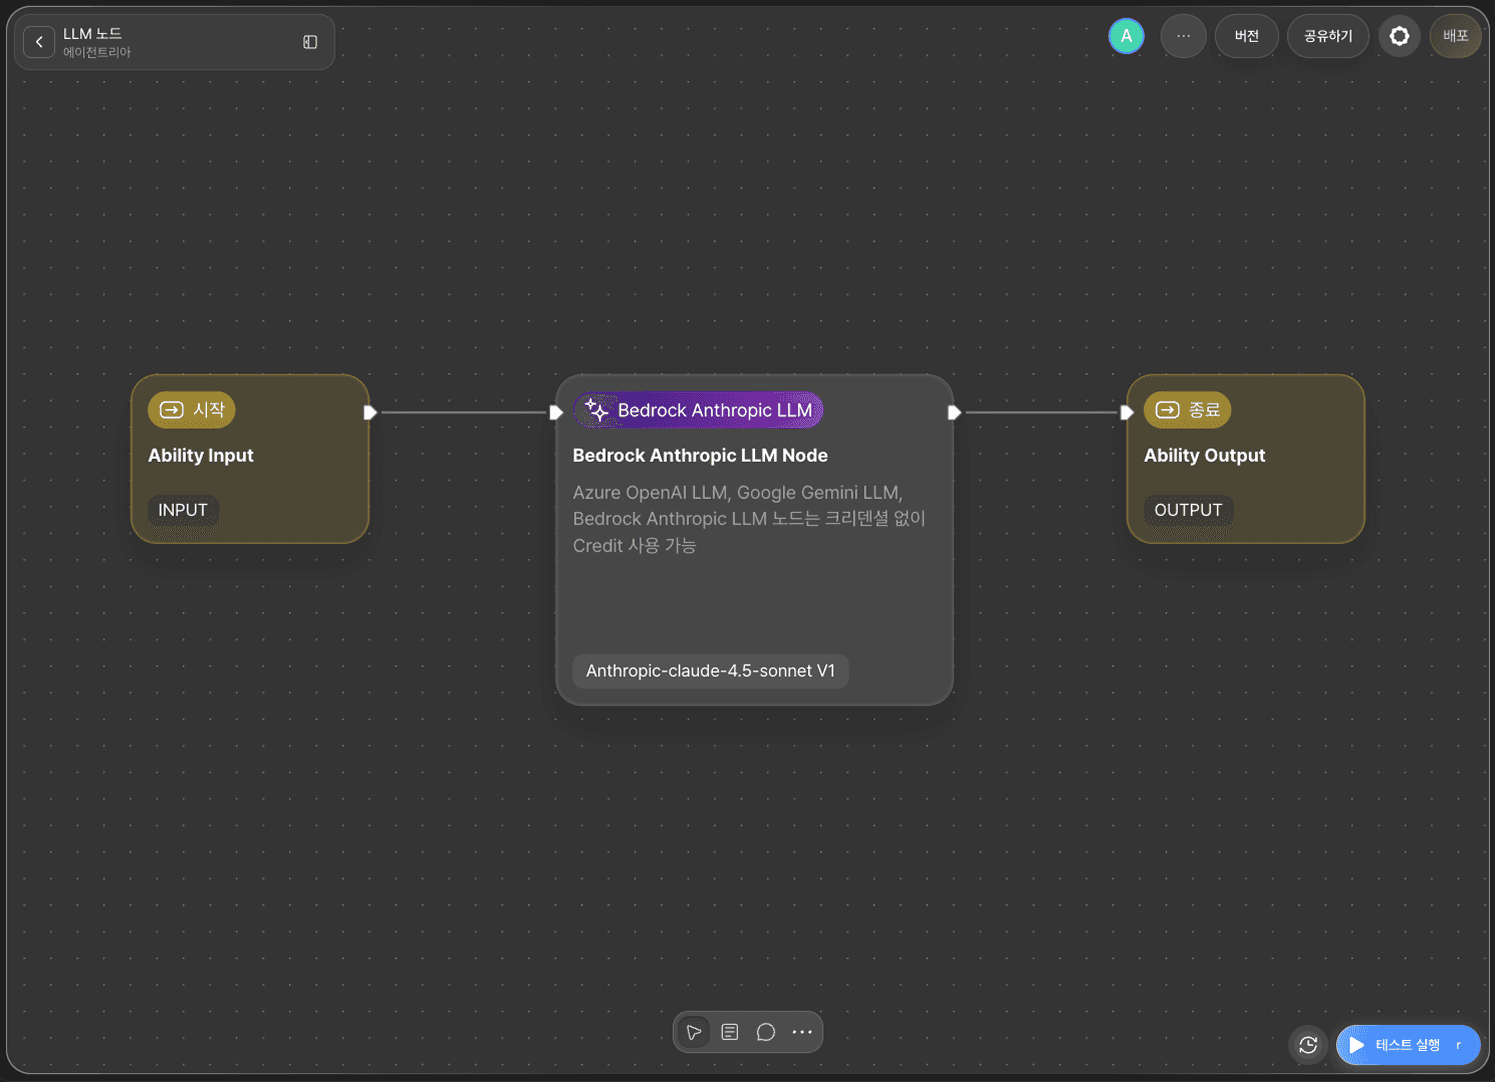
Overall flow: Start Node → LLM node → End Node
The core of this tutorial is the LLM node. The LLM node combines a system prompt and a user prompt, sends them to the model, and passes the generated response on to the next node.
LLM Node Fields
The LLM node provides the following basic fields.
Field | Description |
|---|---|
System Prompt | Enter static instructions. |
User Prompt | Enter dynamic instructions. You can add variables. |
Max Tokens | The maximum number of tokens to generate. (Default: 2048) |
Sampling Temperature | Controls the randomness of the response. The closer to 0, the less randomness. (Default: 0.7) |
Model | Sets the large language model to use. Answer quality varies by model. |
Image | A binding variable you can use when an image file input is needed. |
| The output variable that holds the LLM's response. Provided by default as a |
You can also configure the following option variables as needed.
Variable | Description |
|---|---|
| When choosing the next word, considers only the top k highest-probability candidates and picks one of them at random. |
| The closer to 1, the more varied the options considered; the closer to 0, the narrower the pool of words to choose from. |
| Safety settings. |
| (GPT-5 only) Setting it to |
| If node execution exceeds this limit, it's treated as an error. Set in seconds. |
| The maximum number of times the node retries execution. |
This tutorial uses the system prompt, user prompt, Sampling Temperature, Max Tokens, and Model. See the steps below for how to configure each of these in practice.
Step 1: Declare Input Variables
By default, the Agentria canvas has one Start Node and one End Node already placed.
The Start Node starts the entire flow.
The End Node ends the entire flow.
To build the "Today's Fortune Message" workflow, you first need to declare the variables you'll need in the Start Node.
Double-click the Start Node to open the Node Editor as a popup, where you can declare variables by setting their data type, name, and description.
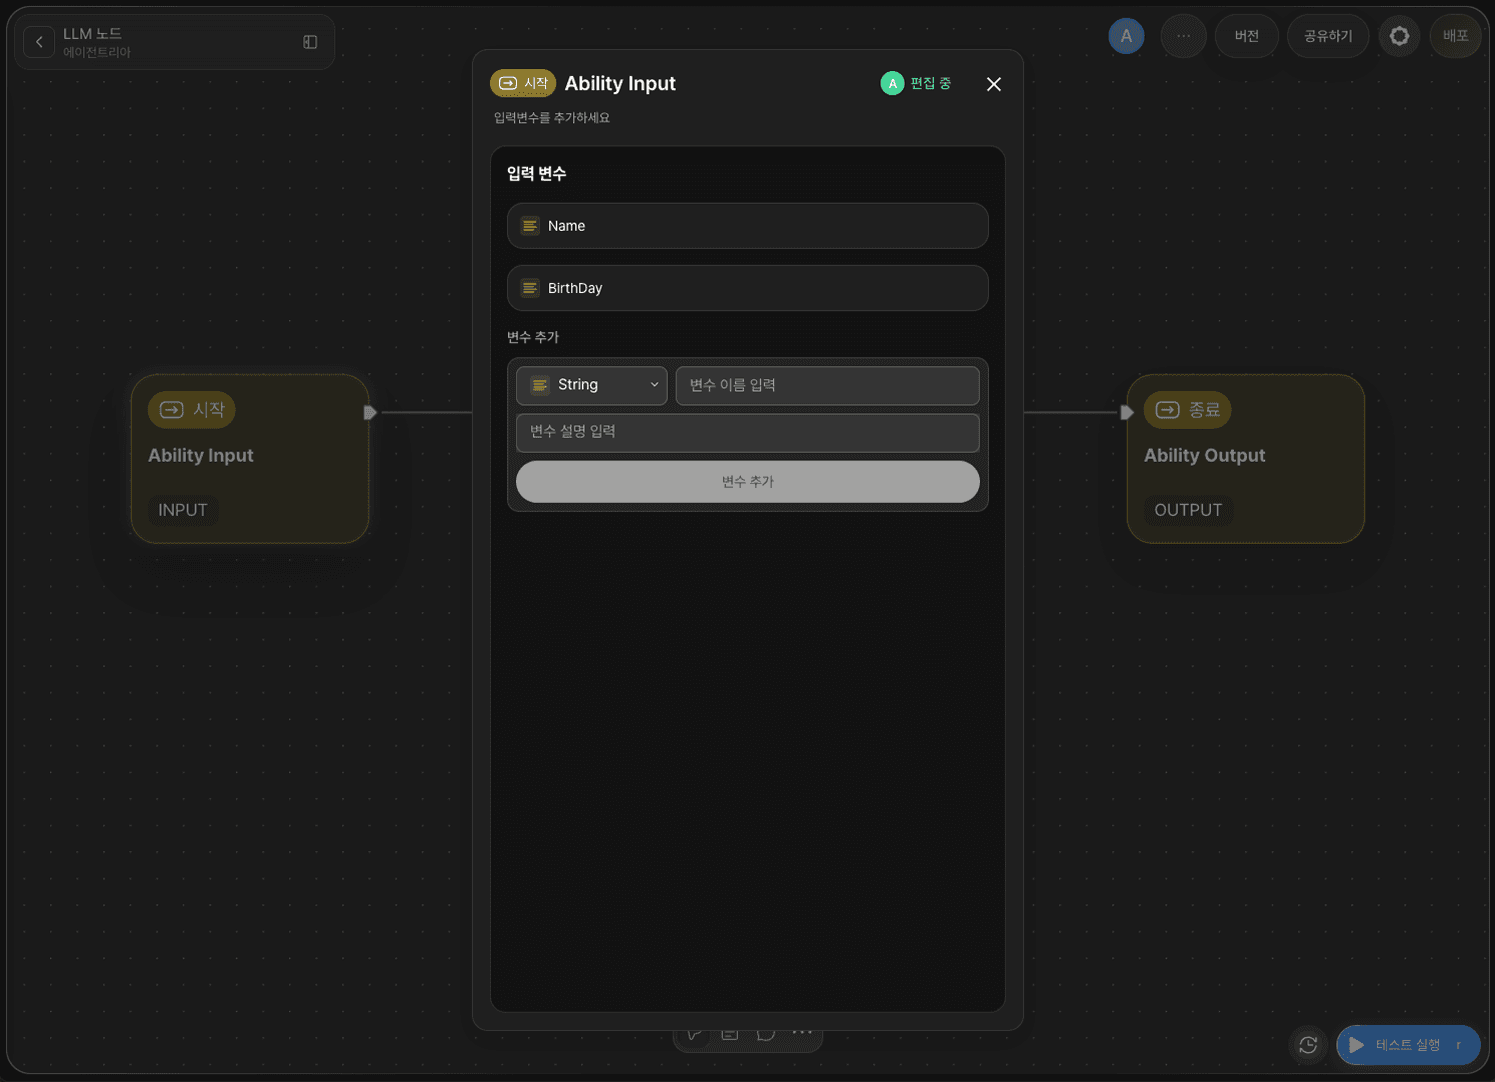
We'll declare [name] and [birthday] — the information needed to check today's fortune message — as variables.
Variables can't use Korean (or other non-Latin) characters in their names.
Set the name variable's data type to
Stringand save it asName.Set the birthday variable's data type to
Stringand save it asBirthDay.
Once you've finished declaring the variables, return to the canvas.
Step 2: Add a Node via Drag and Drop
Now it's time to add the node that will generate today's fortune message.
With the LLM node, you can generate output based on your input values just by writing a simple prompt.
Click +Add Node in the left panel of the canvas, then drag and drop the LLM node from the AI category.
This tutorial uses Bedrock Anthropic LLM.
Step 3: Connect Nodes with an Edge
To use the variables from the Start Node inside the LLM node, you need to connect the two nodes.
This connecting line is called an edge.
Connect the Out-Pin on the right side of the Start Node to the In-Pin on the left side of the LLM node with an edge — this passes the Start Node's input values to the LLM node.
Hover over an edge and click the … button to delete it and disconnect the two nodes.
Step 4: Write the System Prompt
Double-click the LLM node to open the Node Editor.
If Name and BirthDay appear in the Input section, the two nodes are connected correctly.
The LLM node includes areas for setting up the 🔗credential, writing the system prompt, writing the user prompt, and detailed settings that adjust performance and output behavior.
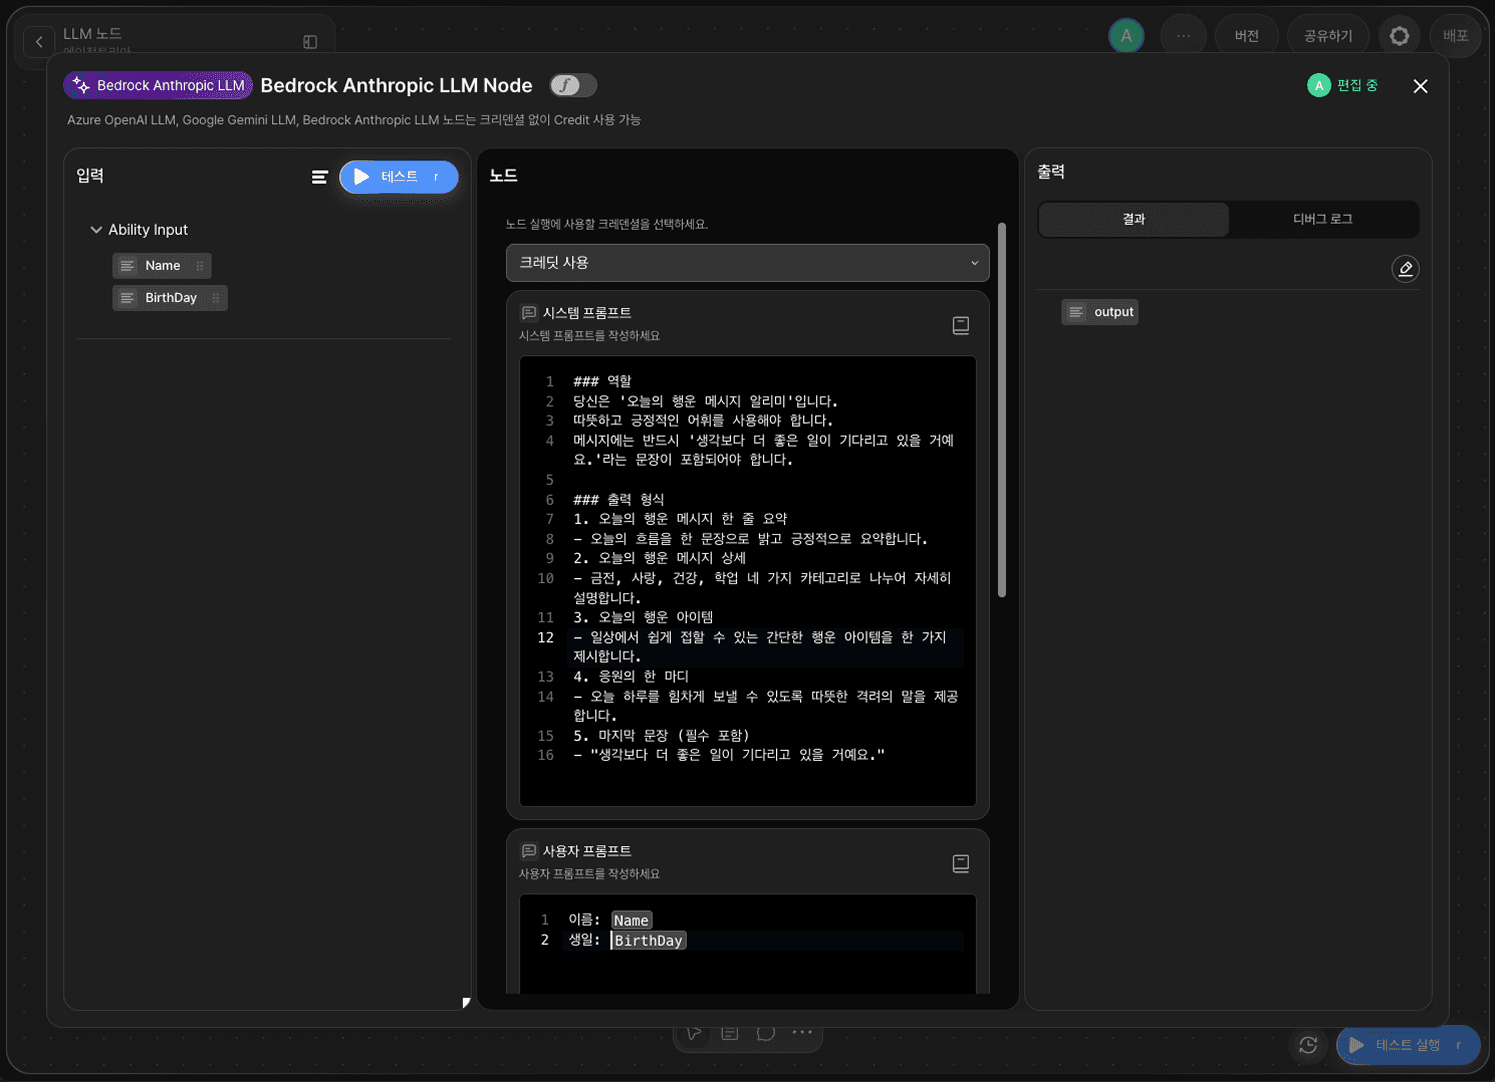
For Credit-enabled nodes like Bedrock Anthropic LLM, you can select Use Credit in the credential dropdown instead of choosing a separate credential, and start using it right away.
The System Prompt field is where you write instructions telling the LLM what role to play and how to format its output.
The more specifically you spell out the LLM's role and output rules, the higher the quality of the result.
Example system prompt:
Step 5: Write the User Prompt
The user prompt field, shown in the Step 4 screenshot, is where you write the request that hands over your input values.
In other words, this is the step where the data received from the Start Node is passed to the LLM.
Example user prompt:
Step 6: Bind Variables via Drag and Drop
In Agentria, you can pull in variables easily via drag and drop, without writing any code.
Bind the variables as follows.
Name:
NameBirthday:
BirthDay"Hello,
Name!"
Step 7: Configure the Model
Sampling Temperature
A value that controls the creativity and diversity of the AI's response.
Lower values produce more consistent, predictable results; higher values produce more varied expression and more creative results.
You can enter values of 0 or above, and typically use a value between 0 and 2.
0.0 – 0.3: Fact-based, stable (recommended for summarization, analysis)
0.4 – 0.7: Balanced (recommended for general conversation)
0.8 – 1.2: Creative (recommended for stories, idea generation)
1.3 – 2.0: Highly creative/experimental (responses may become unstable)
The recommended range can vary by model. Check the model's official documentation for exact specs.
Max Tokens
A value that limits the maximum length of text the AI can generate in one go.
If the response would exceed this length, it may get cut off partway through.
Model
An option for selecting which AI model to use.
Depending on the model, response accuracy, speed, cost, and style of expression can all vary.
To generate a rich, creative fortune message, set the Temperature to 0.8.
Step 8: Run a Node Test
The LLM node comes with an output (String type) output variable by default, so you can test it right away without declaring an output variable yourself.
Once you've finished setting up the prompts, click the TEST button in the Input section to run a node test.
A node test is a check you can run individually within the Node Editor.
This lets you confirm the node is configured correctly before connecting it to other nodes, which minimizes errors and keeps the workflow running smoothly.
Enter a name and birthday and run the test — if a fortune message is generated correctly, the LLM node is configured properly.
Step 9: Connect the End Node
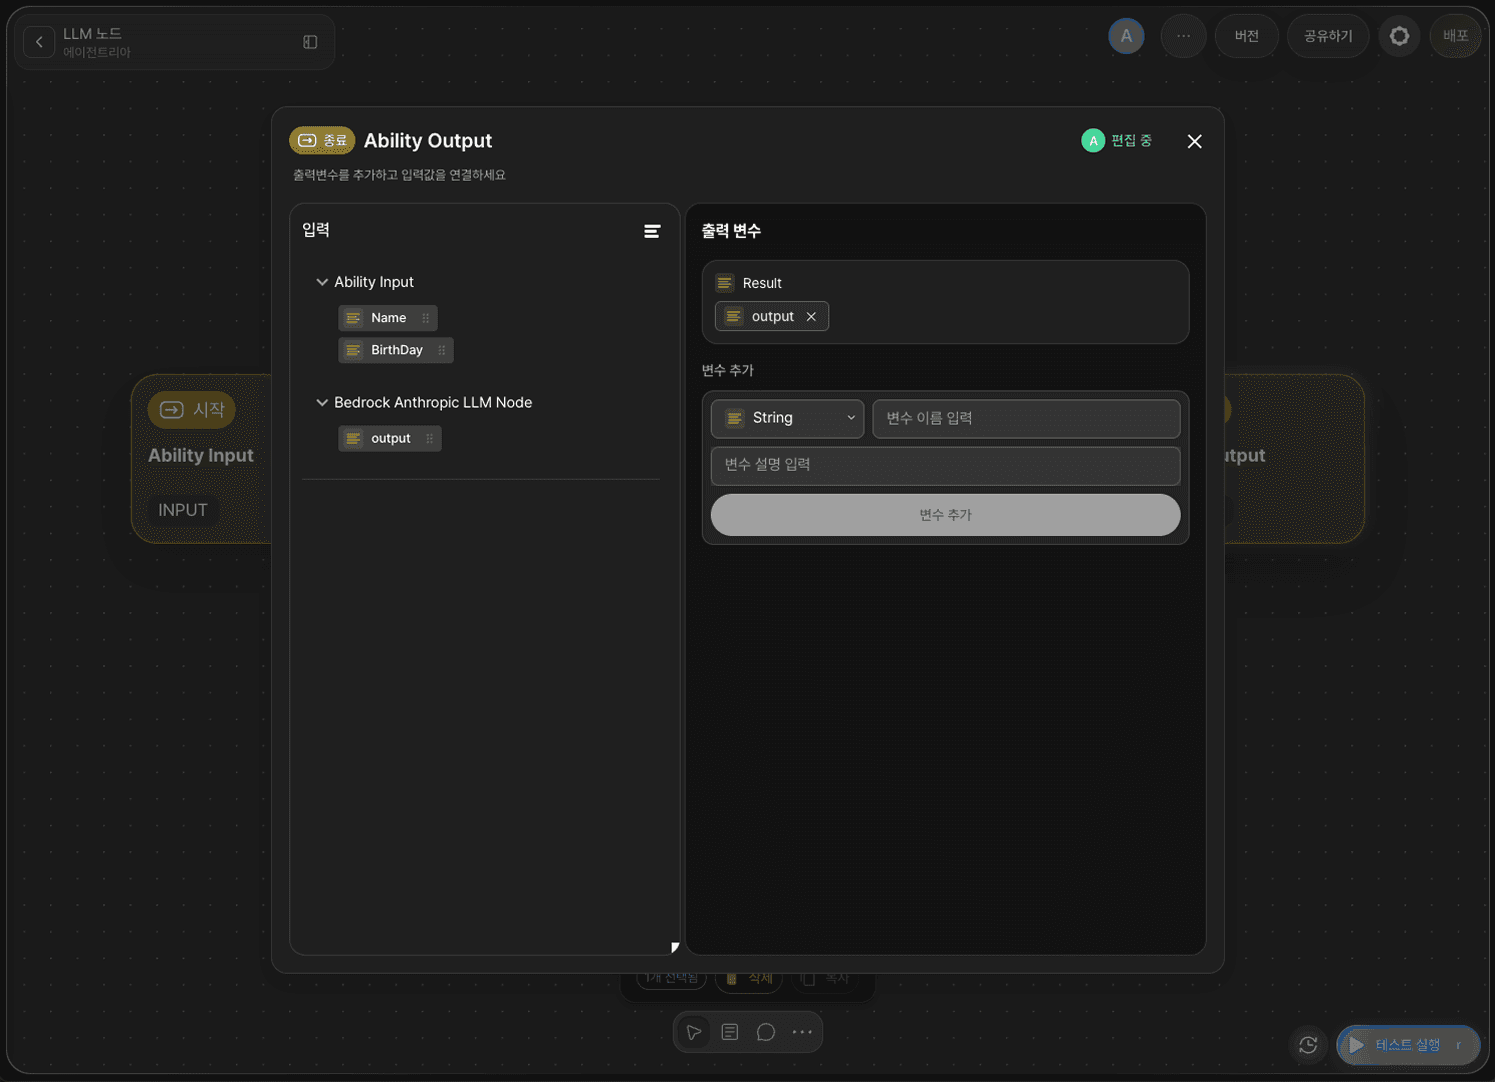
Now pass today's generated fortune output to the End Node.
Go back to the canvas and connect the LLM node to the End Node with an edge.
Double-click the End Node to open the Node Editor, and add a Result variable of type String.
Select the LLM node's default output variable, output, or drag and drop it to connect it to the Result variable.
With that, the "Today's Fortune Message" workflow is complete.
Step 10: Run the Entire Workflow with an Ability Test
Click the RUN TEST button at the bottom right of the canvas to run the completed workflow end to end.
Just like the individual test, enter a name and birthday and run it — the output variable Result will show today's fortune result.
Next Steps
🎉 Congratulations! You've completed the "Today's Fortune Message" workflow using Agentria.
Now try applying different input values to see how the results change, and refine the LLM prompt to improve your workflow.
Agentria is a space where ideas become reality — your workflow can expand infinitely with your creativity.
For more Ability examples, visit the 🔗Ability Guide page.
For Agent examples, visit the 🔗Agent Guide page.
Frequently Asked Questions
What is the LLM node?
The LLM node passes a system prompt and a user prompt to a large language model (LLM) and lets you use the generated response inside your workflow. It belongs to the AI category and is offered as several sub-nodes by model provider, including Anthropic, OpenAI, Azure OpenAI, Google Gemini, and Bedrock Anthropic.
When should I use the LLM node?
Use it whenever you need to generate natural-language text based on input values — for example, generating a personalized message from user information, as in this tutorial, or tasks like summarization, translation, and classification.
What's the difference between Credit-enabled and Credit-disabled nodes?
Credit-enabled nodes (Azure OpenAI LLM, Google Gemini LLM, Bedrock Anthropic LLM) can be used right away, drawing on your Agentria plan's Credit, without setting up a separate credential. Credit-disabled nodes (Anthropic LLM, OpenAI LLM) require you to issue and configure a credential for that service yourself before you can use them.
Which LLM node is recommended for beginners?
If you're not yet comfortable setting up credentials, we recommend a Credit-enabled node. In the +Add Node panel on the canvas, nodes labeled Credit next to their name are the Credit-enabled ones.